
Start with a dog-area site check
Pet turf installation in the Kansas City area starts with a site decision, not with unrolling the turf. Assess a dog area in Kearney, Kansas City, Overland Park, Olathe, or another nearby community for a workable surface, a drainage path, enough access for the installation, and a turf-and-infill choice that matches how your dogs will use the space. Assess those conditions before you buy materials or remove the existing lawn. The property-fit checklist should cover the measured area, the shape of each zone, intended use, existing surface, preparation needs, drainage, edges, seams, transitions, concrete conditions, turf and infill specifications, installation complexity, and ongoing care.
Use this first check to decide whether a DIY project is realistic:
- Area and use: Measure each dog-use zone and note whether it is a short path, a contained run, or a larger play area.
- Existing surface: Identify dirt, living grass, compacted soil, concrete, edges, steps, and transitions.
- Drainage: Identify where water should move and whether the existing surface can support that path.
- Installation access: Consider how tools, crushed rock, turf rolls, and compaction equipment will reach the work area.
- Rules: If you rent or live under a homeowners association or property manager, check whether synthetic grass is allowed before proceeding.
With planning and the right tools, you can install artificial turf yourself. A site with unresolved drainage, difficult access, steep changes, or a complicated transition needs a different decision path.
Write down the intended dog use before selecting the system. Record whether the space is used by one dog for occasional passage or as a frequently used run. That distinction affects the questions you need to ask about turf, infill, base preparation, drainage, fastening, and care. Keep the answers tied to each zone rather than treating the property as one uniform surface. For each zone, pair the intended use with its measured area, existing surface, preparation needs, drainage path, edges, seams, transitions, and any concrete condition. Then note the turf and infill specifications, installation complexity, and ongoing-care questions that remain open. If a condition cannot be described clearly, leave it as an unresolved site question instead of assuming that the standard dirt sequence applies. This record separates a condition that can be handled in the planned sequence from one that needs correction or professional assessment before materials are purchased. It also gives you a basis for explaining the project scope if you request a quote.
Decide what must be removed and corrected
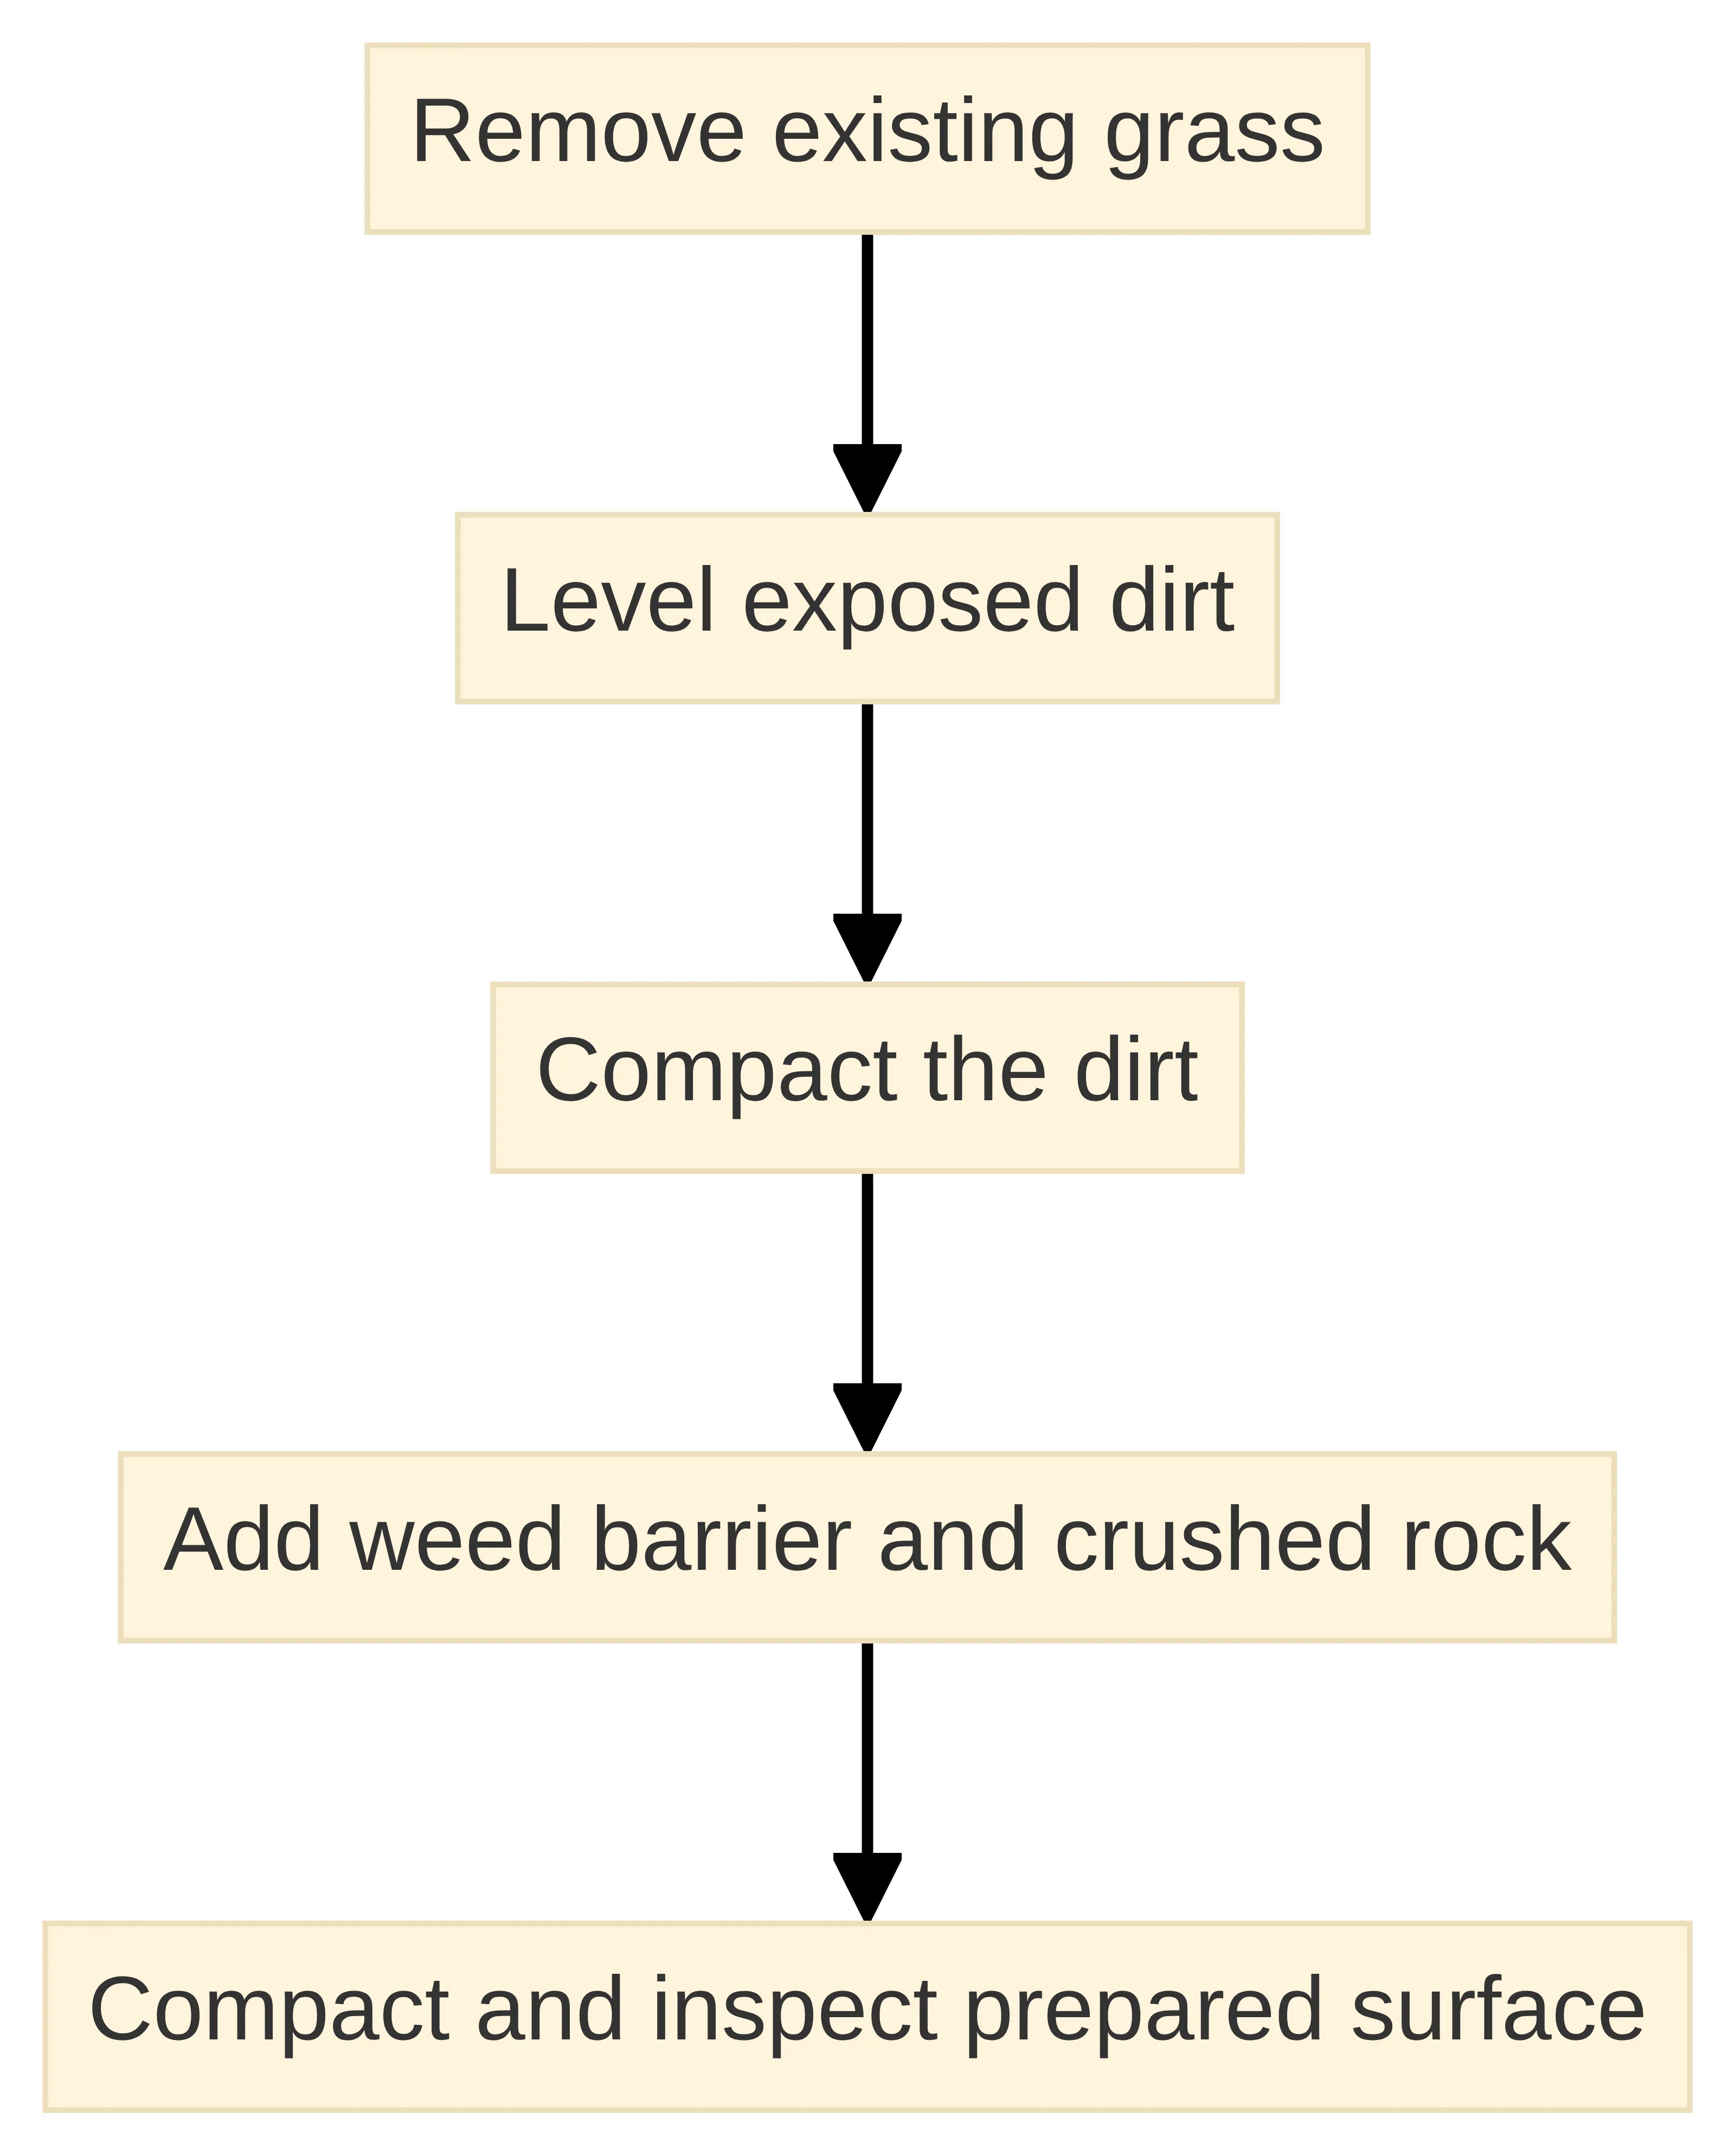
Existing grass and an unprepared dirt surface must be addressed before artificial turf goes down. For a dirt installation, remove the existing grass, level the area, compact the dirt, and add the weed barrier and crushed rock used to support stability and drainage. Site preparation is not a cosmetic step; it creates the surface on which the turf system will sit.
After measuring the dog area, inspect what will remain beneath the turf. Look for uneven ground, compacted soil, slopes, hardscape edges, concrete, and places where the planned boundary changes direction. Separate removable conditions from conditions that need correction. Existing grass belongs in the removal phase. A slope, hardscape transition, or drainage concern belongs in the site plan rather than being hidden under turf.
Use a simple removal sequence:
- Clear the existing grass from the planned dog-use area.
- Level the exposed area so the planned base can be placed consistently.
- Add the weed barrier and crushed rock called for by the installation plan.
- Recheck the edges, transitions, and drainage path before moving to turf placement.
Do not treat the visible turf as a substitute for correcting the surface beneath it.
Check drainage before covering the site
Drainage is an installation checkpoint for a dog area, not an assumed benefit of turf. Assess where water will move, whether the site already has a workable drainage path, and whether the planned high-use zone will place greater demands on that path. Include drainage, edges, seams, transitions, and concrete conditions in the property assessment before choosing the system.
Drainage infrastructure, inadequate drainage for a high-traffic pet area, and corrections around hardscape can increase the cost of a pet-turf installation. That means a flat-looking surface can still carry a larger project scope if water needs to be collected, redirected, or routed around existing hardscape. If the drainage path is unclear, stop before covering the site and resolve that question first. Include any drainage infrastructure, inadequate drainage for a high-traffic pet area, or routing around hardscape in the project scope you compare. A drainage question is therefore both a site-fit question and a cost question: it can change the work required before the base is ready, not merely the appearance of the finished dog area. Keep the issue open until the route and the work around it are understood. Do not use the turf surface or an infill choice to stand in for an unresolved drainage plan.
Ask these practical questions before placing the base:
- Where should water leave the dog area?
- Does the existing surface support that route?
- Will the dog area receive frequent use that changes the drainage requirement?
- Are walls, patios, walks, steps, or other hardscape in the path of the planned work?
- Will the edges and transitions need separate preparation?
A clear answer does not guarantee a particular drainage performance. It gives you the information needed to decide whether your planned installation is within your capabilities.
Know what belongs beneath the turf
A dirt-based turf installation needs a prepared and compacted foundation beneath the finished surface. The supported approach is to remove existing grass, level the area, compact the dirt, and add a weed barrier and crushed rock to support stability and drainage. The base should be treated as part of the pet-turf system, not as a thin layer added after the turf has already been selected.
Inspect the prepared base before moving on. Check the level, the boundaries of the dog-use area, the condition of transitions, and the planned drainage route. Keep the measured area and the intended use in view because those factors guide the turf and infill specifications.
Concrete is a different starting surface from dirt. Concrete can serve as a turf base only when the surface is properly prepared and drainage is addressed before the turf goes down. Do not apply the dirt sequence automatically to a slab, and do not cover concrete while drainage and surface preparation remain unresolved. Treat the slab, its edges, and its transitions as their own installation conditions.
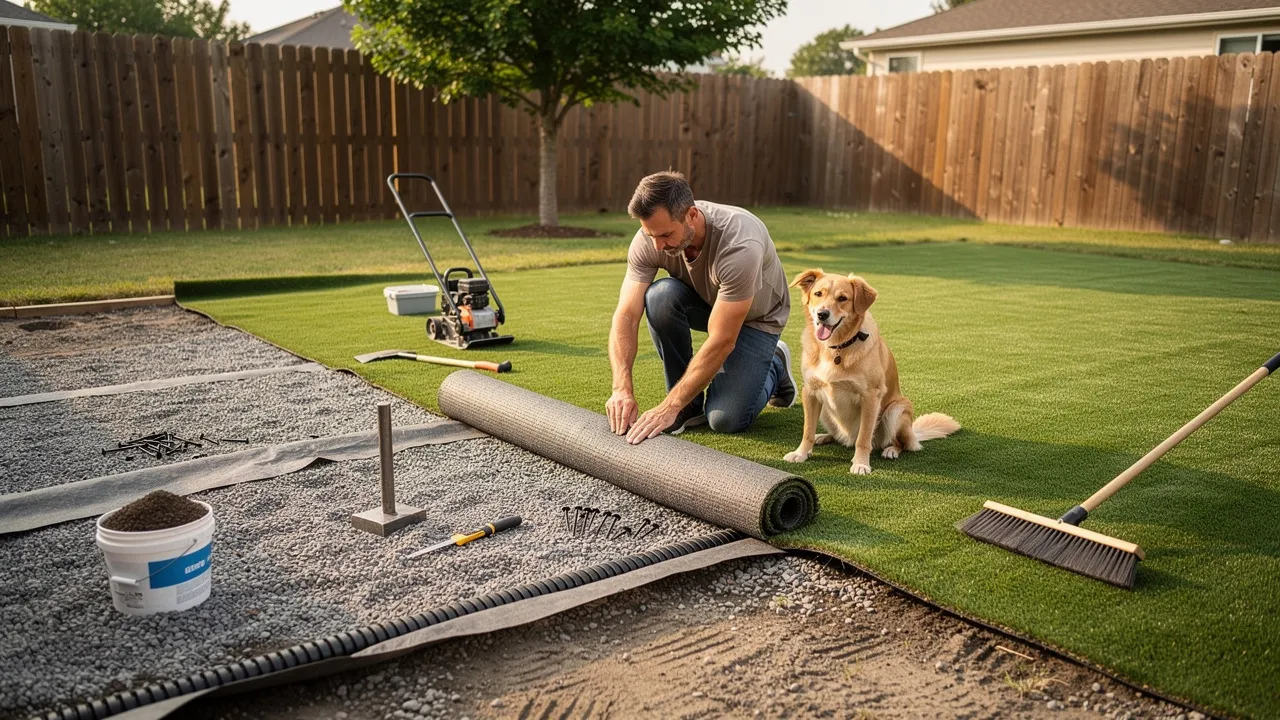
Gather the tools and installation materials
Our necessary installation tools include a shovel, rake, plate compactor, level, rubber mallet, utility knife, sharp scissors, measuring tape, and string line. Gather the tools before excavation and layout begin so you can measure, shape, compact, cut, and secure the work without changing the sequence halfway through.
Your materials list should match the site and the planned finish. Prepare the following categories:
- Weed barrier and crushed rock for the dirt-based preparation.
- Turf panels sized for the measured zones.
- Seaming tape and the adhesive specified for the turf product.
- Landscaping anchor pins, U staples, or galvanized stakes for the outer edges.
- Infill selected for the intended use, with an odor-control option considered for a pet area.
- A stiff-bristled broom or power broom for lifting fibers and distributing infill.
Product instructions control the adhesive method and any product-specific handling details. Keep those instructions with the materials while you work.
We provide guidance so you can gather essential tools and materials for an artificial-turf installation. Before starting, compare the list with your measured area, dog-use pattern, base condition, drainage plan, edges, seams, transitions, and ongoing care needs. A complete checklist is a preparation aid; it does not decide whether a particular property is suitable for DIY work.
Sort the list into three groups before purchasing: site-preparation items, turf-securing and seaming items, and finishing materials. Confirm that the first group matches the existing surface; the dirt-based preparation described here does not automatically apply to a concrete zone or a mixed-surface project. Confirm that the second group covers every planned seam and outer edge. Then match the infill and brushing tools to the intended dog use and the product instructions. Keep the measured area for each zone beside the list so materials are not chosen for the property as though every zone had the same surface, use, or finishing needs. If a quantity, adhesive method, or product-specific requirement remains unclear, resolve that question before cutting or opening materials rather than treating the general checklist as a complete installation specification.
Prepare and compact the base
Use the level, string line, and measured boundaries to check the base before covering it. Confirm that the edges align with the planned dog-use zone and that the route for water has not been overlooked. Revisit the transitions around concrete, walks, patios, or other hardscape while the surface is still accessible. A base that needs substantial correction is a signal to pause rather than compensate by cutting the turf differently.
A concrete starting surface follows a separate preparation path. Concrete can support artificial turf only when the surface is properly prepared and drainage is addressed before installation. If the project combines dirt, concrete, or other surfaces, treat each transition as a separate checkpoint and do not assume one preparation method fits every zone.
Lay out turf before cutting it
Turf panels should be laid out on the prepared base before cutting or seaming. This layout lets you check the amount, panel fit, orientation, edges, and seams while the material is still adjustable. Allow the turf to settle and work out misshapen areas before making permanent cuts.
Avoid dragging turf across the prepared base because dragging can unsettle the surface and make it uneven. Get help positioning a panel when its size or weight makes controlled placement difficult. Set each panel down, align it with the planned boundary, and inspect adjoining edges before reaching for the utility knife.
Use the layout to confirm three things:
- The panels cover the measured dog-use area without an unplanned shortage.
- The seams and edges fall where you intended rather than at awkward transitions.
- The surface remains stable after placement and has not been disturbed by moving the panels.
Only after those checks pass should cutting and seaming begin.
Cut, seam, and secure the installation
Cut turf panels with a sharp utility knife after the dry layout is confirmed. Trim carefully along the planned edges and keep adjoining panels aligned so the seam can be joined cleanly.
For a seam, fold the adjoining turf edges back, place seaming tape beneath them, and apply adhesive according to the product packaging. Press the turf edges into place after the adhesive is ready, and keep turf filaments away from the adhesive. The adhesive instructions for the specific product control the application method; do not improvise a different method because two installations look similar.
Secure the outer edges with landscaping anchor pins, U staples, or galvanized stakes placed about 6 inches apart. Place the fasteners between the filament tufts and stitches rather than through the visible fibers when the installation allows.
Complete an edge and seam check before adding infill. Confirm that the adjoining panels remain aligned, the adhesive has been used according to its packaging, the filaments are clear of adhesive, and the outside edge is fastened. Also check transitions to concrete, paths, or other hardscape because those conditions belong to the project scope, not only to the visible turf surface.
Finish the dog-use surface with infill and brushing
The finishing sequence begins by brushing the turf blades upright. A stiff-bristled broom can lift the fibers and distribute infill evenly, while the cited installation guidance also identifies a power broom for this step. Work across the surface so the fibers are ready to receive the infill rather than laying it over flattened areas.
Spread infill in several passes and brush between the passes. For a lawn without heavy foot traffic, the cited guide recommends 1 to 2 pounds of infill per square foot. That amount should not be transferred automatically to a frequently used dog area because the same guide identifies different infill needs for pet, sport, and playground installations.
Zeolite is identified in the cited guidance as an odor-control infill option for pet areas. Treat it as an option within the system selection, not as a guarantee that odor will be eliminated. The relevant choice depends on the intended use and the product instructions for the turf and infill being installed.
After the final brushing pass, inspect the dog-use surface for exposed seams, loose edges, flattened fibers, and uneven infill distribution. Brush again where the fibers remain down or the infill has not spread evenly. Keep the finish tied to the actual use of the area rather than treating a visual check as proof of long-term performance.
Match the system to the dogs and the care routine
Dog activity should influence the turf selection and the installation plan. We recommend more resilient grass for active dogs whose vigorous activity may otherwise cause signs of wear. Record how many dogs will use the area, how frequently they use it, where they run or turn, and whether the area connects to hardscape or other yard zones. Those details give the turf and infill choice a clear purpose.
Write down the care tasks you are prepared to perform and include them when comparing a DIY installation with a professionally installed system.
Turn that intention into a written care handoff before installation. For each turf and infill product, keep the product care instructions with the project notes and record:
- What cleaning method the product guidance permits.
- When the fibers should be brushed upright.
- How you will inspect seams, edges, and infill after regular dog use.
- What condition would lead you to pause routine care and seek product-specific or professional guidance.
Use the stiff-bristled broom or power broom only in the manner allowed by the product guidance. The cited installation sequence supports brushing for fiber position and infill distribution, but it does not establish a universal care schedule. Treat cleaning and odor management as separate questions: an odor-control infill option does not replace the need to follow care instructions, and a visual inspection does not establish drainage performance. This plan gives you a repeatable way to notice a loose edge, exposed seam, uneven infill, or flattened area before it becomes a larger installation question. If the product documentation does not answer a care question, leave it unresolved rather than assuming that a method used during installation is suitable for ongoing maintenance.
Drainage and odor management are connected to the whole installation. A high-traffic pet area can create drainage questions that affect project scope, while an odor-control infill such as zeolite is one cited option for pet areas. Keep the drainage path, infill selection, cleaning routine, and dog-use pattern together when you assess the system.
We recommend assessing your specific needs because turf choice directly affects installation costs and the overall lifespan of the turf. Use that assessment to choose for the dog area you have, rather than choosing a product by appearance alone. If vigorous activity, frequent use, or difficult access changes the project beyond your tools and experience, move to the professional-installation decision.
Recognize when DIY stops being the right path
Professional installation deserves consideration when your site has drainage issues, compacted soil, slopes, or challenging access. Those conditions complicate the foundation and the sequence, even when the visible dog area seems small. A project that requires correction before turf placement is no longer the same task as laying panels on a prepared, accessible base.
Hardscape transitions also deserve a separate decision. Drainage corrections that route water through or around existing hardscape can increase project cost, and edges, seams, transitions, and concrete conditions belong in the property assessment. If the installation must solve several of those conditions at once, treat the work as a site-design problem rather than an ordinary flat soil installation.
Use this capability screen before committing to DIY:
- You can remove the existing surface and prepare the base in the correct order.
- You can operate the tools needed for leveling, compaction, cutting, seaming, and fastening.
- You understand the drainage route before the turf covers the site.
- You can place and align the panels without dragging them across the prepared base.
- You can follow the adhesive packaging instructions and keep filaments away from adhesive.
- You can complete the infill and brushing sequence for the intended dog use.
If a site condition or installation step falls outside those boundaries, choose professional assessment rather than forcing the DIY sequence. Apply the screen to the whole project, not just to the easiest zone. A homeowner may have the tools for cutting and fastening while still lacking a clear answer about the base, drainage route, hardscape transition, or care instructions. Any one of those unresolved points can change the work from a straightforward installation into a correction or assessment project. Write down the unanswered item, identify which stage it affects, and keep the turf off that area until the question is resolved. This makes the decision practical: proceed when the site condition and the next installation step are understood, and seek a quote when the unresolved condition affects the foundation, water path, access, or project scope.
Use project scope rather than turf alone to judge cost
Build your cost discussion around these scope items:
- The measured area and the shape of each dog-use zone.
- The intended use and activity level.
- Existing grass, dirt, concrete, or other surfaces that need preparation.
- Clearing, leveling, the prepared base, and compaction.
- Drainage, edges, seams, transitions, and hardscape conditions.
- Turf and infill specifications for the planned use.
- Tools, accessories, seaming materials, fasteners, and ongoing care.
- The complexity of doing the work yourself or hiring professional installation.
This list gives you a way to separate turf selection from the work required to make the site ready.
More resilient grass may be appropriate for active dogs, while infill and drainage questions may change the project scope. Make each selection answer a site or use requirement so the finished plan reflects the dog area rather than an isolated product feature.
A useful cost comparison describes what happens beneath and around the turf: what is removed, how the base is prepared, how drainage is addressed, how edges and seams are finished, what accessories are included, and who performs each step. That approach does not promise savings. It gives you a clearer basis for deciding whether the DIY route fits the property.
Make the final choice and request a quote when needed
Your final DIY decision should follow the site, not precede it. Proceed when you have assessed the measured dog area, existing surface, base preparation, drainage path, edges, seams, transitions, tools, turf and infill choices, finishing sequence, and care routine. Check whether your homeowners association or property manager allows synthetic grass before you begin.
Choose professional installation when drainage issues, compacted soil, slopes, challenging access, or hardscape corrections make the sequence uncertain. A qualified professional should decide whether an individual property is suitable when site conditions exceed a general installation guide.
What should you check before installing pet turf yourself?
What should I assess before installing pet turf?
Before installing pet turf, assess the site for existing surfaces, drainage paths, and access for installation. Ensure the area is suitable for the intended use by measuring the space and identifying any necessary removals or corrections.
What tools and materials do I need for pet turf installation?
Essential tools for pet turf installation include a shovel, rake, plate compactor, level, rubber mallet, utility knife, sharp scissors, measuring tape, and string line. Materials should include a weed barrier, crushed rock, turf panels, seaming tape, adhesive, landscaping anchor pins, and infill.
How do I prepare the base for pet turf?
To prepare the base for pet turf, remove existing grass, level the area, compact the dirt, and add a weed barrier and crushed rock to support stability and drainage. Ensure the base is properly prepared before laying the turf.
What drainage considerations should I keep in mind?
Drainage is crucial for pet turf installation. Assess where water will move, ensure the site has a workable drainage path, and consider how high traffic from pets may affect drainage needs. Address any drainage issues before covering the site.
When is professional installation recommended for pet turf?
Consider professional installation if the site has drainage issues, compacted soil, slopes, or challenging access. These conditions complicate the installation process and may require expertise to ensure proper setup.