
Introduction
Many homeowners find the glue application process intimidating, yet it is essential for a flawless installation of artificial grass. This guide will detail the key steps and tools needed for effective glue application, ensuring a durable and visually appealing lawn. What should homeowners do when common issues arise during the process, risking the final result? By exploring these challenges and their solutions, homeowners can confidently tackle their artificial turf projects.
Gather Essential Tools and Materials for Glue Application
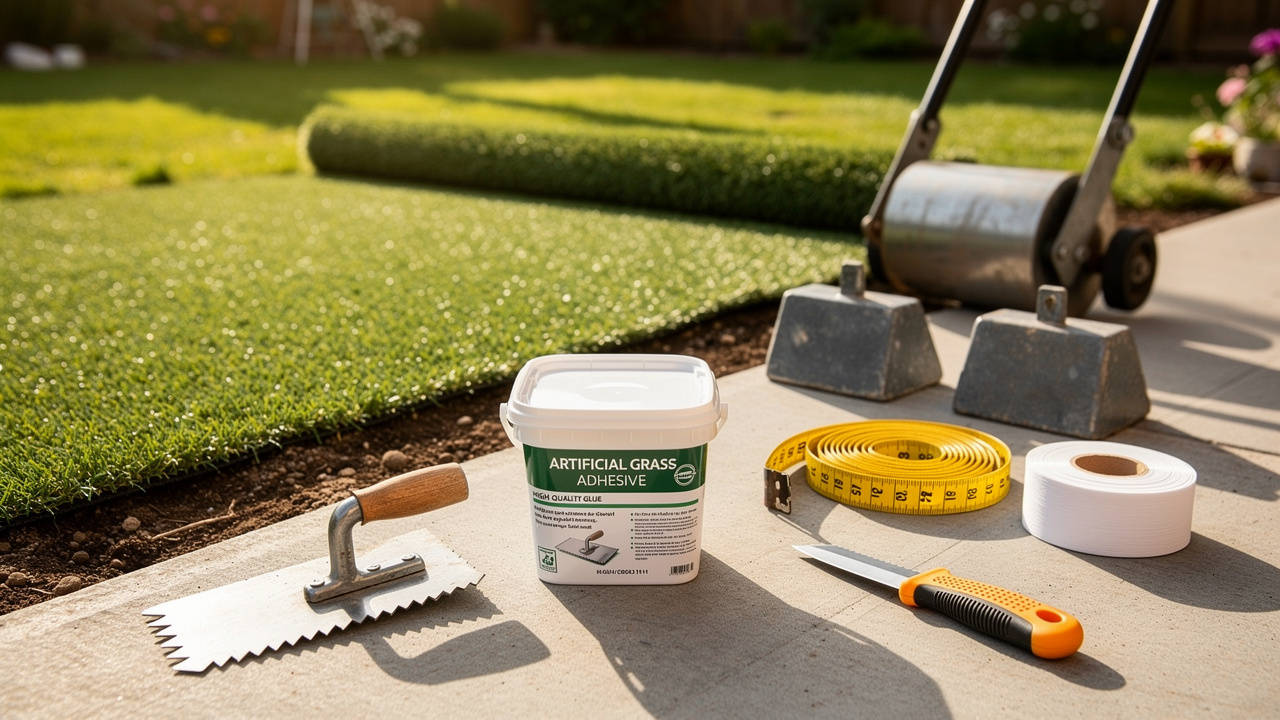
Achieving a successful artificial grass installation hinges on having the right tools at your disposal. To successfully apply glue for artificial grass installation, gather the following essential tools and materials:
- Artificial Grass Glue: Choose a high-quality adhesive specifically designed for synthetic turf, such as Turfstikk PU500 or other polyurethane or two-component adhesives, which provide strong, durable bonds.
- Notched Trowel: A 3/16 inch notched trowel is crucial for evenly spreading the glue across the surface, ensuring a solid adhesion.
- Utility Knife: This tool is necessary for trimming the edges of the grass, allowing for a clean and precise fit.
- Measuring Tape: Accurate measurements are vital for cutting the grass to the correct size, preventing waste and ensuring a proper installation.
- Seaming Tape: Used to securely join two pieces of grass together, this tape is essential for maintaining a seamless appearance.
- Heavy Weights or Rollers: These tools help press the turf down firmly onto the surface where the fake grass glue is applied, ensuring a strong bond that will withstand foot traffic.
- Turf Cutter: This tool is crucial for removing current natural lawns, conserving time and effort during setup.
- Cleaning Supplies: Keep rags or paper towels available to quickly clean up any excess glue, preventing mess and ensuring a tidy setup.
- Safety Gear: Wear gloves and a mask to guard against bonding fumes and skin contact during the setup process.
With these tools ready, you’re set for a successful artificial grass installation. Furthermore, understanding the pot life of the adhesive is crucial for ensuring your installation proceeds without delays.

Prepare the Surface for Optimal Adhesion
To achieve a successful artificial turf installation, meticulous surface preparation is essential. Follow these steps to ensure optimal adhesion:
- Clean the Area: Start by thoroughly removing any debris, dirt, or remnants of old grass from the installation site. For proper adhesion of the grass, it is crucial to have a clean surface for the fake grass glue.
- Excavate the Ground: Excavate about 3 to 4 inches of soil to facilitate drainage and prevent organic matter from decomposing beneath the grass. This step helps keep your synthetic grass in great shape.
- Level the Ground: After cleaning and excavating, ensure the surface is level and smooth. Use a rake to evenly distribute the soil and compact it to a depth of 3 to 4 inches, removing any bumps or dips to create a stable base for the grass.
- Install a Weed Barrier: If desired, place a weed barrier fabric, overlapping the seams by 6 to 12 inches to prevent unwanted growth beneath the grass. This step aids in preserving the integrity of the setup over time.
- Dry Fit the Grass: Before applying any bonding agent, lay out the grass pieces to ensure they fit together correctly. Make any necessary adjustments to the cuts for a seamless appearance. It’s also wise to adjust the grass to the surroundings before setup to prevent shrinkage or expansion.
- Check for moisture, as moisture can interfere with the adhesive bond created by fake grass glue. Ensure all wet areas are completely dry before proceeding with the installation.
By meticulously preparing the surface, you significantly enhance the likelihood of a successful and durable artificial turf installation. Neglecting these preparation steps can compromise the longevity and performance of your artificial turf.

Apply Fake Grass Glue: Step-by-Step Instructions
To ensure a successful installation of fake grass, precise application of glue is essential:
- Mix the Glue: For two-component adhesives, carefully follow the manufacturer’s instructions to mix the adhesive and hardener thoroughly. This ensures that the use of fake grass glue provides optimal bonding strength and durability.
- Apply the Glue: Using a notched trowel, spread the adhesive evenly over the surface where the sod will be laid. Ensure a consistent layer free of gaps or dry spots when using fake grass glue for a strong bond.
- Position the Grass: Carefully lay the grass onto the glued surface, ensuring that the edges align properly. Press down firmly to embed the grass into the fake grass glue, which helps to prevent lifting. Check for air bubbles by pressing down on the surface with a roller or your hands to eliminate any trapped air.
- Secure the Seams: If joining two pieces of grass, place seaming tape underneath the seam and apply fake grass glue on top of it. Press the edges of the grass together firmly to create a seamless finish.
- Weight the Grass: Use heavy weights or a roller to press down on the grass, ensuring a strong bond. Leave the weights in position for the advised curing duration according to the adhesive manufacturer’s guidelines, usually about 24 hours.
- Anchor the Perimeter: Secure the perimeter of the grass with landscape nails or sod staples, spacing them approximately 6 inches apart to enhance durability against foot traffic and weather.
- Clean Up Excess Glue: Immediately wipe away any excess glue that may have squeezed out from under the turf to maintain a clean appearance and prevent unsightly residue.
- Wear Gloves: Always wear gloves during the application process to protect your hands from adhesive exposure.
Following these steps guarantees a professional installation that enhances your outdoor space for years to come.

Troubleshoot Common Issues During Glue Application
During the glue application process, several common issues can arise that may hinder the installation of artificial turf:
- Uneven Adhesion: If the turf isn’t sticking properly, check if the surface was adequately cleaned and prepared. Proper preparation of the sub-base is crucial to avoid future issues. Reapply fake grass glue to any areas that appear dry or uneven.
- Bubbles or Lifting: Moisture trapped beneath the grass can lead to bubbles, complicating the installation process. Lift the affected area, allow it to dry, and then reapply the fake grass glue. A well-compacted sub-base is key to preventing this issue.
- Visible Seams: If seams are noticeable after installation, ensure that the edges were aligned correctly and that sufficient adhesive was applied to the seam tape. Consider using a seam roller to press the edges together more firmly. Furthermore, utilizing VELCRO Brand fasteners can assist in securing the grass and enhancing seam appearance.
- Excess Adhesive: If the adhesive leaks from beneath the grass, clean it up promptly with a damp cloth. For stubborn spots, use a solvent suggested by the adhesive manufacturer.
- Curing Issues: If the turf isn’t adhering after the recommended curing time, check the temperature and humidity, as these factors can impact the adhesive’s performance. Ensure that the area is within the recommended conditions for the fake grass glue being used.
Understanding these common issues and their solutions can significantly improve your installation experience and the longevity of your turf. Addressing these challenges effectively can lead to a more durable and visually appealing turf installation.

Conclusion
Proper installation of artificial grass requires careful attention to detail and adherence to best practices. Homeowners can significantly enhance their outdoor spaces by following essential steps, utilizing the right tools, and understanding the nuances of glue application. Many homeowners struggle with the installation process due to improper techniques and lack of preparation. The journey from gathering materials to troubleshooting common issues is crucial for ensuring a durable and visually appealing turf installation.
Key points discussed include:
- The importance of using high-quality adhesives
- The necessity of meticulous surface preparation
- The step-by-step instructions for applying glue effectively
Additionally, recognizing and addressing potential problems during installation can save time and enhance the longevity of the artificial grass. By adhering to these guidelines, homeowners can confidently tackle their turf projects and achieve professional results.
By applying these techniques, homeowners can ensure their outdoor spaces remain beautiful and functional for years to come. For those seeking expert guidance and support, Hall Turf stands ready to assist with a wealth of experience and a commitment to customer satisfaction.
Frequently Asked Questions
What tools are essential for applying glue in artificial grass installation?
Essential tools include artificial grass glue (preferably polyurethane or two-component adhesives), a 3/16 inch notched trowel, a utility knife, measuring tape, seaming tape, heavy weights or rollers, a turf cutter, cleaning supplies, and safety gear like gloves and a mask.
Why is it important to choose high-quality adhesive for artificial grass?
High-quality adhesive, such as Turfstikk PU500, is designed specifically for synthetic turf and provides strong, durable bonds essential for a successful installation.
What is the purpose of a notched trowel in the glue application process?
A notched trowel is crucial for evenly spreading the glue across the surface, ensuring solid adhesion between the artificial grass and the installation surface.
How should I use a utility knife during installation?
A utility knife is used for trimming the edges of the grass, allowing for a clean and precise fit during the installation process.
What role does measuring tape play in artificial grass installation?
Measuring tape is vital for accurately cutting the grass to the correct size, which helps prevent waste and ensures a proper installation.
What is seaming tape, and why is it necessary?
Seaming tape is used to securely join two pieces of grass together, maintaining a seamless appearance in the finished installation.
How do heavy weights or rollers assist in the installation process?
Heavy weights or rollers help press the turf down firmly onto the surface where the glue is applied, ensuring a strong bond that can withstand foot traffic.
Why is a turf cutter important for artificial grass installation?
A turf cutter is essential for removing existing natural lawns, which conserves time and effort during the setup of artificial grass.
What should I keep on hand for cleaning during the installation?
It’s important to have rags or paper towels available to quickly clean up any excess glue, preventing mess and ensuring a tidy setup.
What safety precautions should be taken during glue application?
Wearing gloves and a mask is recommended to guard against bonding fumes and skin contact during the installation process.
List of Sources
- Gather Essential Tools and Materials for Glue Application
- Which artificial grass accessories do I actually need? (https://petgrows.com/blogs/news/which-artificial-grass-accessories-do-i-actually-need)
- Essential Tools for DIY Artificial Grass Installation (https://artificialturfexpress.com/blog/15-important-tools-youll-need-for-diy-artificial-grass-installation-in-san-jose)
- The Complete Guide To Artificial Turf Glue | Chemique US (https://chemiqueadhesives.com/us/the-complete-guide-to-turf-glue)
- Master Artificial Grass Glue: 4 Steps for a Flawless Installation – Hall Turf | Artificial Turf Installation Kansas City KS & MO (https://hallturf.com/master-artificial-grass-glue-4-steps-for-a-flawless-installation)
- 10 Essential Artificial Grass Equipment for Flawless Installations – Hall Turf | Artificial Turf Installation Kansas City KS & MO (https://hallturf.com/10-essential-artificial-grass-equipment-for-flawless-installations)
- Prepare the Surface for Optimal Adhesion
- magnoliaturf.com (https://magnoliaturf.com/landscapes/artificial-grass-key-surface-requirements)
- How to Install Artificial Turf – RCP Block & Brick (https://rcpblock.com/installation-artificial-turf.html)
- How to Install Artificial Grass – Master Guide (https://artificialturfsupply.com/how-to/how-to-install-artificial-grass-master-guide)
- 4 Steps to Prepare the Base for Artificial Grass Installation – Hall Turf | Artificial Turf Installation Kansas City KS & MO (https://hallturf.com/4-steps-to-prepare-the-base-for-artificial-grass-installation)
- News – Xtreme Green Synthetic Turf (https://xgreensynthetic.com/news)
- Apply Fake Grass Glue: Step-by-Step Instructions
- Master Fake Grass Glue Application in 4 Simple Steps (https://californiaturfco.com/master-fake-grass-glue-application-in-4-simple-steps)
- Master Turf Glue Application: Essential Steps for Homeowners (https://californiaturfco.com/master-turf-glue-application-essential-steps-for-homeowners)
- Master Artificial Grass Glue: 4 Steps for a Flawless Installation – Hall Turf | Artificial Turf Installation Kansas City KS & MO (https://hallturf.com/master-artificial-grass-glue-4-steps-for-a-flawless-installation)
- Harriet Whitaker (https://contractflooringjournal.co.uk/latest-news/chemique-adhesives-an-introduction-to-artificial-turf-adhesives)
- The Complete Guide To Artificial Turf Glue | Chemique US (https://chemiqueadhesives.com/us/the-complete-guide-to-turf-glue)
- Troubleshoot Common Issues During Glue Application
- Solve Turf Troubles: 12 Common DIY Installation Issues Fixed (https://artificialturfexpress.com/blog/troubleshooting-guide-for-diy-installation-of-the-best-artificial-turf)
- Common Issues With DIY Installs | Synthetic Grass Warehouse (https://syntheticgrasswarehouse.com/resources/installing-artificial-grass/common-issues-with-diy-installs)
- Overcoming Common Artificial Grass Installation Issues | Smart Turf® Artificial Grass (https://smartturf.com/overcoming-common-artificial-grass-installation-issues)
- 7 Common Artificial Grass Problems and How to Fix Them (https://ccgrass.com/problems-with-artificial-grass)
- Fixing 5 Challenges in Commercial Artificial Turf Installations (https://velcro.com/news-and-blog/2024/07/fixing-5-challenges-in-artificial-turf-installation)