

Introduction
Transforming your backyard into a golfer’s paradise begins with creating a personal putting green, providing a convenient space for both practice and leisure. This guide offers a comprehensive, step-by-step approach to installing artificial grass golf greens, allowing enthusiasts to enjoy a professional-quality surface at home. Navigating the complexities of site selection and maintenance can be challenging, but identifying the key elements is essential for achieving a successful installation.
Assess Your Space and Design Preferences
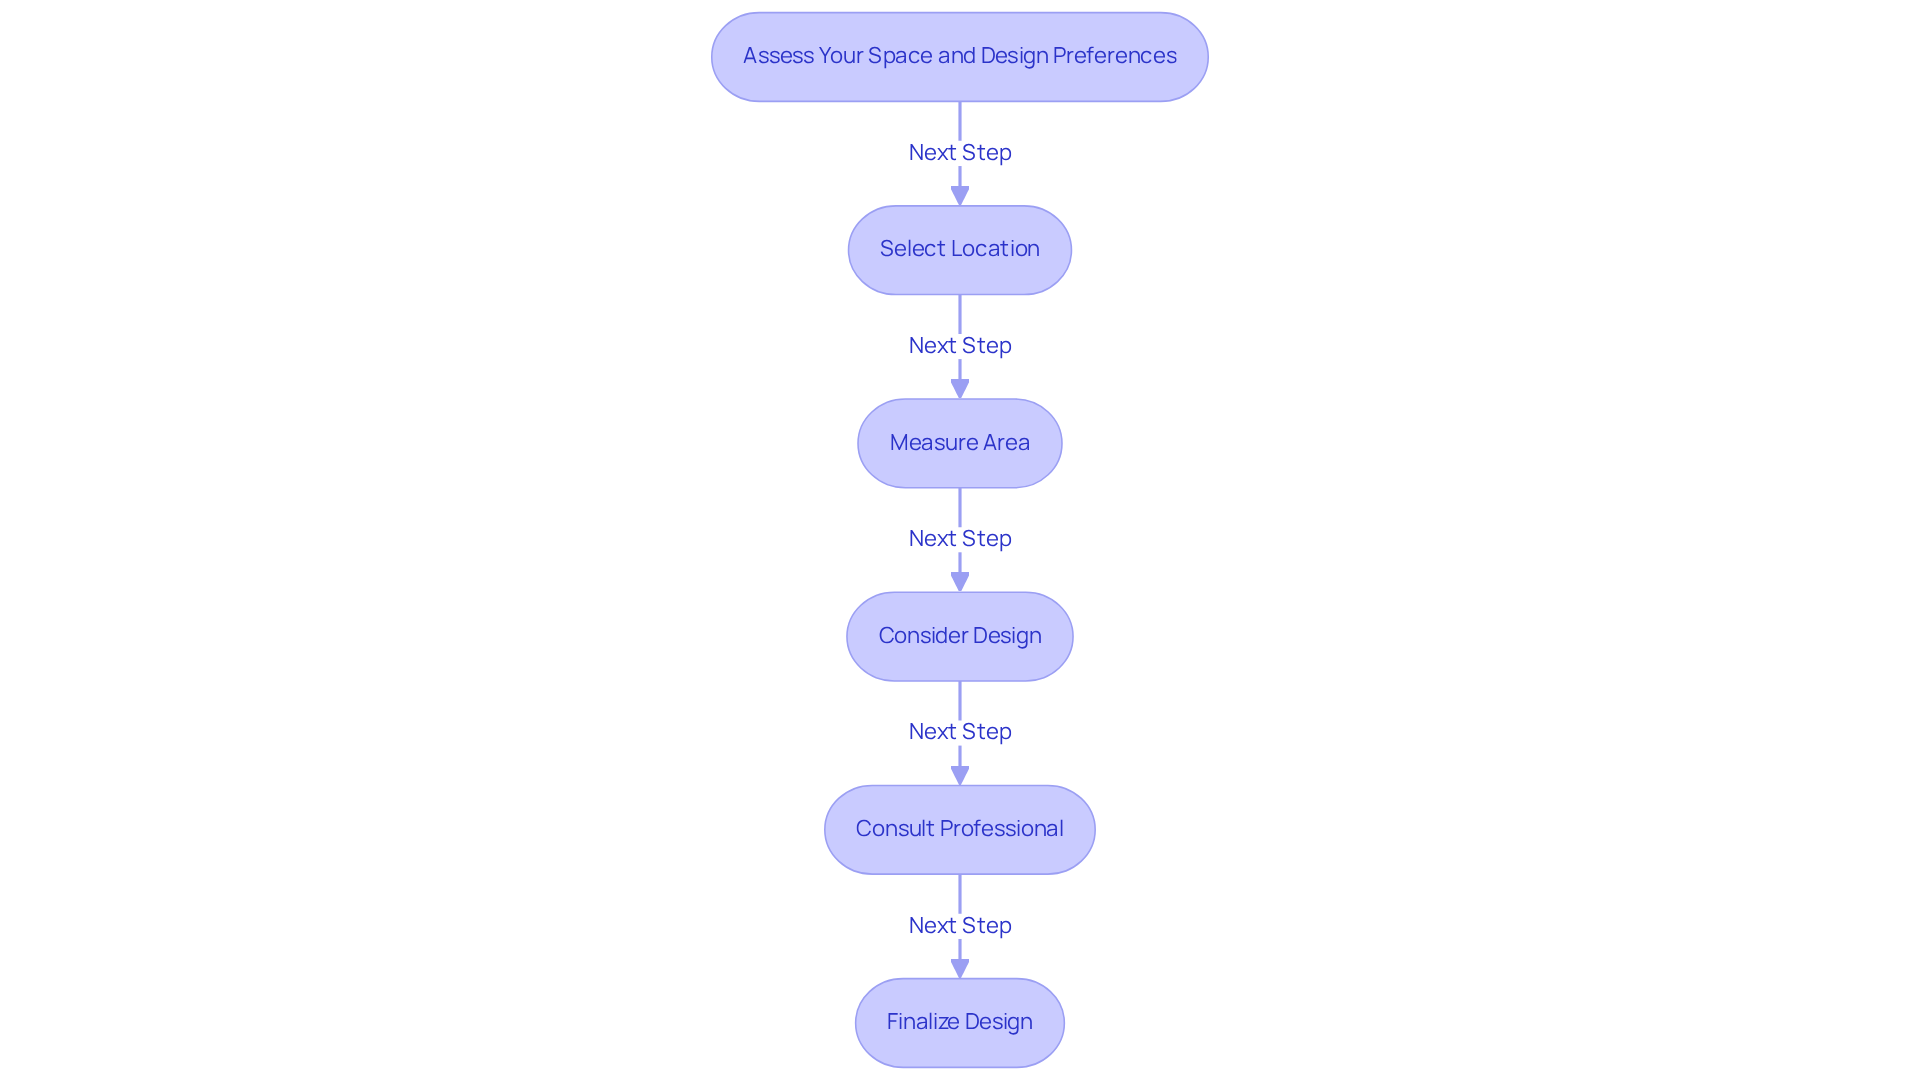
Selecting the ideal location for your putting green is crucial for maximizing your practice experience. Identify a flat area in your yard that receives ample sunlight (at least 6-8 hours a day) and is away from large trees or structures that could cast shadows.
Next, measure the area using a measuring tape to determine the dimensions of the space. Consider how large you want your putting area to be, typically between 200 to 400 square feet for personal use.
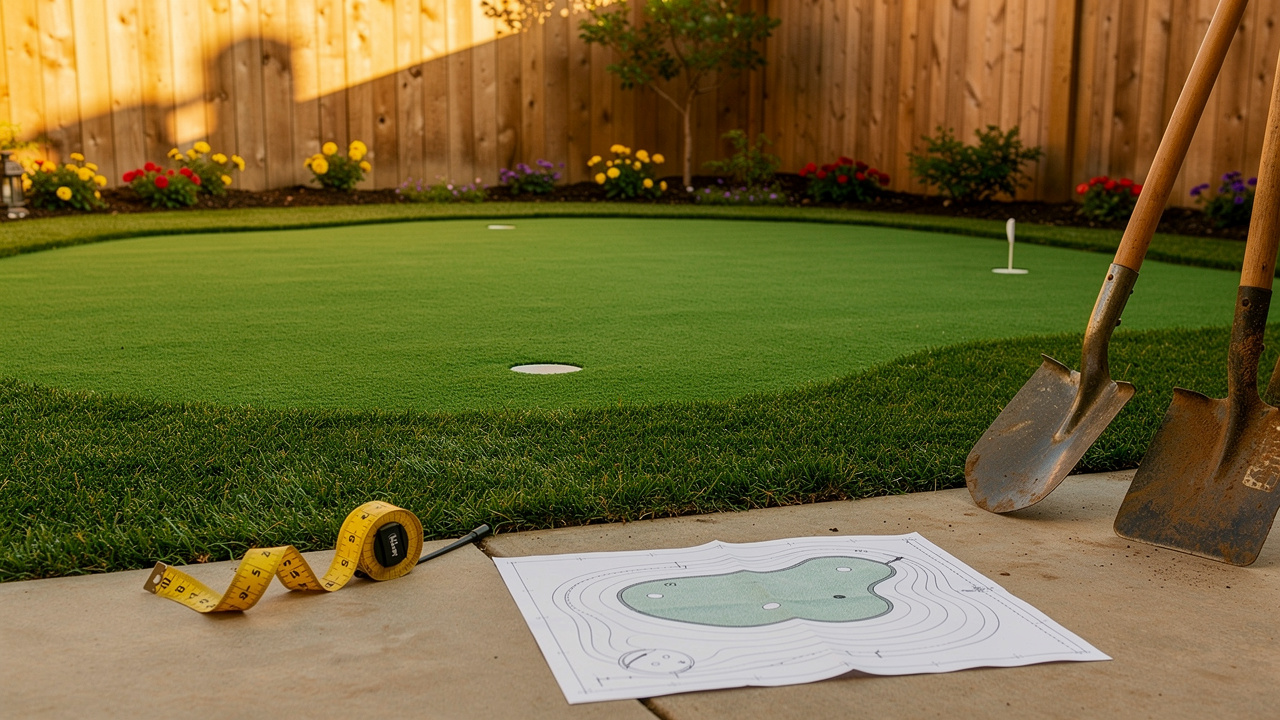
When it comes to design considerations, think about the shape of your green. Do you prefer a traditional oval, a more complex design with contours, or multiple holes? Accommodating multiple holes can enhance the practice experience. Sketch your ideas on paper to visualize the layout and ensure it meets your preferences. Hall works closely with architects and designers to ensure your putting green is both functional and visually appealing. Hall’s extensive experience and satisfied clientele reflect their commitment to quality in every project.
Ensure the area has proper drainage to prevent water pooling. If the ground is too flat, consider slight slopes to facilitate drainage.
If you’re unsure, consult with a professional installer like Hall Turf to get insights on the best design and layout for your specific space. Their group, made up of golf specialists, will guarantee your turf responds like the surfaces you are accustomed to playing on at your country club. They can also offer valuable guidance on possible upselling opportunities, such as incorporating bunkers or water hazards, which can improve the overall aesthetic and functionality of your putting area. As one satisfied customer, Scott Sachse, noted, “Brock and his crew were beyond professional, polite, and courteous. Excellent experience!”
For inquiries, you can contact Hall Grass at (816) 555-7890 or email info@hallgrass.com. Engaging with professionals can elevate your project, ensuring it meets both your functional needs and aesthetic desires.
Gather Necessary Materials and Tools
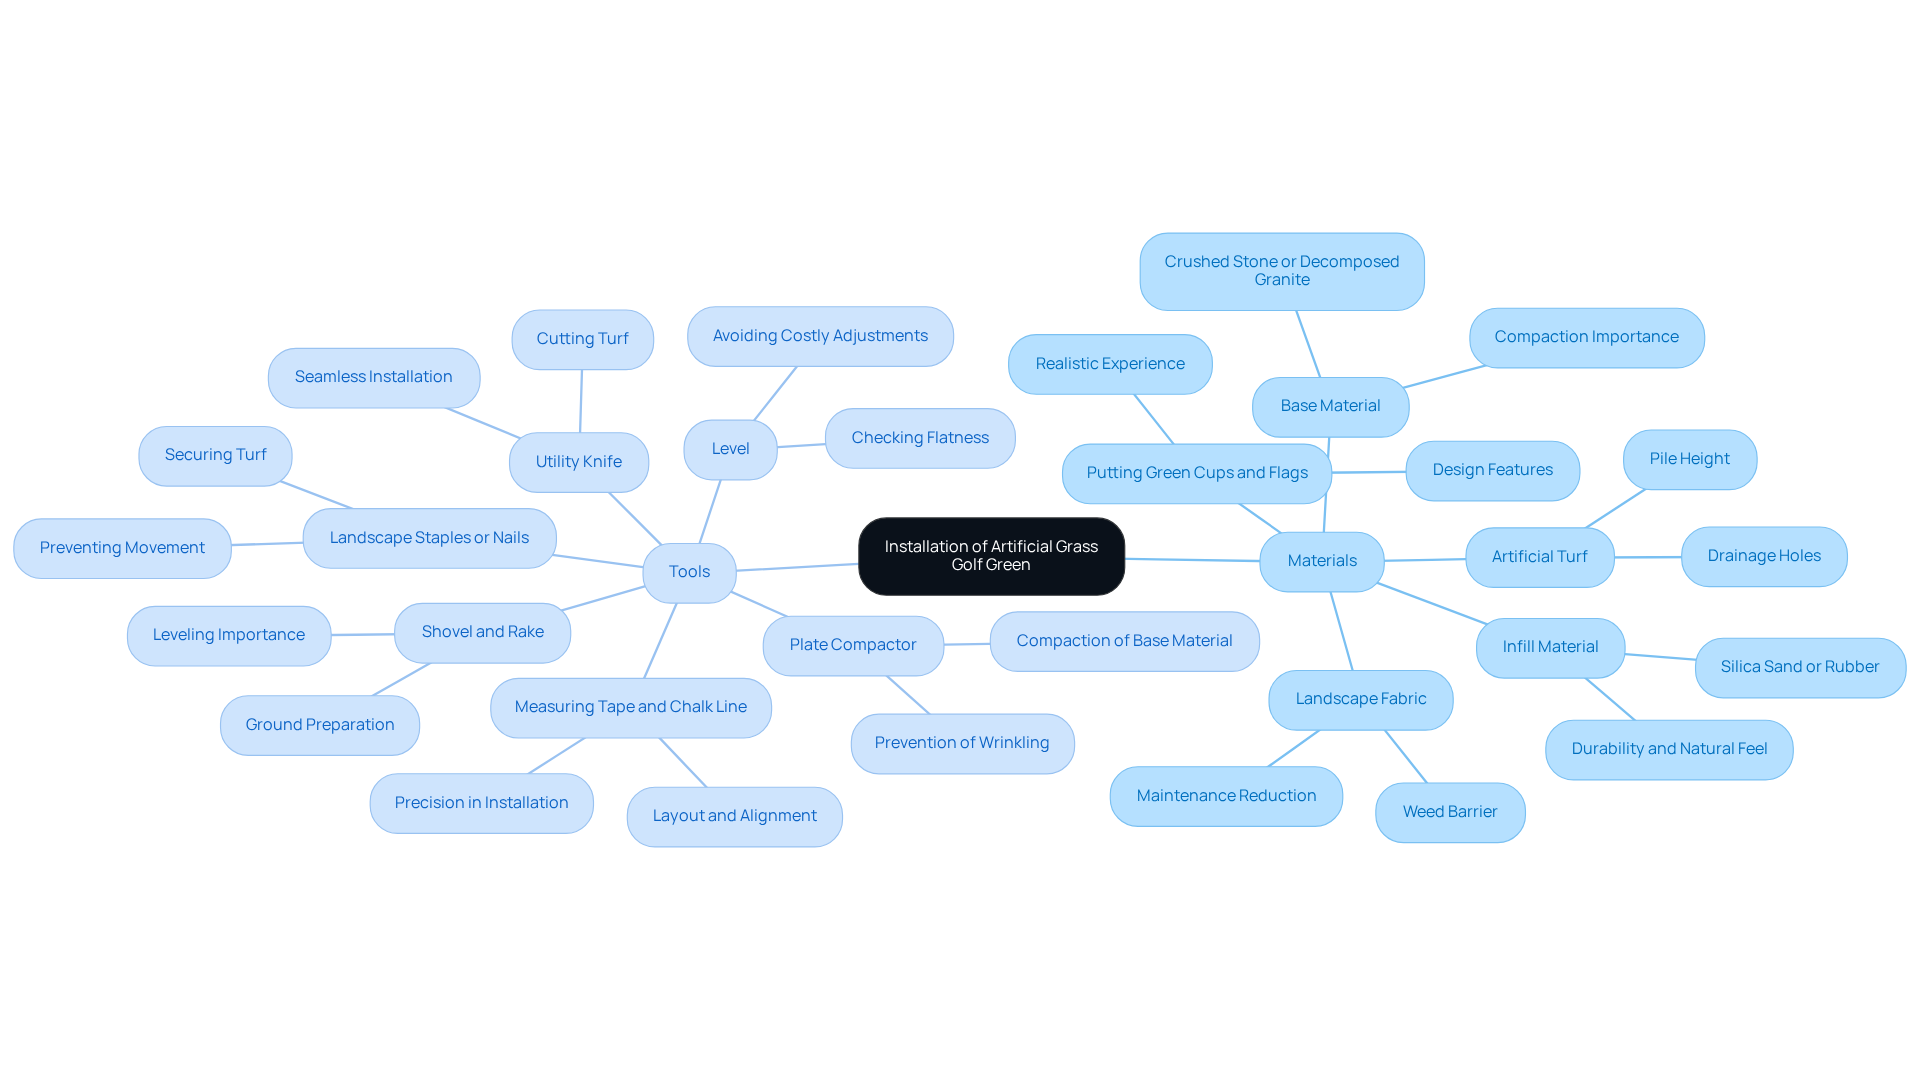
To achieve a successful installation of your artificial grass golf green, gathering the right materials and tools is paramount. Here’s what you’ll need:
- Artificial Turf: Select turf specifically designed for putting greens, ideally with a pile height between 3/8″ to 1/2″ to ensure a smooth ball roll and prevent matting. Quality putting grass usually has small drainage holes every few inches to ensure effective water drainage.
- Base Material: Use crushed stone or decomposed granite as a stable foundation. This base should be compacted to provide a solid surface for the grass, ensuring longevity and performance. Without proper base preparation, you risk visible imperfections and poor water flow.
- Infill Material: Choose between silica sand or rubber infill to improve the surface’s durability and offer a natural sensation underfoot. Infill helps preserve the form of the grass and enhances drainage, which is essential for performance.
- Landscape Fabric: Install a weed barrier to prevent unwanted growth beneath the turf, ensuring a clean and low-maintenance surface. This step is essential to maintain the integrity of the green over time.
- Putting Green Cups and Flags: Include these if you want to create a realistic putting experience, allowing for practice with actual golf equipment. Incorporating breaks, slopes, and undulations in the design can mirror actual golf course situations.
Tools Required:
- Shovel and Rake: Essential for ground preparation, these tools help in leveling the area and spreading the base material evenly. Proper leveling is critical for optimal playability.
- Plate Compactor: This tool is essential for compacting the base material, ensuring a solid foundation that will support the grass over time. A well-compacted base prevents issues such as wrinkling or buckling.
- Utility Knife: Use this for cutting the grass to fit the designated area accurately, ensuring a seamless installation.
- Landscape Staples or Nails: These are necessary to secure the grass in place, preventing movement and ensuring a smooth finish. Proper securing techniques are vital for maintaining the turf’s integrity.
- Measuring Tape and Chalk Line: These tools assist in layout and alignment, ensuring that the installation is precise and visually appealing. Accurate measurements prevent issues during installation.
- Level: A level is vital for checking the flatness of the surface, which is critical for optimal playability. Regular checks during installation can help avoid costly adjustments later.
Safety Gear: Don’t forget, wearing gloves and safety glasses is key to keeping yourself safe during the installation.
Satisfied clients, including Scott Sachse, have praised Hall’s team’s professionalism and attention to detail. Using the right materials and tools not only ensures a successful installation but also enhances the overall quality of your artificial grass golf green. For inquiries and quotes, contact Hall Turf at (816) 555-7890 or email info@hallturf.com.
Follow the Step-by-Step Installation Process
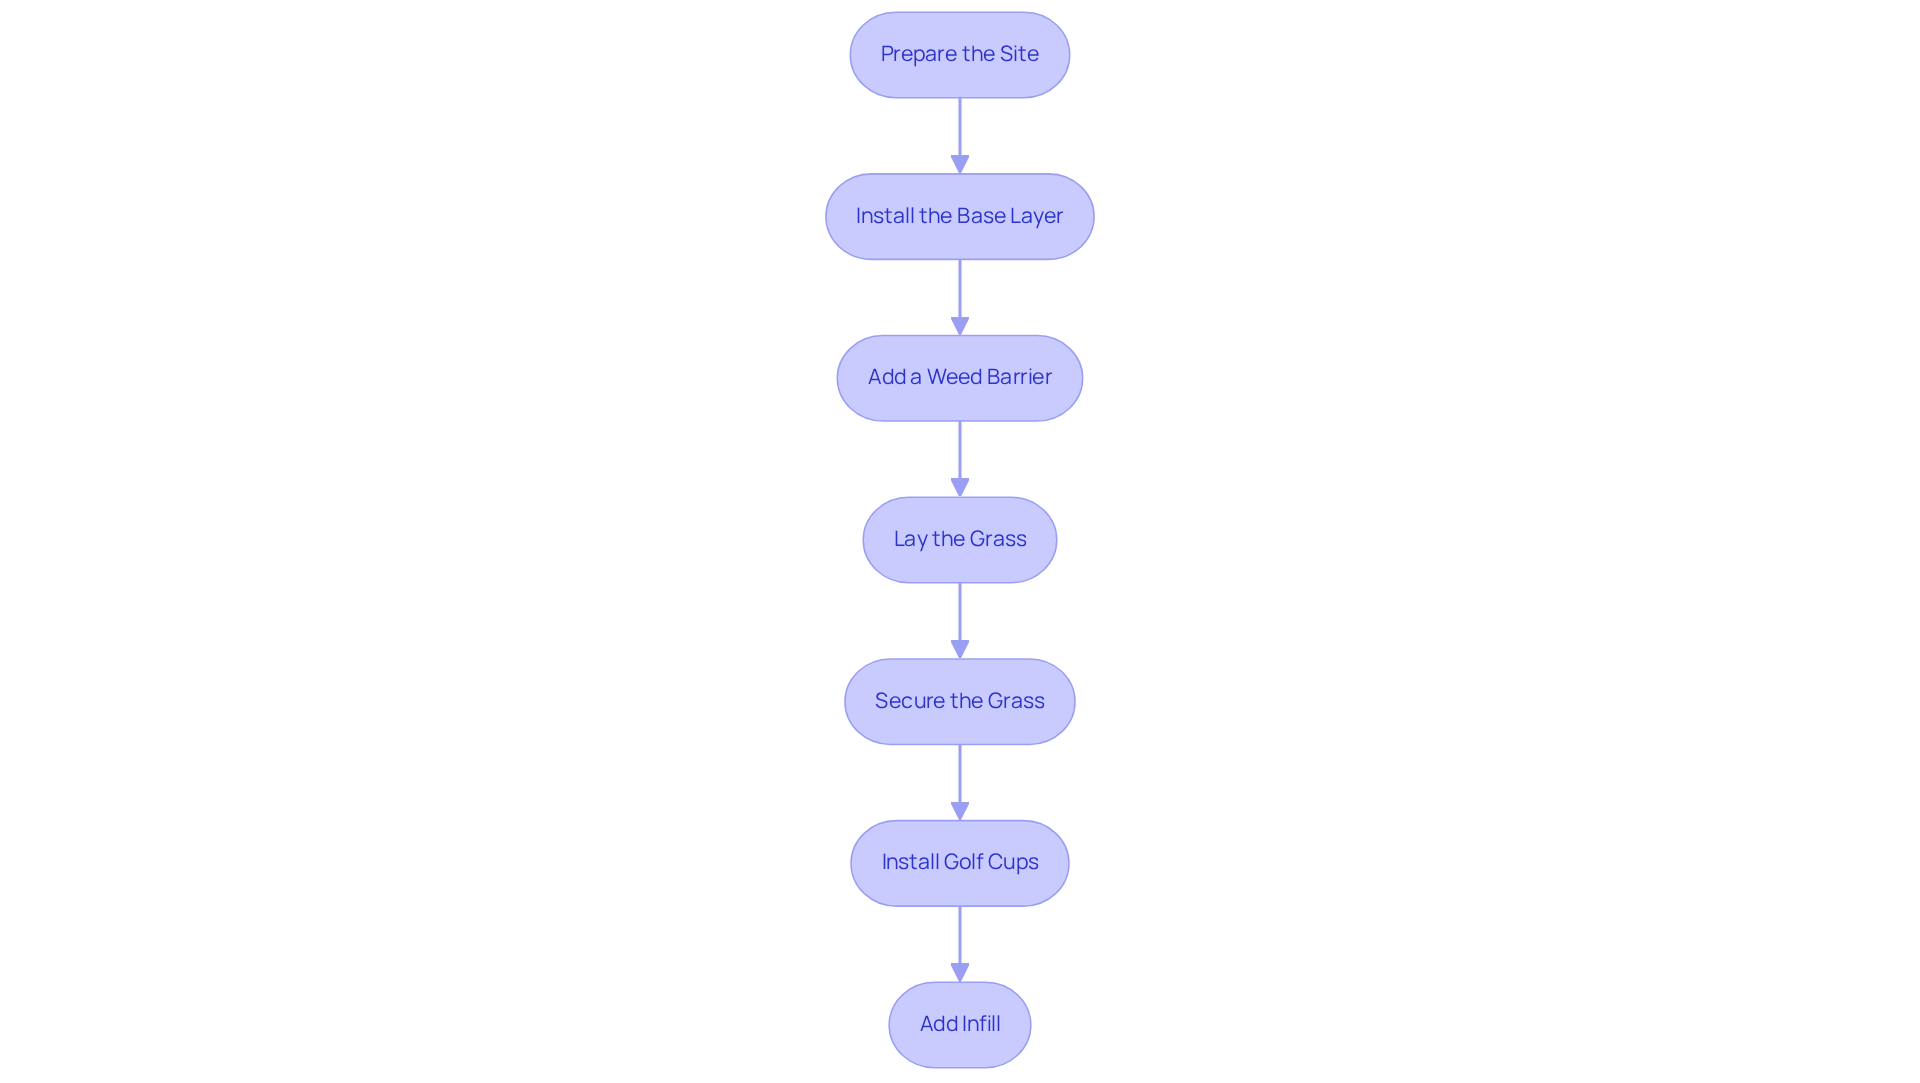
Installing an artificial grass surface can be a daunting task for many homeowners. To achieve a successful installation, follow these structured steps:
- Prepare the Site: Begin by clearing the area of any existing grass, weeds, and debris. Dig the soil to a depth of 3 to 4 inches to establish a firm foundation, ensuring adequate drainage and stability for the grass.
- Install the Base Layer: Spread a layer of crushed stone or decomposed granite evenly across the excavated area. Use a rake to level it out, then compact it with a plate compactor to establish a firm foundation, which is crucial for the longevity of your putting green.
- Add a Weed Barrier: Lay landscape fabric over the compacted base to prevent weeds from growing through the grass, ensuring a clean and low-maintenance surface.
- Lay the Grass: Roll out the synthetic grass over the prepared area, ensuring that the pile faces the house for aesthetic appeal. Trim the edges as necessary to fit the shape of your green, maintaining a uniform appearance.
- Secure the Grass: Use landscape staples or galvanized nails to fasten the grass around the perimeter and in the center, placing them every 6 to 12 inches. This keeps the surface flat and prevents any shifting over time.
- Install Golf Cups: Cut openings in the grass for the golf cups, ensuring they are level with the surface. Secure them in place according to the manufacturer’s instructions to ensure proper functionality.
- Add Infill: Distribute infill material uniformly over the surface of the grass to assist in maintaining the fibers upright and offer a realistic sensation. Sweep the turf with a broom to spread the infill uniformly, improving the overall performance of your golf surface.
Successfully following these steps leads to a beautiful, hassle-free lawn featuring an artificial grass golf green that enhances outdoor enjoyment. With the right approach, your outdoor space can transform into a year-round oasis.
Implement Maintenance Practices for Longevity
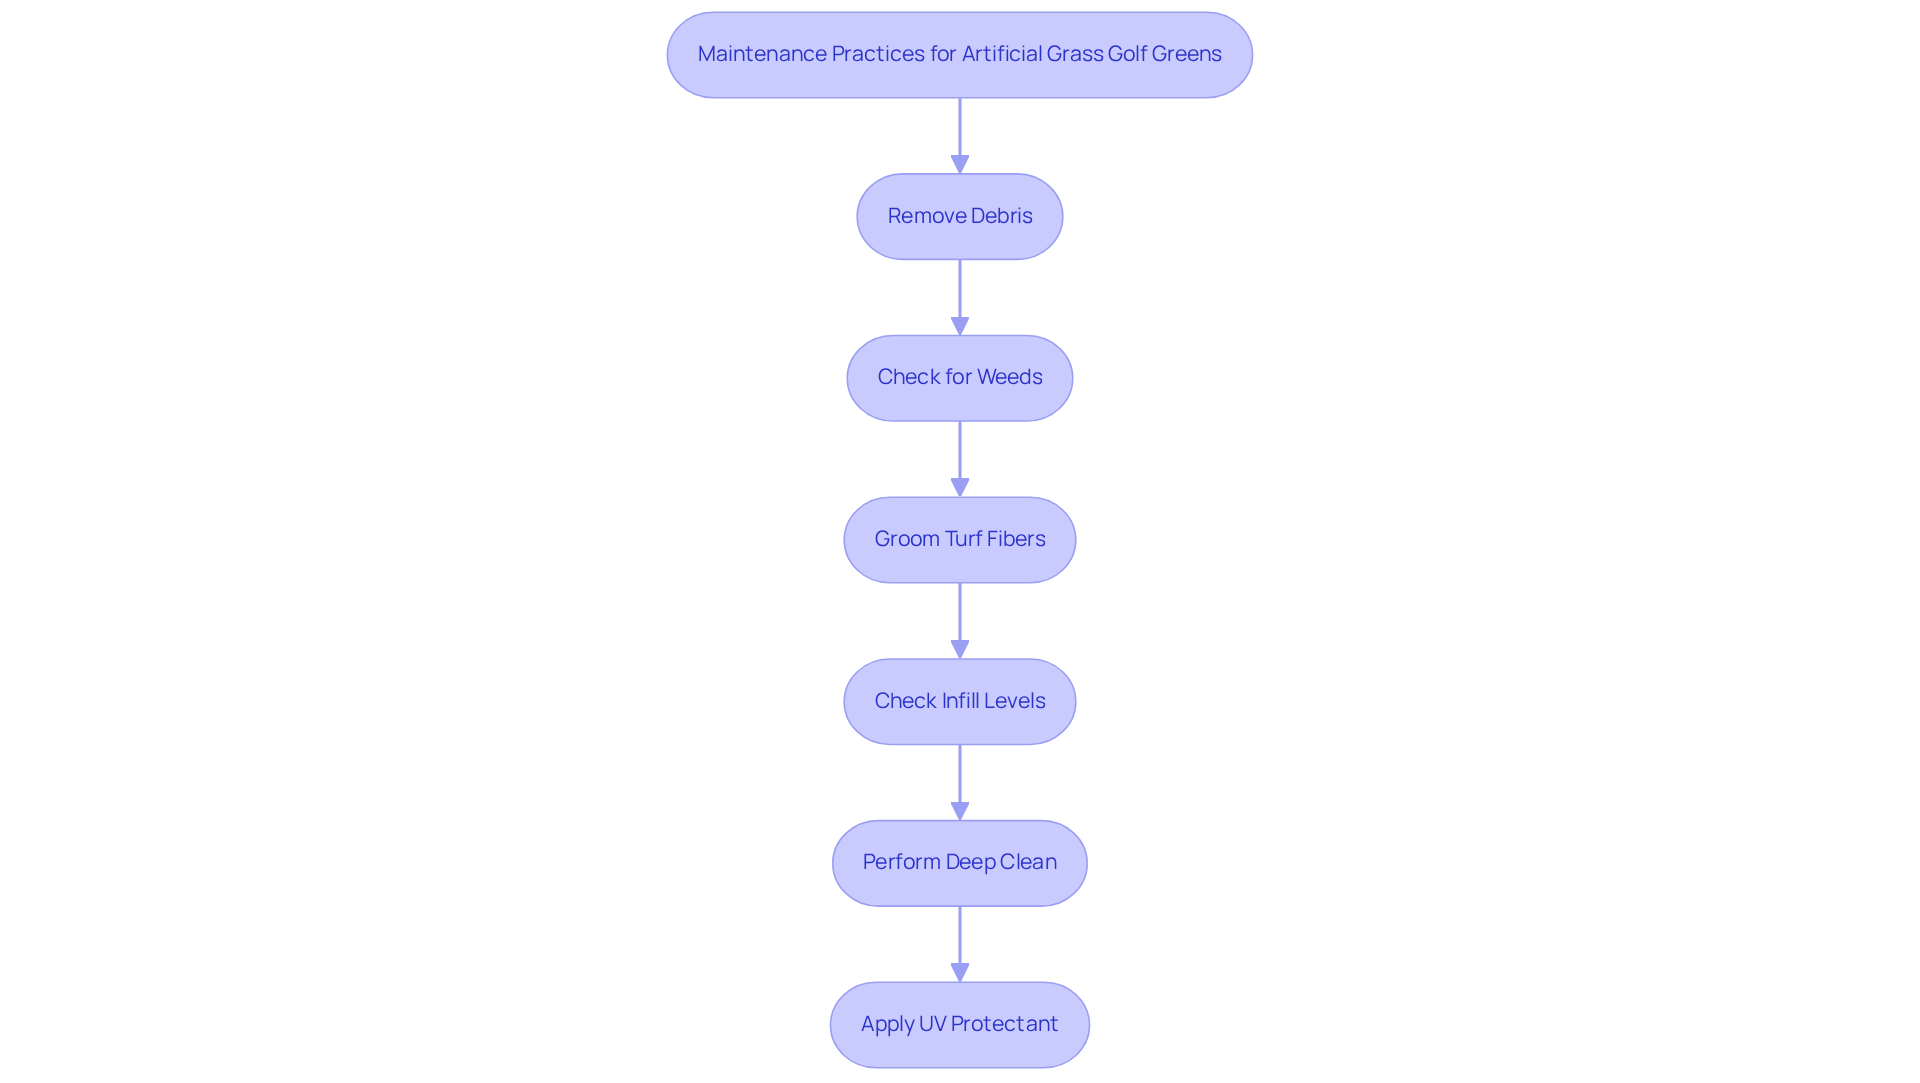
Regular maintenance is crucial for preserving the quality and safety of your artificial grass golf green. To maintain a pristine surface, regularly remove debris such as leaves, twigs, and dirt. A leaf blower or stiff broom effectively removes debris, preventing moisture buildup and mold growth. Additionally, check for weed growth around the perimeter of the putting green and remove them promptly to maintain a clean and safe environment.
Brock from Hall Grass highlights the importance of regular upkeep, sharing, “When I had a grass problem, he assessed my needs and provided the best solution.” This illustrates the personalized service Hall Turf offers to ensure customer satisfaction.
To enhance the visual appeal and playability of the artificial grass golf green surface, groom the turf fibers with a power broom or stiff-bristled brush against the grain. Scott Sachse, another satisfied client, noted, “They recently installed a golf practice area at our new home, and they did an outstanding job. Brock is extremely professional, timely, and responsive.”
Regularly checking infill levels is essential for maintaining stability and ensuring a realistic playing experience. If the infill appears uneven or low, add compatible materials to maintain optimal performance and cushioning. Conduct inspections for signs of wear or damage. Les Boatright remarked, “Brock was always on-time and followed through on his commitments. He has a broad knowledge base to draw upon and is very creative.”
At the start of each season, perform a thorough deep clean and check for necessary repairs. This involves re-compacting the base, examining drainage systems, and replenishing infill as necessary to ensure the artificial grass golf green remains in optimal condition throughout the year. Additionally, consider applying a UV protectant spray to prevent fading and degradation of turf fibers, and avoid placing heavy objects on the putting green for extended periods to prevent damage. Neglecting these maintenance practices can lead to costly repairs and diminished enjoyment of your golf experience.
Conclusion
Transforming your outdoor space into a personal putting green can elevate your golfing experience at home. By following the detailed steps outlined in this guide, from assessing your space to implementing maintenance practices, the installation of an artificial grass golf green becomes a manageable and rewarding project. Working with experts at Hall Turf means you can trust that every detail, from design to installation, will be handled with care and expertise.
Key insights include the importance of selecting the right materials, such as specialized turf and a solid base, as well as the necessity of proper drainage and maintenance. Testimonials from satisfied clients, such as Scott Sachse and Brock, highlight Hall Turf’s commitment to professionalism and customer satisfaction, reinforcing the value of expert guidance throughout the process.
Investing in an artificial grass golf green enhances your home’s look and gives you a year-round space to practice your skills. For those considering this upgrade, reaching out to Hall Turf at (816) 555-7890 or via email at info@hallturf.com can provide the support needed to create the perfect golfing oasis tailored to your preferences. By choosing Hall Turf, you ensure that your putting green is not just a feature, but a valuable asset to your home and golfing journey.
Frequently Asked Questions
What is the first step in selecting a location for a putting green?
The first step is to identify a flat area in your yard that receives ample sunlight, ideally at least 6-8 hours a day, and is away from large trees or structures that could cast shadows.
How do I measure the area for my putting green?
Use a measuring tape to determine the dimensions of the space. A typical size for personal use is between 200 to 400 square feet.
What design considerations should I keep in mind for my putting green?
Consider the shape of your green, whether you prefer a traditional oval, a more complex design with contours, or multiple holes. Sketching your ideas can help visualize the layout.
How can Hall Turf assist with the design of my putting green?
Hall Turf collaborates with architects and designers to ensure your putting green is both functional and visually appealing, leveraging their extensive experience and satisfied clientele.
What should I consider regarding drainage for my putting green?
Ensure the area has proper drainage to prevent water pooling. If the ground is too flat, consider incorporating slight slopes to facilitate drainage.
What if I need help with the design and layout of my putting green?
If you’re unsure, consult with a professional installer like Hall Turf, who can provide insights on the best design for your specific space and ensure the turf responds like the surfaces at your country club.
Are there any additional features I can incorporate into my putting green?
Yes, you can consider upselling opportunities such as incorporating bunkers or water hazards to improve the overall aesthetic and functionality of your putting area.
How can I contact Hall Turf for inquiries or quotes?
You can contact Hall Turf at (816) 555-7890 or email info@hallgrass.com for inquiries and quotes.
List of Sources
- Assess Your Space and Design Preferences
- News – Xtreme Green Synthetic Turf (https://xgreensynthetic.com/news)
- Backyard Putting Green Sizes: How Big Should Yours Be? (https://texasturfusa.com/austin-landscape-design/the-perfect-backyard-putting-green-size-a-golfers-guide)
- Tour Greens | Backyard Putting Green Cost in 2025 (https://tourgreens.com/backyard-putting-green-cost.html)
- How Much Does a Backyard Putting Green Cost? | Southwest Greens (https://southwestgreens.com/artificial-putting-greens/backyard-putting-greens/cost-of-a-backyard-putting-green)
- Artificial Turf Market Size, Share 2031 Industry Report (https://mordorintelligence.com/industry-reports/artificial-turf-market)
- Gather Necessary Materials and Tools
- Best Artificial Putting Green Turf: What to Look For (https://aglgrass.com/blogs/best-artificial-putting-green-turf)
- How To Make Your Backyard Putting Green Dream a Reality (https://usga.org/content/usga/home-page/course-care/green-section-record/62/issue-17/how-to-make-your-backyard-putting-green-dream-a-reality.html)
- The Dos and Don’ts of Installing an Artificial Turf Putting Green – OC Turf & Putting Greens (https://octurfandputtinggreens.com/the-dos-and-donts-of-installing-an-artificial-turf-putting-green)
- How To Build a Backyard Putting Green (https://xgrass.com/how-to-build-putting-green.html)
- DIY Putting Green Installation: A Step-by-Step Guide (https://artificialturfexpress.com/blog/installing-the-best-putting-greens-in-your-yard-the-ultimate-diy-guide)
- Follow the Step-by-Step Installation Process
- How To Install Artificial Grass | SGW (https://sgwflorida.com/miami/resources/installing-artificial-grass/step-by-step-guide-to-installing-artificial-grass)
- Master Artificial Turf Installation: Steps for Your Kansas Home – Hall Turf | Artificial Turf Installation Kansas City KS & MO (https://hallturf.com/master-artificial-turf-installation-steps-for-your-kansas-home)
- 4 Key Factors Influencing Artificial Grass Installation Costs – Hall Turf | Artificial Turf Installation Kansas City KS & MO (https://hallturf.com/4-key-factors-influencing-artificial-grass-installation-costs)
- DIY Putting Green Installation: A Step-by-Step Guide (https://artificialturfexpress.com/blog/installing-the-best-putting-greens-in-your-yard-the-ultimate-diy-guide)
- SYNLawn Kansas City Completes Innovative Residential Backyard (https://synlawn.com/articles/synlawn-kansas-city-completes-innovative-residential-backyard)
- Implement Maintenance Practices for Longevity
- How To Properly Maintain An Artificial Grass Putting Green (https://wintergreengrass.com/how-to-properly-maintain-an-artificial-grass-putting-green)
- Artificial Putting Green Maintenance: Year-Round Care Guide (https://aglgrass.com/blogs/artificial-putting-green-maintenance)
- Artificial Golf Greens Maintenance Tips (https://southwestgreens.com/blog/artificial-golf-greens-maintenance-tips)
- Common Mistakes in Artificial Grass Putting Greens (https://heavenlygreens.com/blog/common-mistakes-homeowners-make-when-investing-in-an-artificial-grass-putting-green)
- Backyard Putting Green Maintenance Made Easy (https://artificialturfexpress.com/blog/backyard-putting-green-maintenance-guide)