

Introduction
Transforming an ordinary outdoor space into a golfer’s paradise requires careful planning and execution. This guide will help you navigate the essential steps to design and install a synthetic golf area that enhances your property value while providing an ideal practice environment for golfers of all skill levels.
Many homeowners underestimate the complexities involved in creating a durable and functional putting green. Understanding these considerations can significantly impact the longevity and enjoyment of your investment.
Select and Prepare Your Site for the Putting Green
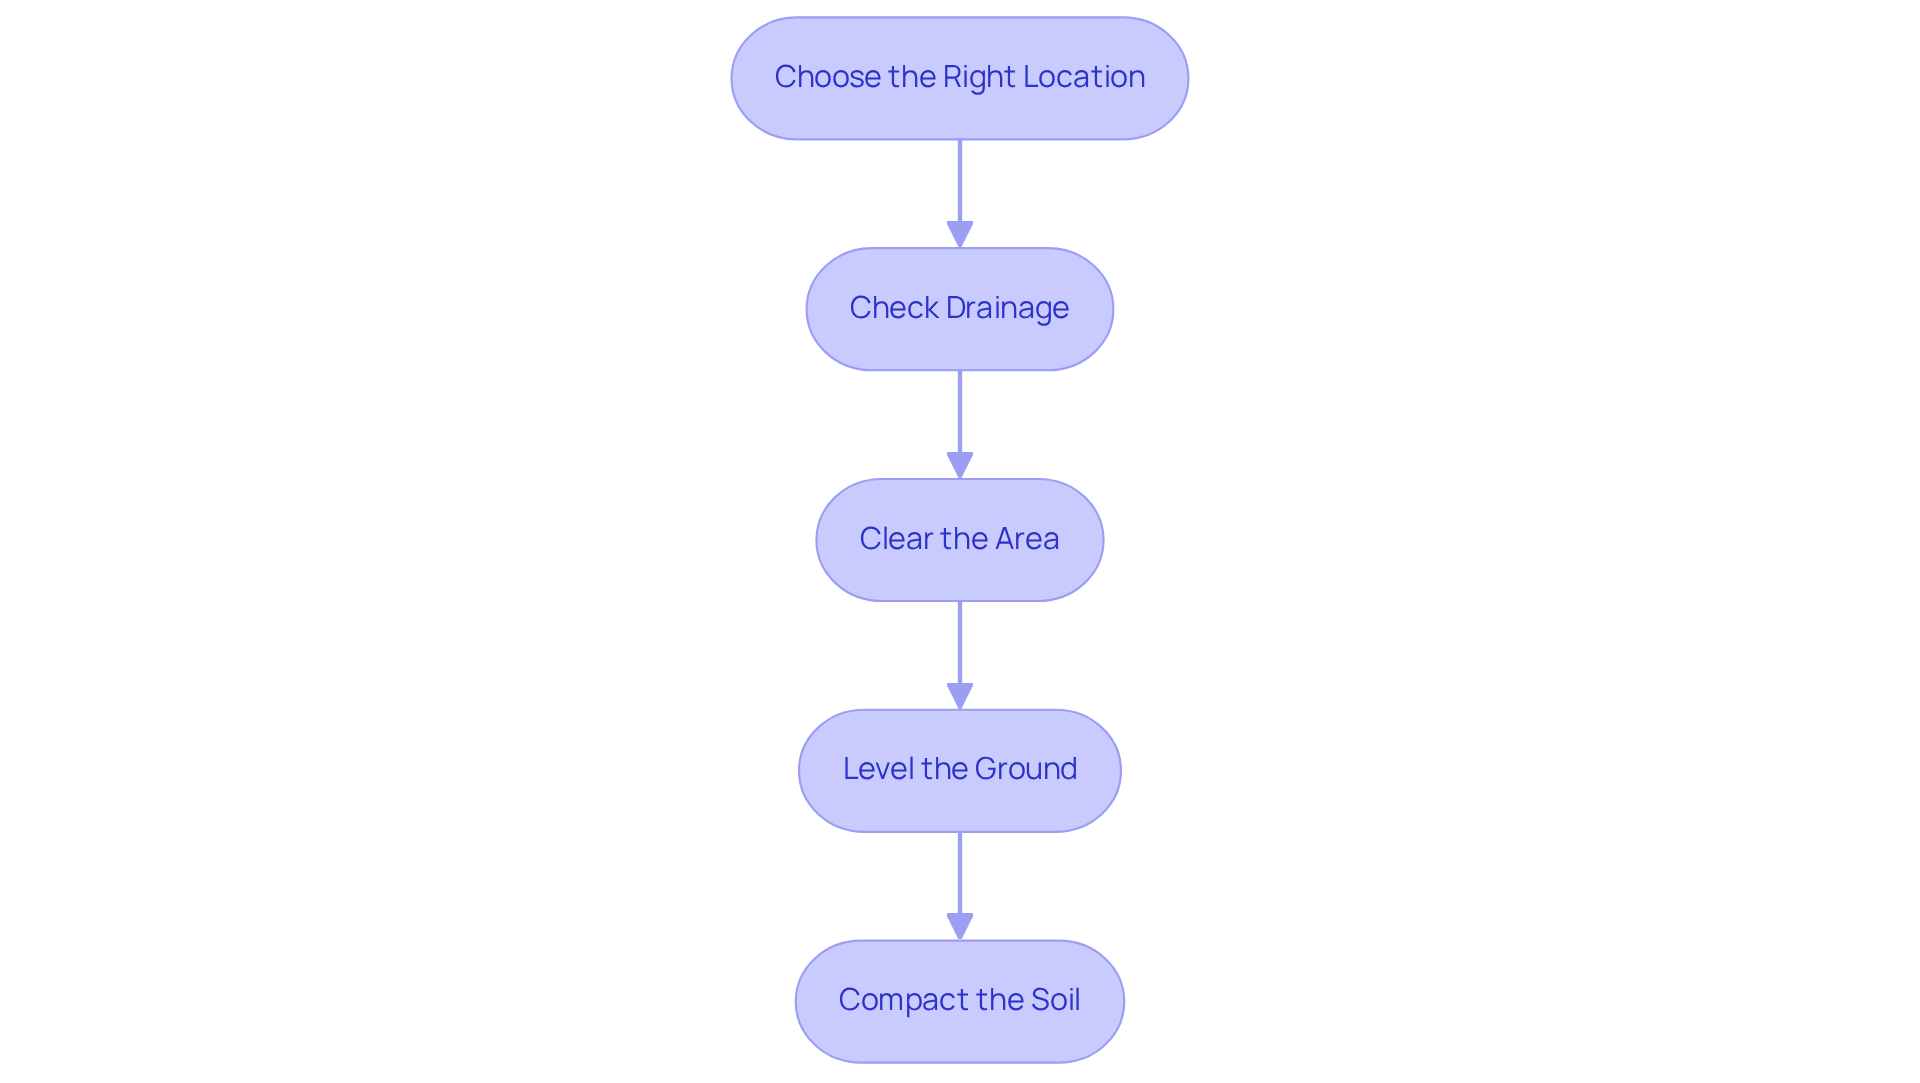
- Choose the Right Location: Selecting the right location for your synthetic golf area is fundamental to its success. Look for a flat area in your backyard putting and chipping green that receives full sunlight for at least 6-8 hours a day. Avoid spots near large trees or buildings that might create shade or drop debris, as these can obstruct the growth and upkeep of your golf area. Choosing the right spot for your backyard putting and chipping green is key because how easy it is to get equipment and materials there can really affect your installation costs and efficiency. As mentioned by Scott Sachse, who had a turf area installed by Hall Turf, the team was not only professional but also made sure that the site was flawlessly prepared for the installation.
- Check Drainage: Ensure the area has good drainage. Poor drainage can lead to costly repairs and a compromised playing surface. If water tends to pool in certain spots, consider grading the land or adding drainage solutions to prevent water accumulation. A well-constructed synthetic golf surface designed for a backyard putting and chipping green should have a lifespan of 10 years or more if properly maintained. Dick Bryant emphasized how Hall Turf evaluated his needs and provided the best solution for drainage, ensuring a long-lasting installation. Without proper drainage, the lifespan of your synthetic golf surface could be significantly reduced.
- Clear the Area: Remove any existing grass, plants, or debris from the selected site. Utilize a shovel or sod cutter to guarantee the ground is clear and level, establishing a solid base for your golf area.
- Level the Ground: After clearing, use a rake to level the ground. If there are any dips or bumps, fill them in with soil or sand to create a smooth surface, essential for a consistent golfing experience. Since a synthetic backyard putting and chipping green costs about $25 per square foot, it’s important to have a solid foundation to maximize your investment. Les Boatright observed that Hall Turf’s focus on detail during this phase was essential for achieving a high-quality green surface.
- Compact the Soil: Use a hand tamper or plate compactor to compact the soil thoroughly. This step is vital to prevent settling after the turf is installed, which can lead to uneven surfaces. Proper compaction guarantees a stable foundation for your golf surface, improving playability and durability. Clients of Hall Turf have noted that focusing on the details during installation is crucial for a top-notch golf surface.
Design Your Backyard Putting Green Layout and Features
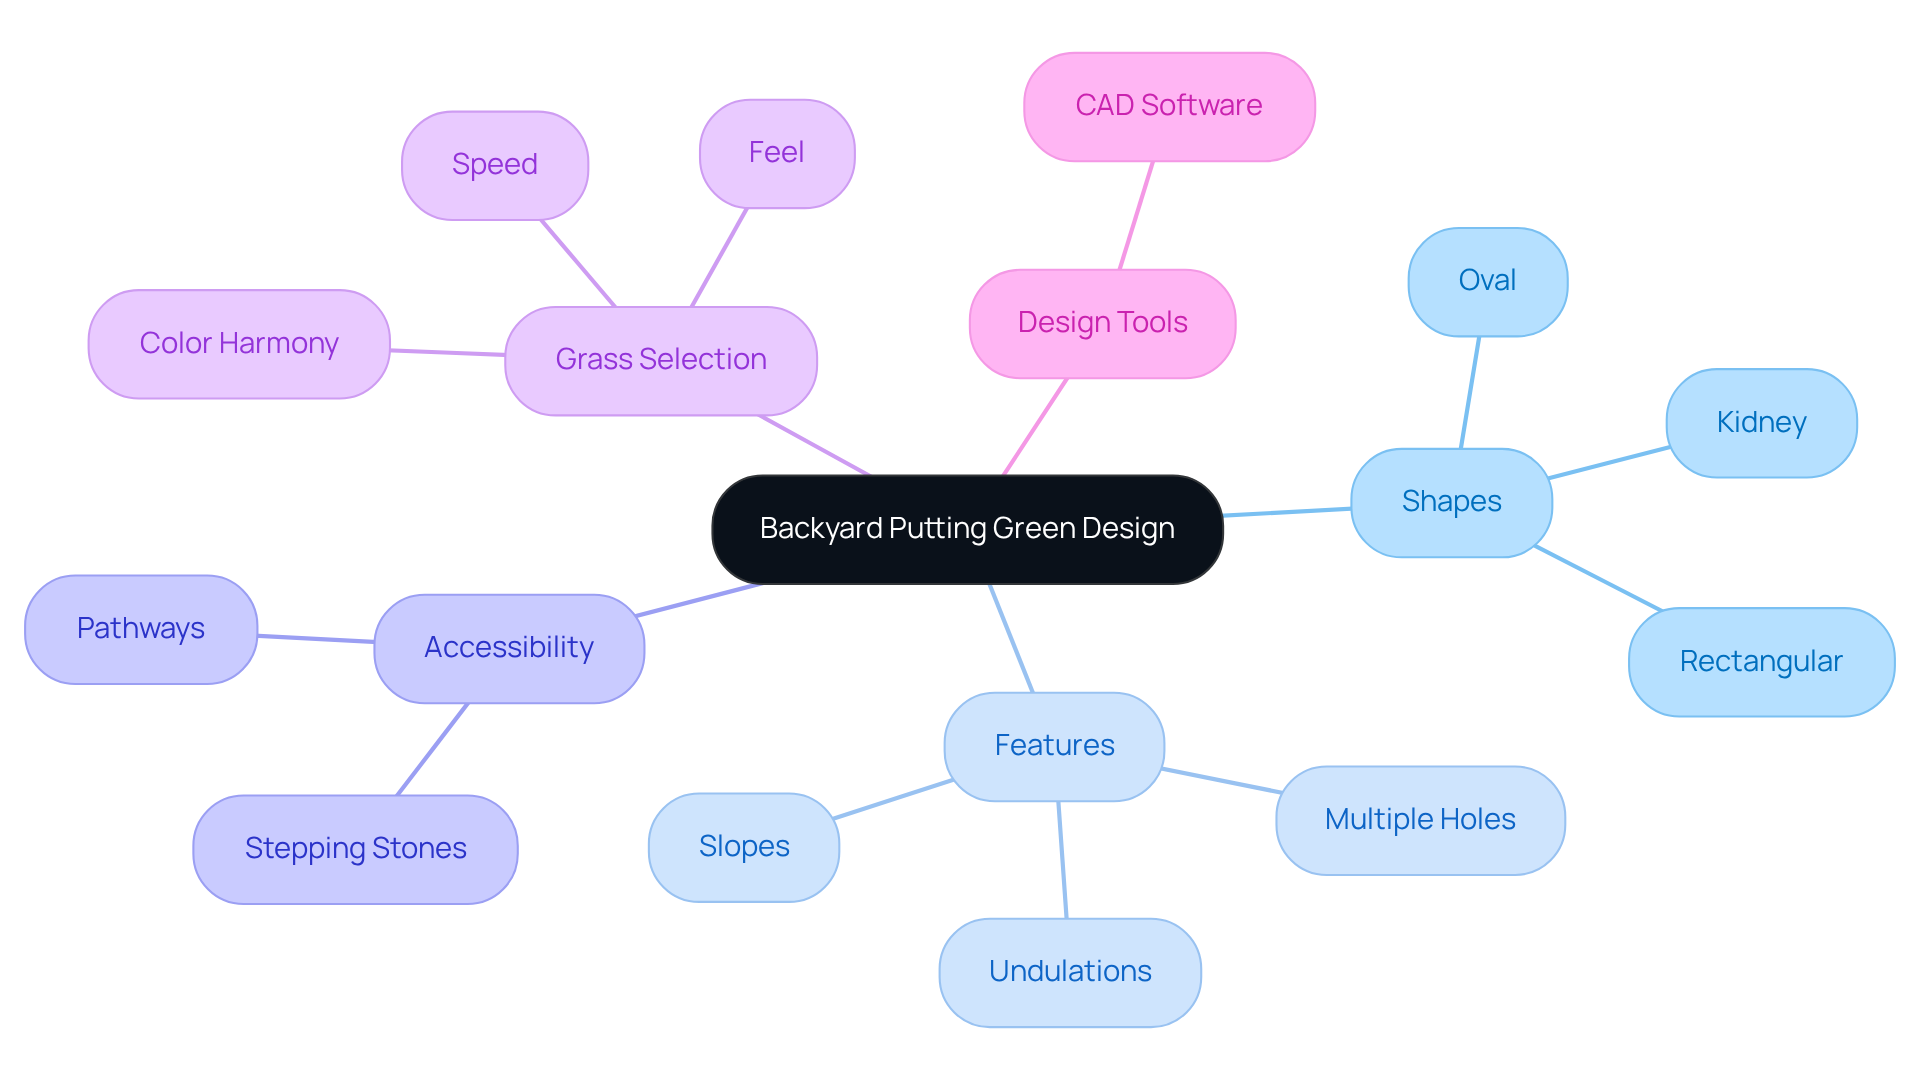
Creating a functional and visually appealing backyard putting and chipping green begins with a thoughtful design that suits the dimensions and shape of your yard. Popular shapes include kidney, oval, and rectangular, each offering unique aesthetics and functionality. A well-designed garden complements your landscape and boosts your property’s visual appeal.
Consider adding features such as multiple holes, slopes, or undulations to your backyard putting and chipping green to replicate the experience of a real golf course. Incorporating a backyard putting and chipping green provides you with more ways to practice and enjoy your course. Remember, a well-designed backyard putting and chipping green can accommodate both beginners and advanced golfers, providing a space for everyone to enjoy. As Scott Sachse noted, Hall Turf’s team was “extremely professional, timely, and responsive,” ensuring that the installation meets your expectations.
Ensure your design allows for easy access to all areas of the space. If the vegetation is located away from the main yard, consider incorporating pathways or stepping stones to facilitate movement. Without proper planning, your putting area may face drainage issues that compromise its longevity. Brock, a Hall Turf expert, is known for his attention to detail and commitment to delivering projects on time and on budget, as Les Boatright’s experience demonstrates.
Select the suitable kind of synthetic grass that aligns with your design objectives. Different grass varieties provide varying levels of speed and feel, so choose one that suits your playing style and desired experience. Additionally, consider color harmony; selecting synthetic turf shades that complement your existing landscaping will enhance the overall aesthetic.
If you have access to CAD software, use it to visualize your design. This tool can help you assess how the green will integrate into your yard, allowing for adjustments before installation. Ultimately, investing time in the design process can significantly enhance your enjoyment and the longevity of your backyard putting and chipping green.
Install Your Artificial Turf and Ensure Proper Maintenance
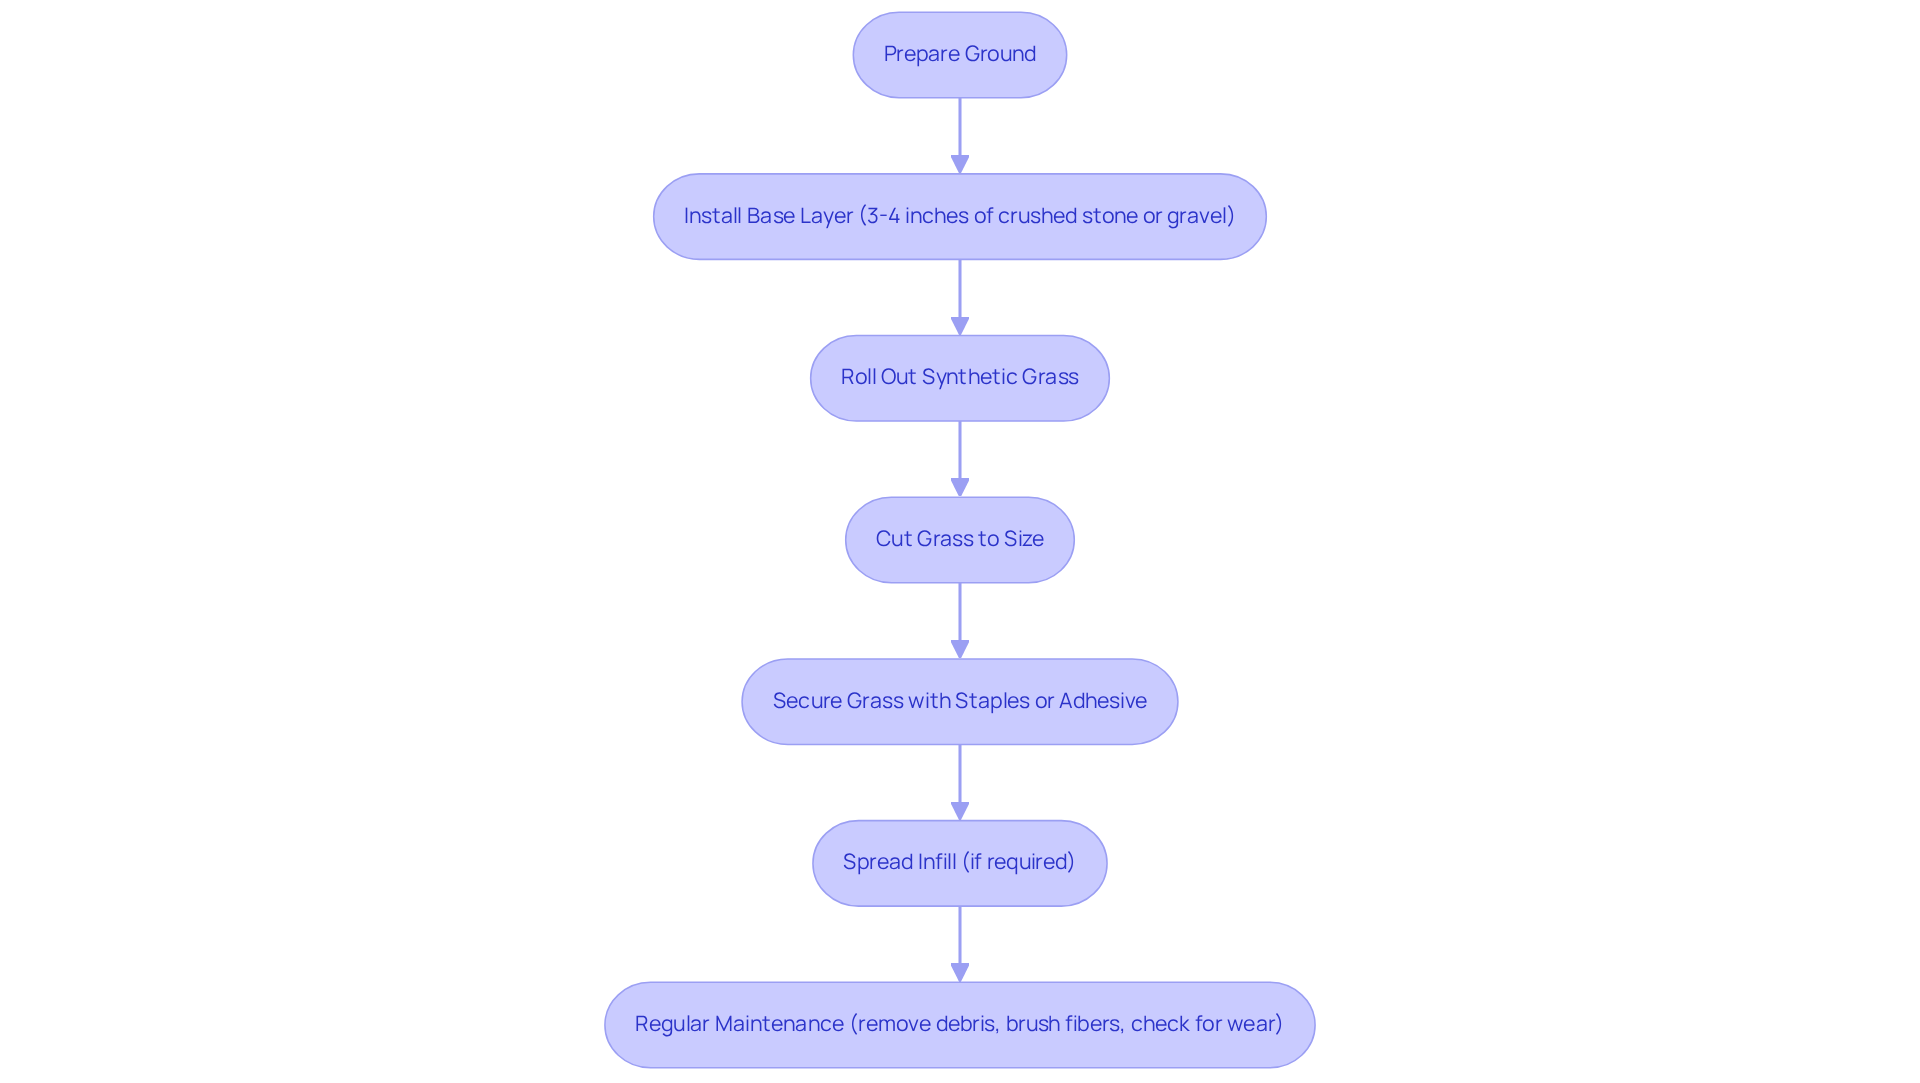
Installing synthetic grass requires careful preparation to ensure a durable and functional surface. Begin by leveling the ground and installing a base layer of crushed stone or gravel, approximately 3 to 4 inches deep. This depth ensures stability and proper drainage, avoiding issues like puddling and grass damage.
Next, roll out the synthetic grass over the prepared base, ensuring it fits snugly against the edges. Use a utility knife to cut the grass to size, leaving a little extra for trimming later to ensure a perfect fit.
Secure the ground using landscape staples or adhesive to prevent any movement, which is essential for maintaining a smooth playing surface.
If your grass requires infill, spread it evenly across the surface. This step is important as it helps weigh down the grass and keeps the fibers upright, enhancing the overall playing experience.
Finally, to keep your surface for putting in optimal condition, regularly remove debris, brush the grass fibers, and check for any signs of wear. Neglecting routine upkeep can lead to a deteriorating surface that affects playability and aesthetics. Regular maintenance is crucial to preserving the quality and longevity of your synthetic grass surface.
Enhance Your Putting Green with Chipping Areas and Landscaping
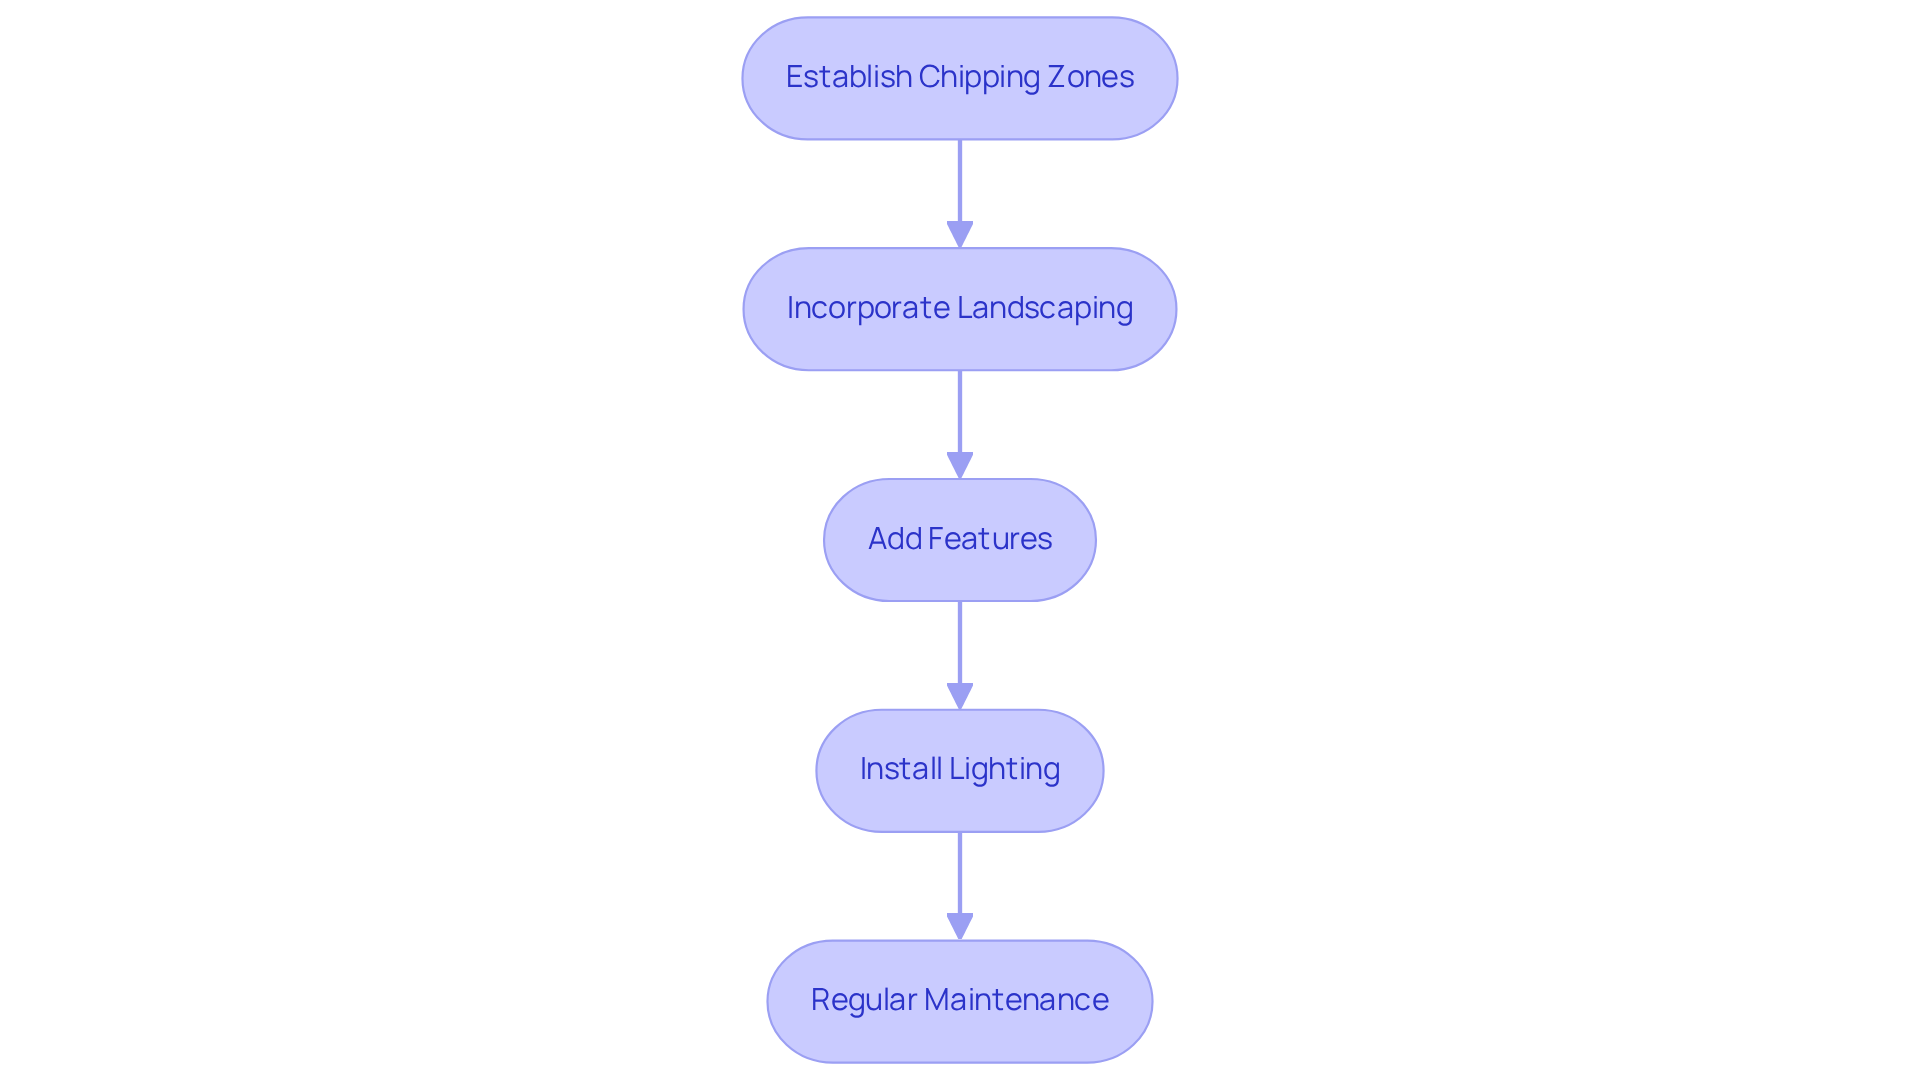
Creating a functional and aesthetically pleasing backyard putting and chipping green requires careful planning and execution.
- Establish Chipping Zones: Allocate an area next to the golf surface for chipping practice. This area should have shorter turf or varied textures to mimic different grass types, improving practice and versatility for users.
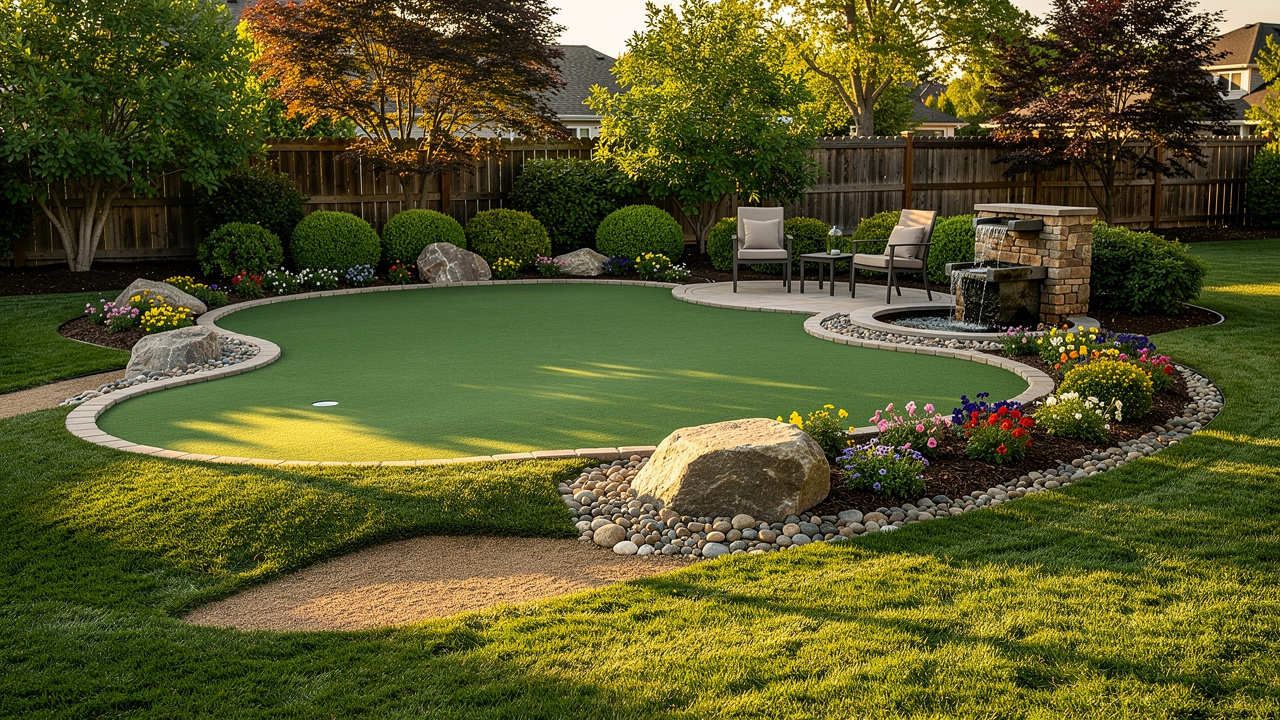
- Incorporate Landscaping: Surround your golf area with landscaping features like flower beds, decorative stones, or rocks. Landscaping not only beautifies the area but also clearly defines the space, making it more inviting for practice and gatherings. Hall’s team evaluates your needs and provides tailored solutions to transform your backyard into an inviting oasis, complete with a backyard putting and chipping green.
- Add Features: Consider incorporating features like a small water fountain or a seating area nearby. These additions can create a relaxing environment, making your backyard a perfect spot for gatherings and leisure activities. Scott Sachse commended Hall Turf for their outstanding setup of a golf surface, emphasizing the professionalism and attention to detail of the team.
- Install Lighting: If you intend to utilize the golf area in the evening, installing landscape lighting is crucial. Without proper lighting, the usability of your golf area diminishes, limiting your enjoyment and playtime.
- Regular maintenance of the landscaping around the backyard putting and chipping green is crucial to maintain the surroundings. Trim plants, remove debris, and ensure the area remains clean and inviting to keep your outdoor space looking its best. Les Boatright expressed his satisfaction with Hall’s commitment to quality and timely execution, emphasizing the importance of maintaining a beautiful outdoor space.
Hall Landscaping is a licensed contractor with more than 15 years of experience and a client base of over 80,000 satisfied customers globally. For inquiries and quotes, please contact Hall Turf at (816) 555-7890 or email info@hallturf.com. Investing in landscaping not only enhances your outdoor space but also significantly increases its value.
Conclusion
Creating a backyard putting and chipping green can seem overwhelming, but with the right guidance, it becomes an exciting opportunity to enhance your golfing skills and outdoor space. Homeowners can create a functional and visually appealing putting green by:
- Selecting the right site
- Designing a thoughtful layout
- Installing quality synthetic turf
- Adding landscaping features
Key insights from the article emphasize the importance of:
- Proper site selection
- Drainage solutions
- Meticulous installation
Clients like Scott Sachse and Les Boatright have praised Hall Turf for their professionalism and meticulous attention to detail, showcasing the quality of their work. Additionally, incorporating chipping areas and thoughtful landscaping can transform your backyard into a serene oasis, perfect for relaxation and entertainment.
Investing in a backyard putting green is a significant decision. Ultimately, this investment not only enriches your golfing experience but also significantly boosts your property’s value, making it a worthwhile endeavor. For those considering this enhancement, reaching out to Hall Turf at (816) 555-7890 or via email at info@hallturf.com can provide the necessary support and expertise to bring your vision to life.
Frequently Asked Questions
What is the first step in selecting a site for a putting green?
The first step is to choose the right location, ideally a flat area that receives full sunlight for at least 6-8 hours a day, while avoiding spots near large trees or buildings that could create shade or drop debris.
Why is drainage important for a putting green?
Good drainage is crucial because poor drainage can lead to costly repairs and a compromised playing surface. It is recommended to grade the land or add drainage solutions if water tends to pool in certain spots.
What should be done to prepare the area before installation?
The area should be cleared of any existing grass, plants, or debris using a shovel or sod cutter to ensure the ground is clear and level, establishing a solid base for the golf area.
How can I ensure the ground is level for my putting green?
After clearing the area, use a rake to level the ground. Fill in any dips or bumps with soil or sand to create a smooth surface, which is essential for a consistent golfing experience.
Why is soil compaction necessary before installing the turf?
Soil compaction is necessary to prevent settling after the turf is installed, which can lead to uneven surfaces. Proper compaction guarantees a stable foundation, improving playability and durability.
How much does a synthetic backyard putting green typically cost?
A synthetic backyard putting green costs about $25 per square foot, making it important to have a solid foundation to maximize your investment.
Can you provide an example of customer satisfaction with Hall Turf’s installation process?
Scott Sachse noted that Hall Turf’s team was professional and ensured that the site was flawlessly prepared for installation, while Dick Bryant emphasized how Hall Turf evaluated his needs for the best drainage solution.
What is the expected lifespan of a well-constructed synthetic golf surface?
A well-constructed synthetic golf surface designed for a backyard putting and chipping green should have a lifespan of 10 years or more if properly maintained.
List of Sources
- Select and Prepare Your Site for the Putting Green
- How To Make Your Backyard Putting Green Dream a Reality (https://usga.org/content/usga/home-page/course-care/green-section-record/62/issue-17/how-to-make-your-backyard-putting-green-dream-a-reality.html)
- 5 Backyard Putting Green Installation Mistakes & How to Fix Them (https://aglgrass.com/blogs/backyard-putting-green-mistakes)
- Tour Greens | Backyard Putting Green Cost in 2025 (https://tourgreens.com/backyard-putting-green-cost.html)
- How To Build a Backyard Putting Green (https://xgrass.com/how-to-build-putting-green.html)
- Design Your Backyard Putting Green Layout and Features
- News – Xtreme Green Synthetic Turf (https://xgreensynthetic.com/news)
- A Growing Trend: The Popularity of Putting Greens in Backyards (https://turffactorydirect.com/blog/growing-trend-popularity-of-putting-greens-in-backyards?srsltid=AfmBOop05Y3BxZh5GeyOYparGXUcMt5YrUf5Vurf_So5A3DpzuGTHaTi)
- [Case Study] A backyard DIY synthetic golf green – Supreme Greens (https://supremegreens.com.au/case-study-a-backyard-diy-synthetic-golf-green)
- Gil Hanse’s Architecture 101: Green Design – LINKS Magazine (https://linksmagazine.com/gil-hanses-architecture-101-green-design)
- Thoughts on Design, Golf and Life (https://jdrewrogers.com/101/thoughts-on-design,-golf-and-life)
- Install Your Artificial Turf and Ensure Proper Maintenance
- News – Xtreme Green Synthetic Turf (https://xgreensynthetic.com/news)
- How to Choose the Right Base for Artificial Grass (https://realturf.com/us/what-sub-base-is-best-for-your-artificial-grass)
- Golf Entertainment Complex Project | SYNLawn Golf (https://synlawngolf.com/blog/synlawn-kansas-city-hits-hole-in-one-with-state-of-the-art-golf-entertainment-complex?srsltid=AfmBOooBsGbXhUYkj0D_Z_HRdQ-2KTNiOlDm3eJYplI1q3QuYYWVW-Zb)
- Sub-Base Material for Artificial Turf // TURF NETWORK (https://turfnetwork.org/artificial-grass/components/sub-base)
- Why Base Materials Matters For Artificial Turf – Waterloo Turf (https://waterlooturf.com/blog/why-base-materials-matters-for-artificial-turf)
- Enhance Your Putting Green with Chipping Areas and Landscaping
- A Growing Trend: The Popularity of Putting Greens in Backyards (https://turffactorydirect.com/blog/growing-trend-popularity-of-putting-greens-in-backyards?srsltid=AfmBOoqBbbpymQvuKG6z26zXwabjaw8mg7NAeBtCM0PxMiuTYo05jO7p)
- Top Backyard Putting Green Trends for 2026 Revealed (https://artificialturfexpress.com/blog/backyard-putting-green-design-trends)
- 10 Backyard Putting Green Ideas (https://synlawn.com/articles/backyard-putting-green-ideas)
- Backyard Putting Green Design: Best Tips & Ideas (https://aglgrass.com/blogs/backyard-putting-green-design)
- Landscape Industry Statistics | NALP (https://landscapeprofessionals.org/LP/LP/Media/landscape-industry-statistics.aspx)