

Introduction
Transforming your backyard into a golfer’s paradise with a large outdoor putting green requires meticulous planning and execution. This article provides insights on best practices for installing a putting green, including:
- Site selection
- Design specifications
- Material choices that enhance both performance and aesthetics
Understanding the common pitfalls that can derail this ambitious project is essential for success. By being aware of potential challenges, homeowners can ensure a successful and rewarding enhancement to their outdoor spaces.
Select and Prepare the Ideal Site for Your Putting Green
Selecting the right location for your large outdoor putting green is vital for ensuring its long-term success and usability. Here are essential considerations to keep in mind:
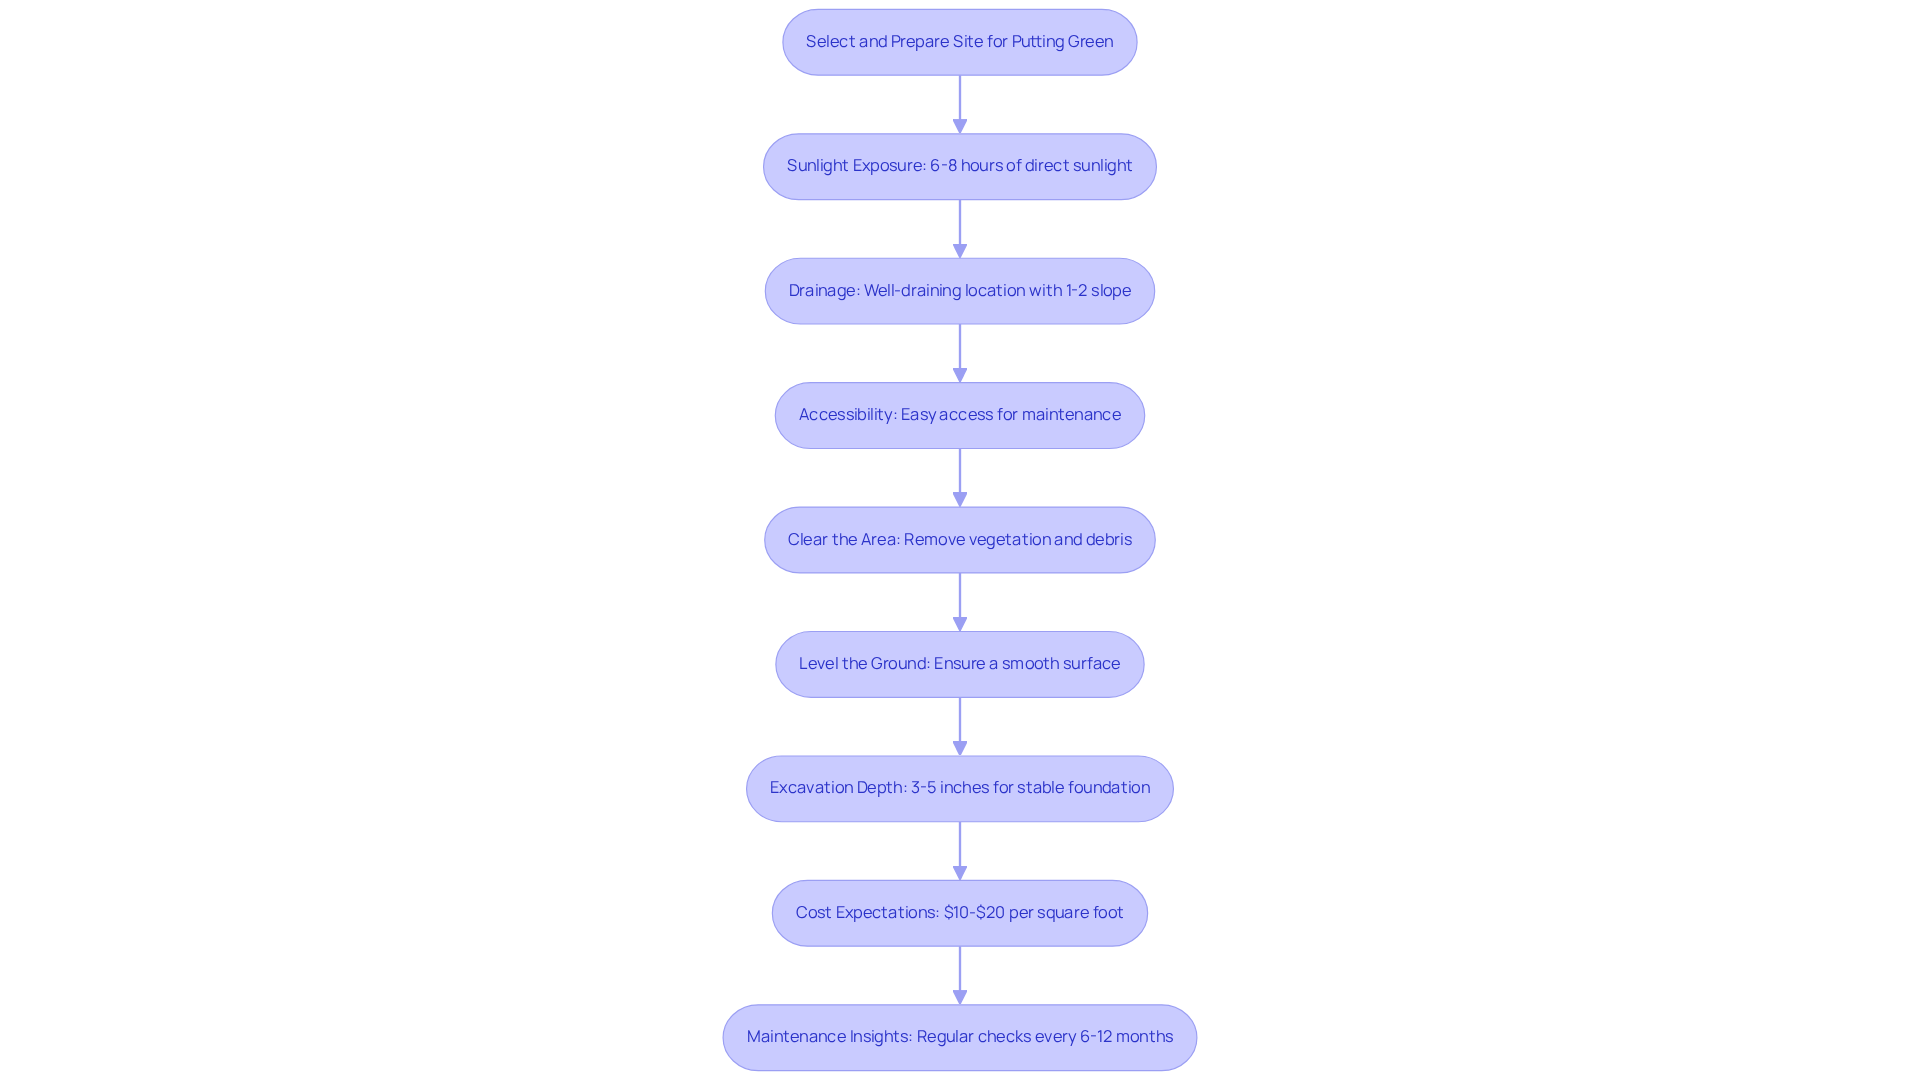
- Sunlight Exposure: Choose a site that receives at least 6-8 hours of direct sunlight daily. This exposure is crucial for maintaining the grass’s health and preventing mold, which keeps the surface vibrant and playable.
- Drainage: Select a well-draining location to prevent water accumulation, as poor drainage can severely damage the grass. A slight slope of 1-2% is recommended to effectively direct water away from the area, enhancing its longevity and playability.
- Accessibility: Ensure the site is easily accessible for maintenance and regular use. Avoid placing the putting green in areas with heavy foot traffic, as this can lead to wear and tear on the turf.
- Clear the Area: Before setup, remove all vegetation, rocks, and debris from the site. This preparation provides a clean slate for the installation and helps prevent future complications.
- Level the Ground: Use a rake to level the ground, ensuring a smooth surface for the base layer. This step is essential for attaining a uniform surface, as an uneven base can result in inconsistent ball rolls and other problems.
- Excavation Depth: Excavate the area to a depth of approximately 3 to 5 inches to create a stable foundation for the putting green. This depth is essential for proper drainage and turf performance.
- Cost Expectations: Homeowners can typically expect to spend between $10 to $20 per square foot for installation, depending on material quality and site conditions.
- Maintenance Insights: Keeping up with regular maintenance is key to making sure your turf lasts. Check infill levels every 6 to 12 months to ensure optimal performance and appearance.
Following these guidelines will help you establish a large outdoor putting green that performs well and enhances your outdoor space. Hall Turf, a licensed contractor with over 15 years of experience, emphasizes the importance of investing time in creating a stable, level base before laying turf. Furthermore, a case study on sunlight exposure highlights that a well-placed golf area in a sunny location will dry quickly after rain, improving its usability and maintenance efficiency. Customers like Scott Sachse have praised Hall Turf for their exceptional installation services, noting the professionalism and attention to detail of the crew. Dick Bryant also shared his satisfaction with the tailored solutions provided by Hall Turf, emphasizing the importance of expert guidance in achieving the best results. Ultimately, the right preparation and expert guidance can transform your outdoor space into a golfer’s paradise featuring a large outdoor putting green.
Design and Engineer for Performance: Key Specifications and Features
A well-designed putting green is essential for effective practice and skill development.
- Contouring: Integrate gentle slopes and undulations to replicate the characteristics of natural landscapes. This approach enhances the challenge and adds realism to your practice sessions. Understanding the contours and breaks is crucial; this complexity can lead to misjudgments in putting.
- Cup Placement: Strategically plan the location of the cups early in the design process. Varying distances and angles will enhance practice versatility, allowing for a more engaging experience.
- Size and Shape: Determine the size based on the available space and intended use. A larger area, such as a large outdoor putting green, allows for more intricate designs and varied practice scenarios, accommodating different skill levels.
- Surrounding Areas: Design fringe areas around the green for chipping practice. This feature enhances both functionality and the aesthetic appeal of the installation.
- Material Specifications: Utilize CAD software to create detailed designs that specify turf types, base materials, and drainage systems. This ensures that all elements work together seamlessly, contributing to the longevity and performance of the environment. Additionally, Hall Turf is a licensed contractor, and we adhere to product certifications that guarantee compliance and technical rigor.
- Safety Features: Incorporate non-slip borders and clearly defined pathways to enhance safety and usability in landscaping integration.
Investing in a well-designed practice area can also enhance your property value, making it a valuable addition to your home. By concentrating on these design features, you can create a golf area that not only appears impressive but also functions remarkably well, offering year-round golfing chances for all skill levels.
As noted by satisfied customers, Hall Turf’s expertise shines through in every project. Dick Bryant shared, “When I needed a solution to my turf issue, Brock came out, evaluated my needs and came up with the best solution. I went with his advice and the recommendation was perfect!” Scott Sachse added, “A huge thank you to Brock! They recently set up a golf practice area at our new residence, and they did an outstanding job. Brock is extremely professional, timely, and responsive.” These testimonials reflect our commitment to quality and client satisfaction, guaranteeing that your surface setup is managed with the highest level of professionalism. Our extensive experience in the Kansas and Missouri regions, including collaboration with architects and designers, further enhances our ability to deliver exceptional results.
Ultimately, a thoughtfully designed practice area can transform your golfing experience and elevate your property’s worth.
Choose Quality Materials: Selecting the Right Turf and Accessories
Selecting the right materials is critical for achieving a successful golf surface installation that meets both performance and aesthetic standards. Here are essential considerations:
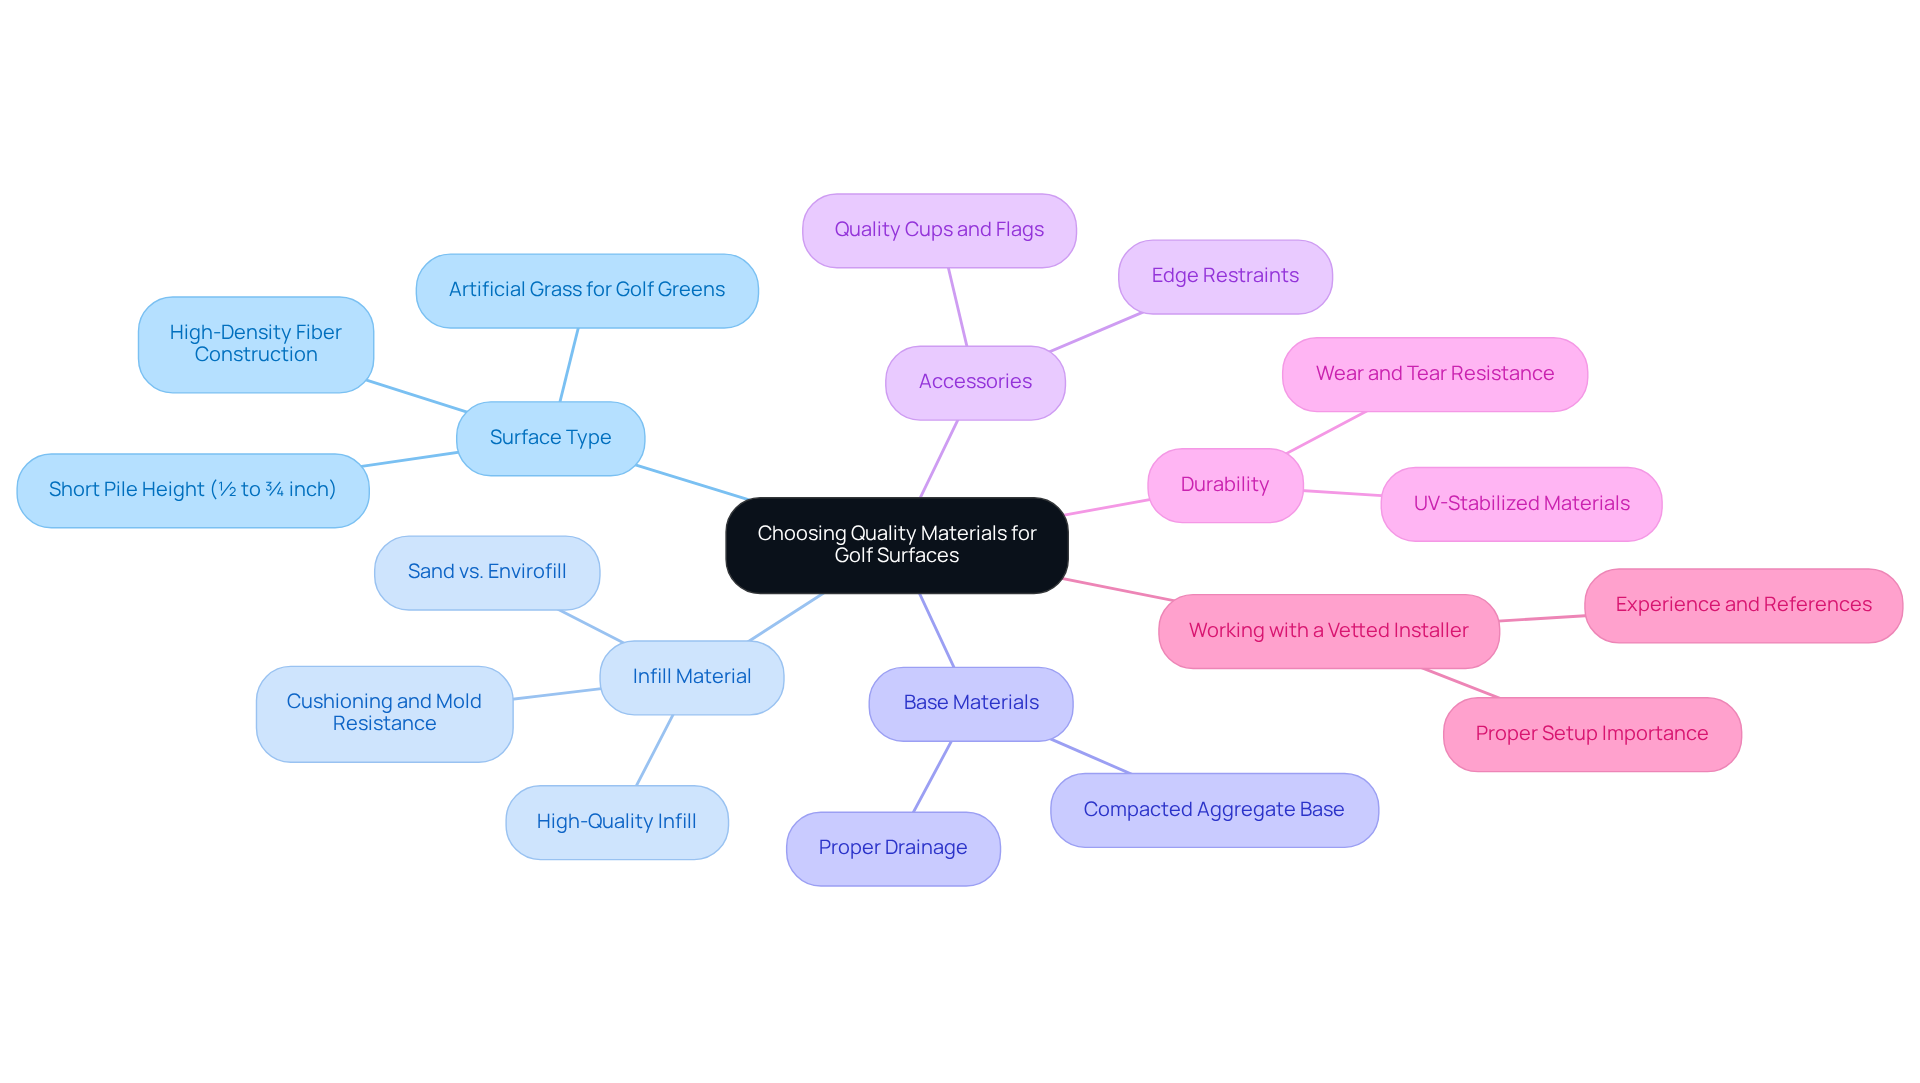
- Surface Type: Choose artificial grass specifically designed for golf greens. Look for features such as a short pile height of ½ to ¾ inch and dense fibers that ensure a smooth and predictable ball roll. High-density fiber construction minimizes bounce and maintains a consistent surface. You can find a variety of certified products at Hall Turf that are designed to meet industry standards for both performance and safety.
- Infill Material: Opt for high-quality infill that supports the turf fibers and enhances ball roll. While sand is a common choice, alternatives like Envirofill can provide additional cushioning and mold resistance, contributing to a better playing experience. Hall Turf’s infill options are designed to optimize performance while ensuring durability.
- Base Materials: A compacted aggregate base is essential for stability and proper drainage. This foundation prevents settling and maintains the integrity of the surface, ensuring consistent performance in various weather conditions typical of the Kansas and Missouri regions.
- Accessories: Invest in quality accessories such as cups, flags, and edge restraints. These components not only enhance the functionality of your golf area but also improve its overall appearance. Hall Turf provides a selection of professional-grade accessories tailored for optimal performance.
- Durability: Ensure that all materials are UV-stabilized and resistant to wear and tear. This will extend the lifespan of your turf and sustain its performance over time, enabling year-round use without the significant maintenance needed for natural grass.
- Working with a Vetted Installer: Collaborating with a vetted installer is crucial for ensuring quality and longevity of your putting green. Hall Turf is a licensed contractor with significant experience and a large satisfied client base, which can help prevent common issues related to improper setup. If the installation isn’t done correctly, it can result in uneven surfaces that frustrate golfers and lower the value of your investment. As one satisfied customer, Dick Bryant, noted, “When I needed a solution to my turf issue, Brock came out, evaluated my needs and came up with the best solution. I went with his advice and the recommendation was perfect!”
By emphasizing high-quality materials and expert setup, you can create a practice area, such as a large outdoor putting green, that endures over time and offers an outstanding playing experience, improving both your short game and your property’s value. Choosing quality materials and professional installation not only improves your golfing experience but also safeguards your investment for the long haul. The typical expense of setting up a 200-square-foot turf area in 2024 was around $4,300, rendering it a considerable investment that can yield returns over time. As Scott Sachse shared, “A huge thank you to Brock! They recently set up a golf practice area at our new residence, and they did an outstanding job. Brock is extremely professional, timely, and responsive.
Implement Professional Installation and Maintenance Practices
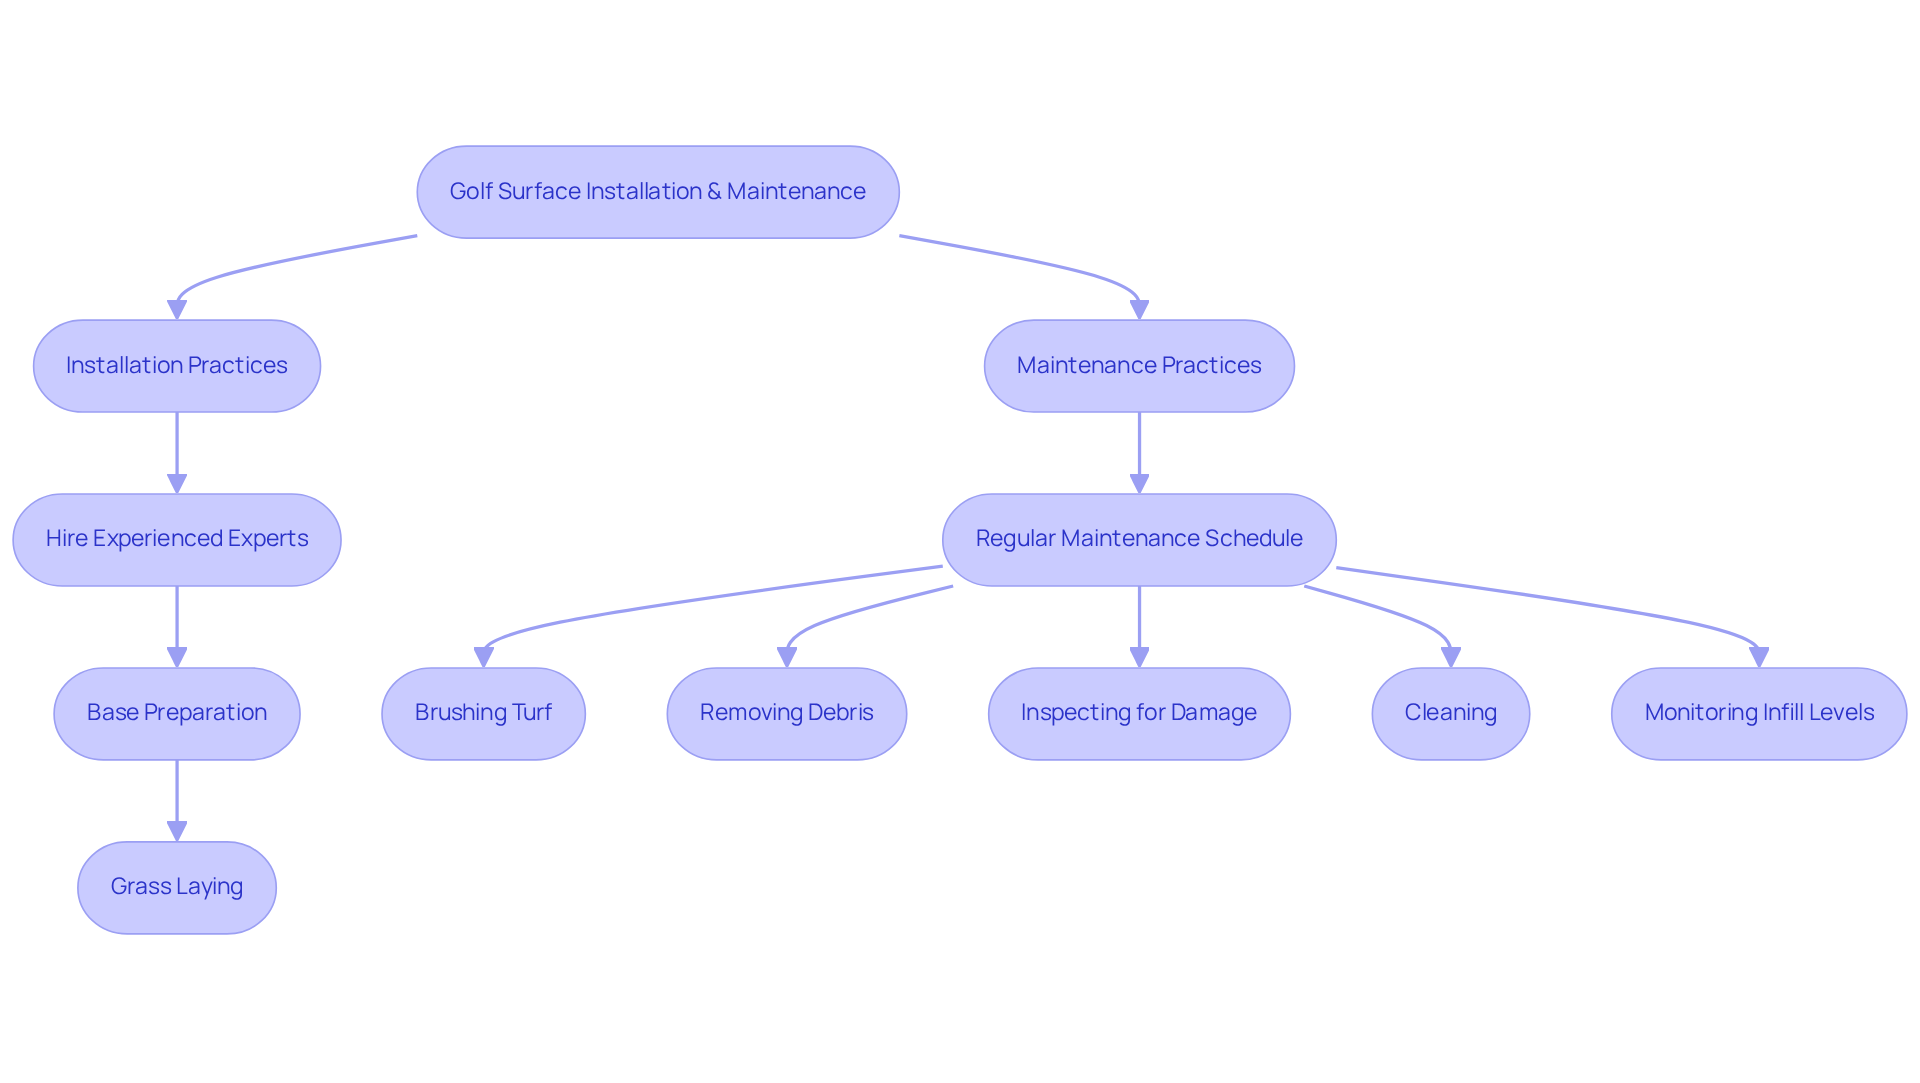
Proper setup and maintenance are critical for ensuring the longevity and performance of your golf surface. It’s crucial to hire experienced experts for your putting surface setup. Hall Turf focuses on constructing PGA Tour-quality golf surfaces using distinctive installation techniques that guarantee every aspect, from base preparation to grass laying, is carried out with precision. This expertise significantly reduces the risk of future issues, as over 70 PGA Tour professionals have trusted Hall Turf for their short games.
You should set up a regular maintenance schedule to keep your landscape looking its best. This includes:
- Brushing the turf to maintain its softness
- Removing debris to prevent mold growth
- Regularly inspecting for signs of wear or damage
Brushing and rolling the turf are essential practices that help achieve a true roll and enhance playability, ensuring your experience mirrors that of a real golf course.
Regular cleaning is vital to prevent the accumulation of dirt and organic matter. Utilize a gentle soap solution mixed with water and a soft brush to maintain the surface’s appearance and functionality. If you neglect cleaning, you could face mildew and other issues that compromise the turf’s integrity.
Monitor the infill levels, replenishing as necessary to ensure the grass’s performance and aesthetic appeal. Proper infill maintenance contributes to a true roll and enhances playability, making it essential for an enjoyable experience.
Adapt your maintenance practices according to seasonal changes. For example, during winter, quickly clear snow and ice to avoid damage and ensure the area remains usable when warmer weather arrives. Heavy objects should also be kept off the turf to avoid compression and damage.
By adhering to these expert installation and upkeep methods, you can guarantee that your large outdoor putting green remains a high-quality, enjoyable element for years ahead, ultimately enhancing your property value and offering a space for relaxation and practice. Investing in expert care not only preserves your turf but also enhances your overall golfing experience. For more detailed guidance, consider consulting a comprehensive golf maintenance manual. If you’re ready to enhance your home with a premier putting green, contact Hall Turf at (816) 555-7890 or email info@hallturf.com for inquiries and quotes.
Conclusion
Investing in a large outdoor putting green can elevate your golfing experience and increase your property value. By adhering to best practices in site selection, design, material choice, and professional installation, homeowners can ensure a high-quality setup that meets their needs. Proper preparation and expert guidance are essential for creating a putting green that looks great and performs well.
Key considerations include:
- Selecting an ideal site with adequate sunlight and drainage
- Designing for performance with thoughtful contours and cup placements
- Choosing high-quality materials that ensure durability and playability
Hall Turf’s extensive experience and commitment to excellence, as highlighted by satisfied customers, underscore the importance of working with a licensed contractor to avoid common pitfalls and achieve the best results.
With the right investment, your outdoor space can become a golfer’s paradise that you and your family will enjoy. For those ready to elevate their home with a premier putting green, reaching out to Hall Turf at (816) 555-7890 or via email at info@hallturf.com can provide the expert support needed to bring this vision to life. By taking the right steps, you can create an outdoor feature that not only enhances your home but also provides enjoyment for years to come.
Frequently Asked Questions
Why is selecting the right location for a putting green important?
Choosing the right location is vital for ensuring the long-term success and usability of the putting green, affecting factors like sunlight exposure, drainage, and accessibility.
How much sunlight should the site for a putting green receive?
The site should receive at least 6-8 hours of direct sunlight daily to maintain the grass’s health and prevent mold.
What drainage considerations should be taken into account?
The location should be well-draining to prevent water accumulation, with a slight slope of 1-2% recommended to direct water away from the area.
What accessibility factors should be considered when selecting a site?
The site should be easily accessible for maintenance and regular use, avoiding areas with heavy foot traffic to prevent wear and tear on the turf.
What preparation steps are necessary before installing a putting green?
Before setup, clear the area of all vegetation, rocks, and debris, and level the ground using a rake to ensure a smooth surface for the base layer.
How deep should the excavation be for a putting green?
The area should be excavated to a depth of approximately 3 to 5 inches to create a stable foundation for proper drainage and turf performance.
What are the cost expectations for installing a putting green?
Homeowners can typically expect to spend between $10 to $20 per square foot for installation, depending on material quality and site conditions.
How can I maintain my putting green after installation?
Regular maintenance is key; check infill levels every 6 to 12 months to ensure optimal performance and appearance.
What experience does Hall Turf have in installing putting greens?
Hall Turf is a licensed contractor with over 15 years of experience, emphasizing the importance of creating a stable, level base before laying turf.
Can you provide examples of customer satisfaction with Hall Turf’s services?
Customers like Scott Sachse have praised Hall Turf for their exceptional installation services, while Dick Bryant highlighted the tailored solutions and expert guidance provided by the team.
List of Sources
- Select and Prepare the Ideal Site for Your Putting Green
- 4 Steps to Install Your Perfect Putting Green at Home | Hall Turf (https://hallturf.com/4-steps-to-install-your-perfect-putting-green-at-home)
- 5 Backyard Putting Green Installation Mistakes & How to Fix Them (https://aglgrass.com/blogs/backyard-putting-green-mistakes)
- Avoid Costly Mistakes: Backyard Putting Green Installatio (https://heavenlygreens.com/blog/avoid-backyard-putting-green-mistakes)
- 4 Best Practices for Your Professional Putting Green Installation | Hall Turf (https://hallturf.com/4-best-practices-for-your-professional-putting-green-installation)
- How To Choose The Right Location For Your Putting Green | Northeast Synthetic Turf (https://northeastsyntheticturf.com/how-to-choose-the-right-location-for-your-putting-green)
- Design and Engineer for Performance: Key Specifications and Features
- 2018 revisions to the USGA method for putting green construction – GCMOnline.com (https://gcmonline.com/course/environment/news/usga-putting-green-construction)
- Understanding Putting Green Contours and Breaks (https://integriturf.com/glossary/understanding-putting-green-contours-and-breaks)
- How to Design the Ideal Backyard Artificial Grass Putting Green (https://verdigrass.webflow.io/posts/how-to-design-the-ideal-backyard-artificial-grass-putting-green)
- Contouring Greens for Putting Challenge (https://golfcourseindustry.com/article/contouring-greens-for-putting-challenge)
- 2026’s Biggest Artificial Turf Putting Green Design Trends – OC Turf & Putting Greens (https://octurfandputtinggreens.com/2026s-biggest-artificial-turf-putting-green-design-trends)
- Choose Quality Materials: Selecting the Right Turf and Accessories
- The Best Putting Green Turf: Buyer’s Guide (https://synlawn.com/articles/best-putting-green-turf-buyers-guide)
- How to Choose the Best Putting Green Turf: Ultimate Guide (https://flooringinc.com/blog/the-best-putting-green-turf?srsltid=AfmBOop0KPLHddpydKuNJrM242j3nqJotB_JX0nInnJ70MJLnjzwUimM)
- The Best Artificial Grass for Putting Green (https://themotzgroup.com/infill_blog/the-best-artificial-grass-for-putting-greens)
- Kansas City Artificial Grass Installation and Putting Greens (https://celebritygreens.com/kansas-city)
- Kansas City MO Putting Greens: Are They Worth It? (https://waterlooturf.com/kansascity/backyard-putting-greens)
- Implement Professional Installation and Maintenance Practices
- Artificial Golf Greens Maintenance Tips (https://southwestgreens.com/blog/artificial-golf-greens-maintenance-tips)
- Tour Greens Kansas | Artificial Golf Greens & Backyard Putting Green Installation (https://tourgreens.com/tour-greens-kansas-dealer.html)
- Artificial Putting Green Maintenance: Year-Round Care Guide (https://aglgrass.com/blogs/artificial-putting-green-maintenance)
- Tour Greens | Putting Green Maintenance (https://tourgreens.com/putting-green-maintenance.html)
- The hole truth about backyard putting greens (https://golfcourseindustry.com/news/the-hole-truth-about-backyard-putting-greens)