
Introduction
Installing synthetic grass can significantly enhance an outdoor space, offering a vibrant, green landscape without the upkeep associated with natural grass. This guide details the essential steps homeowners should follow for a successful installation, from area preparation to final grooming. However, it is crucial to consider the common pitfalls that can complicate what may seem like a straightforward project. Recognizing these challenges is vital for achieving a durable and visually appealing synthetic lawn.
Prepare the Installation Area
- Clear the Area: Begin by removing any existing vegetation, weeds, and debris from the installation site. Utilize a shovel or sod cutter to excavate the top 2 to 4 inches of soil, establishing a base for your synthetic grass.
- Check for drainage: Proper drainage is essential for understanding how to successfully install synthetic grass. Ensure the area is properly graded to create a slight slope away from structures, preventing water accumulation that could compromise the surface’s longevity and performance.
- Level the Surface: Employ a rake to smooth the soil, addressing any low spots with additional soil. This step is critical for achieving a uniform surface, which is essential when considering how to install synthetic grass to support both its performance and appearance.
- Compact the Soil: After leveling, compact the soil using a plate compactor or hand tamper. For best results, when considering how to compact the soil, compact in circular motions to create a stable base and minimize settling after the grass is installed.
- Install a Weed Barrier (Optional): While some homeowners consider using a weed barrier to inhibit weed growth, it is generally not recommended for synthetic grass. Instead, prioritize proper maintenance to effectively reduce weed issues.

Lay the Base for Synthetic Grass
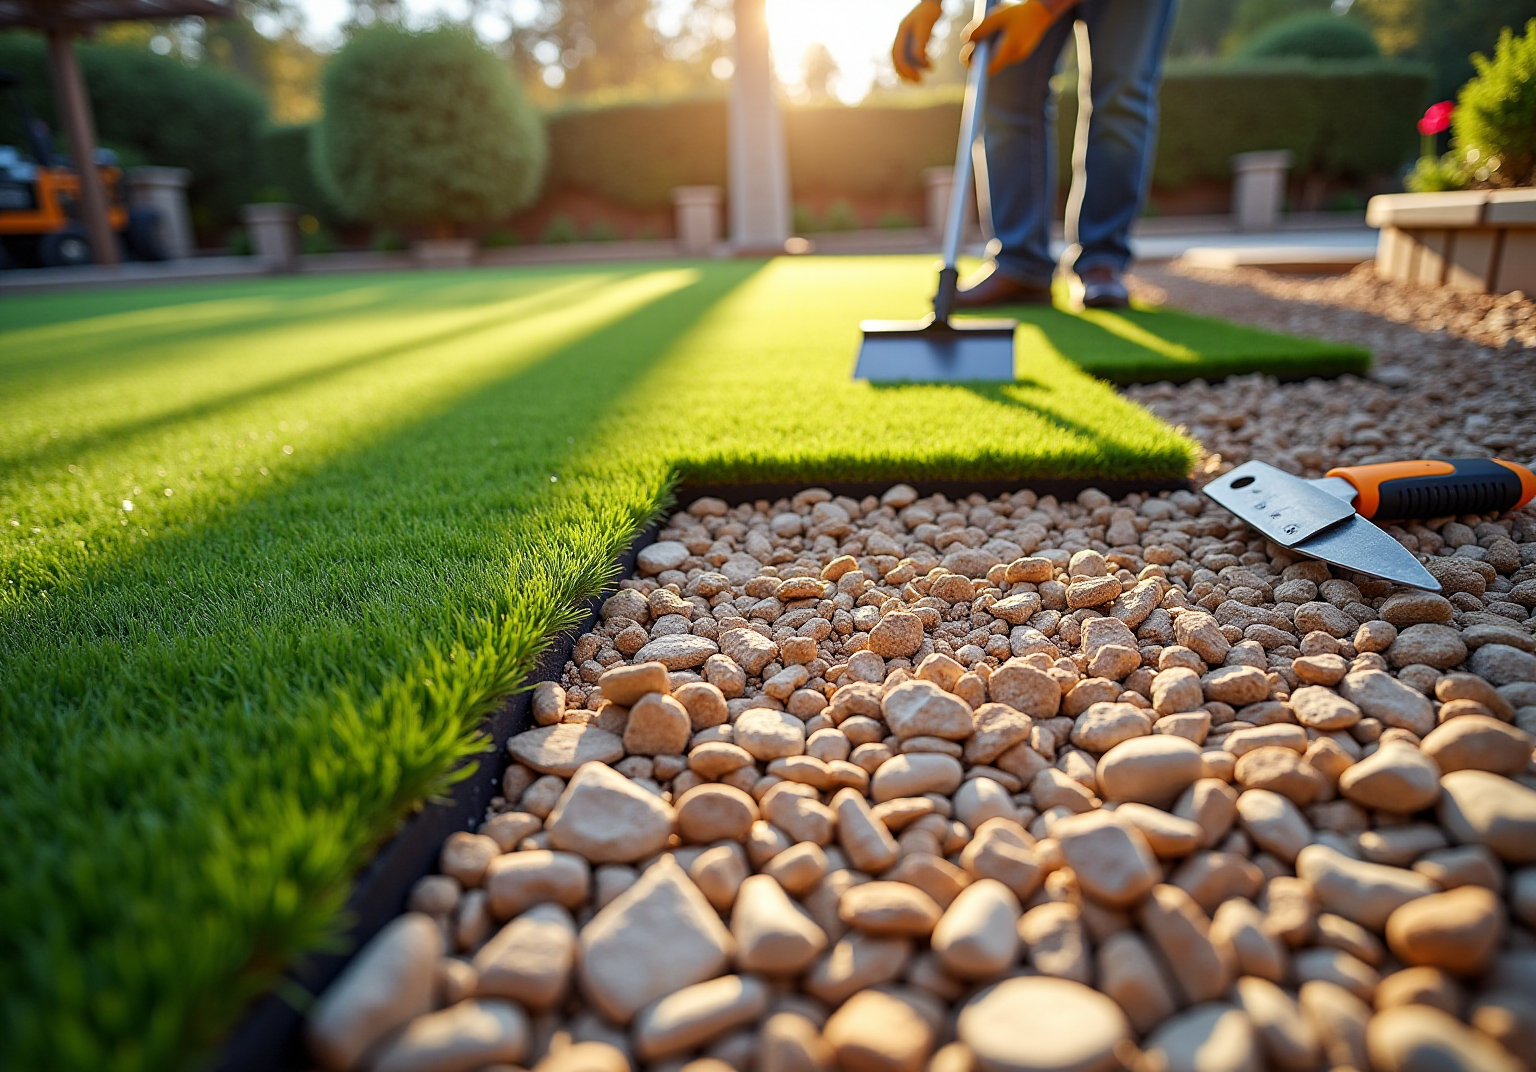
- Choose the Right Material: Select crushed stone or gravel as your base material, aiming for a depth of 3-4 inches. This depth is crucial for effective drainage and support, especially in residential yards where water accumulation can lead to issues such as mold and odors. The Association of Installers recommends a thickness of 3 inches to optimize the performance of the base.
- Spread the Base Material: Distribute the base material evenly across the installation area. Use a rake to ensure a consistent layer, which is essential for preventing uneven surfaces that can impact the durability of your synthetic turf. Additionally, maintain a slight slope of 1-2% away from buildings and structures to prevent water pooling.
- Compact the Base: After spreading the base material, compact it using a plate compactor. This step is vital for creating a solid foundation that can withstand foot traffic and weather conditions. A well-compacted base minimizes the risk of shifting grass and drainage issues, which can arise from insufficient preparation. As emphasized by US Turf, understanding how to install synthetic grass with proper techniques is one of the most important aspects of a successful installation.
- Check for Levelness: Once compacted, verify the surface for levelness. Utilize a level or a straight edge to identify any high or low spots, ensuring a smooth surface for your grass.
- Add a Cushion Layer (Optional): For enhanced cushioning and improved comfort, consider adding a thin layer of foam over the compacted base before laying the grass. This extra layer helps fill gaps and ensures that the surface remains flat and secure, which is important when learning how to install synthetic grass. Furthermore, using a high-quality permeable weed barrier can prevent unwanted vegetation while allowing water to pass through freely.

Install and Secure the Synthetic Grass
- Begin by rolling out the synthetic grass over the prepared base. Allow the grass to acclimate in direct sunlight for 1-2 hours. This step minimizes creasing and ensures a snug fit when installing.
- Cut to Fit: Always cut from the back to prevent fraying and damage to the grass blades. This practice ensures a clean edge that enhances the overall appearance.
- Secure the grass by using landscape nails, placing them every 4-6 inches along the perimeter and seams. This spacing is crucial for preventing movement and maintaining the integrity of the installation. Research indicates that using nails is generally more effective than staples for securing grass edges, as they provide a stronger hold and help smooth out wrinkles.
- Seam the Grass: If multiple sections of grass are being utilized, connect them with seaming tape and adhesive. When considering installation methods, avoid overlapping seams, which can lead to uneven surfaces and potential wear over time.
- Assess the alignment: After securing the turf, step back to assess the alignment. Before proceeding to the next steps in your installation process, make any necessary adjustments to ensure a uniform appearance, especially when considering the final look.

Finalize Installation with Grooming and Infill
- Groom the Lawn: Start by using a power broom or a stiff-bristled broom to brush the grass fibers against the grain. This technique elevates the blades, returning them to their vertical position and enhancing the overall appearance of the grass. Satisfied customers emphasize that this step is essential for achieving a professional finish, akin to the exceptional work performed by experts.
- Add Infill: Evenly distribute the infill material. Infill is crucial as it weighs down the vegetation, supports the blades, and improves drainage. Common options include silica sand, recognized for its excellent drainage properties, and rubber, which offers cushioning and shock absorption. Homeowners have found that using a combination of these materials, as recommended by professionals, significantly enhances the durability and functionality of their artificial grass.
- Compact the Infill: After applying the infill, use a compactor or broom to work it into the turf. This step is essential for ensuring that the infill settles properly, providing stability and preventing premature wear. Customers have praised Hall for their thorough approach, ensuring that every step is completed effectively.
- Final Inspection: Conduct a final review of the setup. Check for any areas that may need additional infill or adjustments to guarantee an even surface. Brock, a key member of Hall Turf, highlights the importance of this phase, ensuring that every setup adheres to high quality standards.
- Clean Up: Remove any excess materials and debris from the installation area. Having completed these steps, you have learned how to install synthetic grass, which will give you a beautiful and functional outdoor space. Ultimately, homeowners can enjoy a landscape that enhances their outdoor environment.

Conclusion
In conclusion, installing synthetic grass is a valuable investment that transforms outdoor spaces into vibrant, low-maintenance environments. By adhering to the essential steps outlined, homeowners can achieve a successful installation that not only elevates the visual appeal but also ensures long-lasting functionality.
The article highlighted the key phases of preparation, base laying, grass installation, and final grooming. From clearing the area and ensuring proper drainage to selecting suitable materials and securing the turf, each step is crucial for achieving a seamless result. Careful attention to detail, such as compacting the soil and evenly distributing infill, significantly enhances the durability and appearance of the synthetic grass.
Ultimately, the installation of synthetic grass provides numerous advantages, including reduced maintenance, water conservation, and a safe, green space for families and pets to enjoy. By embracing these practices, homeowners not only create a visually appealing lawn but also promote a sustainable approach to landscaping. With thorough preparation and meticulous execution, this project will yield a beautiful outdoor space that can be enjoyed for years to come.
Frequently Asked Questions
What is the first step in preparing the installation area for synthetic grass?
The first step is to clear the area by removing any existing vegetation, weeds, and debris. This can be done using a shovel or sod cutter to excavate the top 2 to 4 inches of soil.
Why is checking for drainage important before installing synthetic grass?
Checking for drainage is essential to ensure the area is properly graded, creating a slight slope away from structures. This prevents water accumulation that could compromise the surface’s longevity and performance.
How can I level the ground before installing synthetic grass?
You can level the ground by using a rake to address any low spots with additional soil. This step is crucial for achieving a uniform surface, which supports the performance and appearance of the synthetic grass.
What should I do after leveling the ground?
After leveling, you should compact the soil using a plate compactor or hand tamper. For best results, compact in circular motions to create a stable base and minimize settling after the grass is installed.
Is it necessary to install a weed barrier when preparing for synthetic grass?
Installing a weed barrier is optional. While some homeowners consider it to inhibit weed growth, it is generally not recommended for pet-friendly grass. Instead, focusing on proper base preparation is more effective in reducing weed issues.
List of Sources
- Prepare the Installation Area
- How to Prep the Base for Artificial Grass (https://installartificial.com/how/to-prep-the-base-for-artificial-grass)
- How To Prepare Your Home for Artificial Grass Installation: 5 Expert Tips – SGW Colorado (https://sgwcolorado.com/blog/2025/08/28/how-to-prepare-your-home-for-artificial-grass-installation-5-expert-tips)
- Artificial Turf Market Size And Share | Industry Report, 2033 (https://grandviewresearch.com/industry-analysis/artificial-turf-market)
- Lay the Base for Synthetic Grass
- cincomosqueteros.co (https://cincomosqueteros.co/choosing-the-best-artificial-grass-base-material)
- What’s the Best Base for Artificial Grass Installation? – US Turf (https://us-turf.com/uncategorized/best-base-artificial-grass-installation)
- Best Base for Artificial Turf: What Matters | US Turf (https://usturfsandiego.com/news/ideal-base-for-artificial-turf)
- How to Choose the Right Base for Artificial Grass (https://realturf.com/us/what-sub-base-is-best-for-your-artificial-grass)
- hallturf.com (https://hallturf.com/essential-base-material-for-artificial-turf-best-practices-for-homeowners)
- Install and Secure the Synthetic Grass
- Considering synthetic turf? What homeowners should know before installation – News (https://blogs.ifas.ufl.edu/news/2025/07/15/considering-synthetic-turf-what-homeowners-should-know-before-installation)
- theturfyard.com (https://theturfyard.com/the-ultimate-checklist-for-a-flawless-artificial-turf-installation)
- Ultimate Guide to Securing Artificial Turf (https://premiumgrassblades.com/the-ultimate-guide-to-securing-artificial-turf-spiral-nails-staples-and-proper-installation)
- lowes.com (https://lowes.com/n/how-to/install-artificial-grass)
- Finalize Installation with Grooming and Infill
- What is Artificial Grass Infill and Why Do You Need It? (https://themotzgroup.com/sport_blog/what-is-artificial-grass-infill-and-why-do-you-need-it)
- grizzlyoutdoor.com (https://grizzlyoutdoor.com/blog/how-important-is-infill-to-your-artificial-grass-installation)
- Artificial Turf Infill Options (Pros, Cons & Best Uses) | US Turf (https://usturfsandiego.com/news/artificial-turf-infill-options)
- capecodtimes.com (https://capecodtimes.com/press-release/story/80533/the-missing-category-in-hardware-artificial-turf-maintenance-tools-tps-introduces-ecosystem-for-synthetic-grass-care)
- 10 Benefits of Synthetic Turf Infill for Your Home – Hall Turf | Artificial Turf Installation Kansas City KS & MO (https://hallturf.com/10-benefits-of-synthetic-turf-infill-for-your-home)