
Introduction
Transforming an outdoor space with synthetic turf creates a lush, green oasis that eliminates the upkeep associated with natural grass. This guide offers homeowners a structured, step-by-step approach to ensure a successful installation, covering everything from site preparation to ongoing maintenance.
While the process presents challenges, navigating the complexities of installation is essential for achieving both durability and aesthetic appeal. This article will outline the essential tools, techniques, and tips necessary for a seamless synthetic turf experience.
Prepare the Installation Site
-
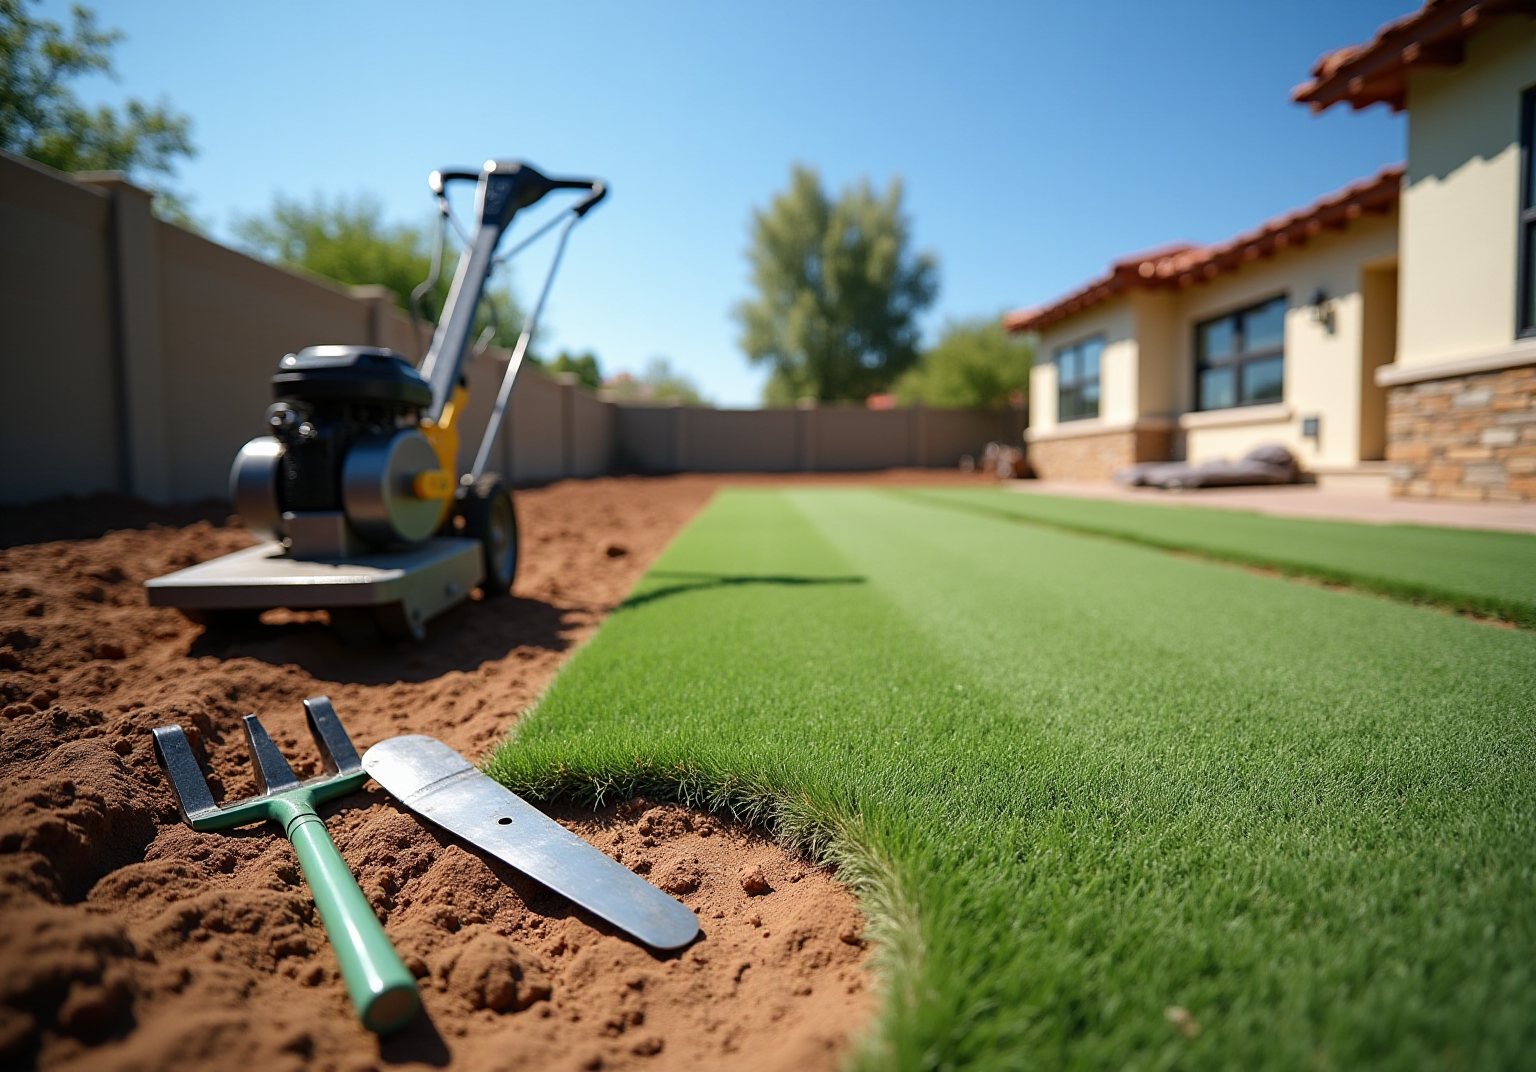
Clear the Area: Begin by removing any existing grass, weeds, and debris from the installation site. This process may require a shovel or sod cutter to eliminate the top layer of soil, typically around 3-4 inches deep. It is important to note that synthetic grass can contribute to urban heat islands, resulting in significantly warmer regions compared to those with natural vegetation. This factor should be considered in relation to your local environment. As highlighted by satisfied customers, having a professional like Brock assess your needs can lead to optimal solutions for your turf challenges.
-
Grade the Soil: Ensure that the location is level and properly graded to facilitate adequate drainage. An ideal slight slope of about 2% away from structures helps prevent water pooling. Proper grading is crucial, as the surface temperatures of artificial grass can exceed 200 degrees Fahrenheit, posing safety risks for children and pets. Customers have commended Hall Turf for their meticulous attention to detail and professionalism during this essential phase.
-
Check for Underground Utilities: Prior to digging, confirm that there are no underground utilities in the area. Contact local utility companies if necessary to avoid interruptions during the setup process. This precaution is vital for a seamless installation, as emphasized by the thorough approach taken by Hall Turf’s team.
-
Compact the Soil: Use a plate compactor to compress the soil, creating a stable foundation for the grass. This step is critical to prevent settling after installation, ensuring the longevity of your investment. Clients have expressed satisfaction with Hall Turf’s commitment to providing a solid foundation for their landscaping projects.
-
Install a Weed Barrier: Lay down a weed barrier fabric to prevent weeds from growing through the grass. This measure will help maintain the appearance and integrity of the installation over time. Additionally, consider the ecological impact of artificial grass; recent advancements, such as PFAS-free synthetic grass, may offer safer alternatives for your setup. Homeowners have noted that Hall’s dedication to quality and innovation positions them as a reliable choice for synthetic grass solutions.

Gather Tools and Materials
Assembling the appropriate tools and materials is crucial for a successful synthetic turf install. Here’s what you’ll need:
-
Tools Needed:
- Turf Cutter or Shovel: Essential for removing existing grass.
- Plate Compactor: This tool compacts the soil, ensuring a stable foundation that prevents future settling issues and drainage problems.
- Rake: Used for leveling the base material, which is vital to prevent wrinkles and extend the lifespan of the synthetic surface.
- Utility Knife: Necessary for cutting the grass to size, ensuring clean edges for a professional finish.
- Hammer or Mallet: To secure the grass with nails.
- Measuring Tape: For accurate measurements of the area.
- Wheelbarrow: For transporting materials.
- Power Sweep: A battery-operated broom designed for maintaining synthetic grass surfaces, helping to keep the lawn clean and functional.
-
Materials Required:
- Synthetic Turf: Select the appropriate type based on your needs (e.g., pet-friendly, playground, etc.). Modern synthetic grass systems are designed to be environmentally stable and safe for groundwater. Hall Grass offers a variety of options tailored to specific requirements, ensuring quality and safety.
- Base Material: Crushed stone or decomposed granite serves as the sub-base, providing proper drainage and support.
- Weed Barrier Fabric: This material prevents weed growth.
- Grass Nails: Used for securing the grass in place.
- Seaming Tape and Adhesive: For joining pieces of turf together, ensuring a seamless appearance.
-
Safety Equipment: It is important to use gloves, safety glasses, and knee pads to protect yourself during the installation process. Customers have praised the professionalism and attention to detail of Hall’s team, which helps ensure that your installation is not only successful but also safe and efficient.

Install the Synthetic Turf
-
For the synthetic turf install, start by rolling out the synthetic grass over the prepared area, ensuring it fits snugly against edges and corners. Allow the grass to acclimate for several hours to minimize curling and ensure a better fit.
-
Cut to Fit: Use a utility knife to trim the edges of the grass for a precise fit. To achieve a clean edge essential for a professional appearance, always cut from the back of the grass during a synthetic turf install.
-
Fasten the Grass: Secure the edges with grass nails placed every 6 to 12 inches around the perimeter. During the synthetic turf install, ensure that the nails are flush with the ground surface to prevent any tripping hazards, as emphasized by installation specialists.
-
Seam the Turf: When working with multiple pieces, align the seams carefully. During the synthetic turf install, apply seaming tape and adhesive according to the manufacturer’s guidelines, pressing the seams together firmly to create a seamless look.
-
Add Infill: Depending on the grass type, incorporating infill material such as sand or rubber granules may be necessary to stabilize the surface and keep the blades upright. Distribute the infill uniformly over the surface and use a broom to integrate it into the grass fibers, improving both aesthetics and performance.

Finalize and Maintain Your Turf
-
Final Grooming: After setup, utilize a power broom or a stiff-bristled broom to lift the fibers and evenly distribute the infill. This step is essential for achieving a natural look and feel, as it helps maintain the upright position of the grass blades. Brush the grass in various directions to ensure an even appearance.
-
Inspect for Issues: Regularly inspect for loose seams or areas where the grass may not be securely fastened. Promptly addressing these issues can prevent further complications, thereby ensuring the longevity and integrity of your installation.
-
Regular Maintenance: Maintain your grass in optimal condition by routinely removing debris, leaves, and dirt. Washing the turf with water helps eliminate dust and allergens, particularly in areas with heavy foot traffic, contributing to a cleaner and healthier environment.
-
Address Stains Promptly: For spills or stains, clean the affected area with a mild soap solution and rinse thoroughly. For tougher stains, such as grease or oil, a mixture of vinegar and water can be effective. When dealing with pet waste, promptly remove solid waste and rinse the area with water to uphold hygiene and prevent odors.
-
Annual Deep Cleaning: Schedule an annual deep cleaning with a professional service to maintain the turf’s appearance and performance. This comprehensive maintenance may include brushing, rinsing, and replenishing infill, ensuring your synthetic grass remains vibrant and functional for years to come.

Conclusion
Successfully installing synthetic turf requires careful planning and execution, ensuring a beautiful and durable landscape for years to come. By following the outlined steps – from site preparation to maintenance – the installation process can be simplified, resulting in a professional finish that enhances any outdoor space.
Key insights highlight the importance of thorough site preparation, which includes:
- Clearing the area
- Grading the soil
- Ensuring proper drainage
Gathering the right tools and materials is essential for a smooth installation. Moreover, meticulous attention to detail during the turf laying and fastening processes guarantees a seamless appearance. Regular maintenance, such as grooming and cleaning, will keep the turf looking pristine and extend its lifespan.
Ultimately, investing time and effort into the installation and upkeep of synthetic turf not only enhances the aesthetic appeal of a property but also contributes to a sustainable environment. Embracing these practices can lead to a successful synthetic turf experience, making outdoor spaces more enjoyable for everyone.
Frequently Asked Questions
What is the first step in preparing the installation site for synthetic grass?
The first step is to clear the area by removing any existing grass, weeds, and debris. This may require a shovel or sod cutter to eliminate the top layer of soil, typically around 3-4 inches deep.
Why is it important to consider the urban heat island effect when installing synthetic grass?
Synthetic grass can contribute to urban heat islands, resulting in significantly warmer regions compared to areas with natural vegetation. This factor should be considered in relation to your local environment.
How should the soil be graded before installing synthetic grass?
The soil should be level and properly graded to facilitate adequate drainage, ideally with a slight slope of about 2% away from structures to prevent water pooling.
What safety risks are associated with improper grading of synthetic grass?
Improper grading can lead to surface temperatures of artificial grass exceeding 200 degrees Fahrenheit, posing safety risks for children and pets.
What should be checked before digging the installation site?
It is essential to check for underground utilities in the area. Contact local utility companies if necessary to avoid interruptions during the setup process.
Why is it important to compact the soil before installing synthetic grass?
Compacting the soil creates a stable foundation for the grass and prevents settling after installation, ensuring the longevity of the investment.
What is the purpose of installing a weed barrier under synthetic grass?
A weed barrier fabric is laid down to prevent weeds from growing through the grass, helping to maintain the appearance and integrity of the installation over time.
What recent advancements should homeowners consider when choosing synthetic grass?
Homeowners should consider advancements such as PFAS-free synthetic grass, which may offer safer alternatives for their setup.