
Introduction
Many homeowners feel overwhelmed by the complexities of transforming their yards into pet-friendly spaces with artificial turf. This guide offers a step-by-step approach to ensure a successful installation, from assessing unique yard characteristics to implementing an effective drainage plan. This guide will provide clarity and direction for homeowners seeking to achieve the best results.
Assess Your Yard’s Unique Characteristics
Understanding the foundational aspects of your lawn installation is crucial for ensuring a successful outcome.
- Evaluate Soil Type: Begin by determining whether your soil is sandy, clayey, or loamy. Sandy soils drain well but might need extra support for stability. In contrast, clay soils hold moisture and often require better drainage solutions to avoid water buildup. Homeowners should also consult local authorities to navigate regulations and secure the necessary permits for their artificial pet turf installation, as compliance with new subgrade regulations is essential in Kansas City. You can trust Hall Turf to help you navigate local regulations and ensure your installation meets all standards.
- Check for Existing Vegetation: Identify any existing grass, weeds, or plants that need to be removed. This step is crucial for planning the excavation and preparation processes effectively.
- Observe Drainage Patterns: Pay attention to areas where water tends to pool or drain poorly. Understanding these patterns will guide your drainage strategy and assist in minimizing future problems with water buildup beneath the grass. Ignoring drainage patterns can lead to costly water damage and maintenance issues in the future.
- Measure the Area: Accurately measure the dimensions of the installation site to calculate the amount of grass needed. Be mindful of any irregular shapes or obstacles that could affect the layout.
- Consider Sunlight Exposure: Assess how much sunlight the area receives throughout the day. This factor can significantly influence your selection of grass, as some varieties thrive in full sun while others are better suited for shaded environments. By opting for synthetic grass, homeowners can save around 99,000 gallons of water each year for an average lawn of 1,800 square feet, highlighting its sustainability.
- Plan for Maintenance: Understanding effective maintenance strategies is essential for keeping your synthetic turf in optimal condition. Regular cleaning, brushing, and inspections for signs of wear will help prolong the lifespan of your setup.
As highlighted by pleased clients such as Scott Sachse, who commended the company for their outstanding setup of a putting green, the professionalism and attention to detail demonstrated by the team can greatly improve your project experience. Likewise, Dick Bryant emphasized how Hall’s product offered the best answer for his grass requirements, demonstrating their dedication to customer contentment and high-quality service. With more than 300 playground setups and a client base of over 80,000 pleased customers globally, Hall Turf is well-prepared to manage your needs for artificial pet turf installation. Choosing the right approach can save you time, money, and frustration in the long run.

Develop a Comprehensive Drainage Plan
- Identify Drainage Needs: Assessing your yard’s drainage needs is crucial for maintaining a healthy landscape. Begin by pinpointing areas prone to water accumulation, focusing on low spots and regions where water tends to pool after heavy rains. Evaluating soil conditions is crucial; clay soils often need additional drainage solutions, such as French drains.
- Choose Drainage Solutions: Consider effective options such as French drains, perforated pipes, or gravel trenches. Select a method that aligns with your yard’s layout and soil conditions to ensure optimal performance. Hiring a professional drainage service ensures expert planning and execution, which is vital for effective drainage.
- Plan for Slope: Establish a slight slope (1-2%) in the installation area to facilitate water runoff. This can be accomplished by grading the soil prior to placing the grass, ensuring that water drains away from the grass and any structures.
- Install Drainage Materials: For a French drain, excavate a trench and install a perforated pipe surrounded by gravel. If focusing on surface drainage, create channels that direct water away from the turf area, enhancing overall drainage efficiency. Additionally, ensure a 3-4 inch stone base is established to provide effective drainage and prevent future issues.
- Test the Drainage System: After setup, conduct a water test by pouring water in different areas to confirm efficient drainage. Make necessary adjustments to the drainage plan to address any pooling issues, ensuring a reliable and functional system. Neglecting drainage needs can result in unpleasant odors, sinking spots, and damage to landscaping materials. A well-planned drainage system not only prevents damage but also enhances the longevity of your yard.

Prepare the Site for Turf Installation
Proper preparation is crucial for a successful artificial pet turf installation, which begins with the removal of existing grass and debris. Begin by using a shovel or sod cutter to eliminate all existing grass, weeds, and debris from the installation area. This essential step prevents organic matter from breaking down beneath the grass, which can lead to costly repairs and dissatisfaction with the final result. Kathy Leavell, the company’s founder, emphasizes that clearing debris and leveling the earth prevents future bumps and uneven areas. Clients such as Dick Bryant have commended Hall’s Lawn for their comprehensive method, stating, “When I needed a solution for my grass issue, Brock came by, evaluated my needs, and provided the perfect recommendation.” I followed his advice, and the recommendation was perfect! Hall Turf is a licensed contractor with extensive experience, having completed over 300 playground setups and serving more than 80,000 satisfied customers globally.
Next, excavate the area by digging out 3 to 4 inches of soil to create a level base. This excavation depth is crucial for proper drainage and offers sufficient space for the base materials, guaranteeing a stable foundation for the grass. Research shows that proper drainage is essential for the durability of artificial pet turf installations.
After excavation, utilize a plate compactor to compact the soil thoroughly. This process is vital for establishing a solid foundation, helping to prevent settling and maintaining an even surface over time. Scott Sachse, another satisfied customer, noted, “Brock was professional, timely, and responsive. The crew was not only skilled but also polite and courteous. It was an excellent experience!” Hall Turf’s commitment to quality is reflected in their adherence to product certifications and technical standards.
Then, spread a layer of crushed stone or gravel, approximately 2 to 4 inches thick, over the excavated area. This base layer enhances drainage and provides a robust support structure for the turf.
Finally, rake the base material to achieve a smooth, even surface. Use a level to identify any low areas that may require extra material, ensuring a perfect setup that enhances the overall appearance and functionality of your outdoor space. Les Boatright, another Hall client, expressed satisfaction with the process, stating, “Overall, I am extremely happy with the end product and Brock’s ability to get the job done, on time and on budget.” The average setup expense for a 500-square-foot lawn is generally about $6,365, which homeowners should take into account when planning for their synthetic grass setup. Investing in these foundational steps ensures a long-lasting and visually appealing outdoor space that meets homeowner expectations with artificial pet turf installation.

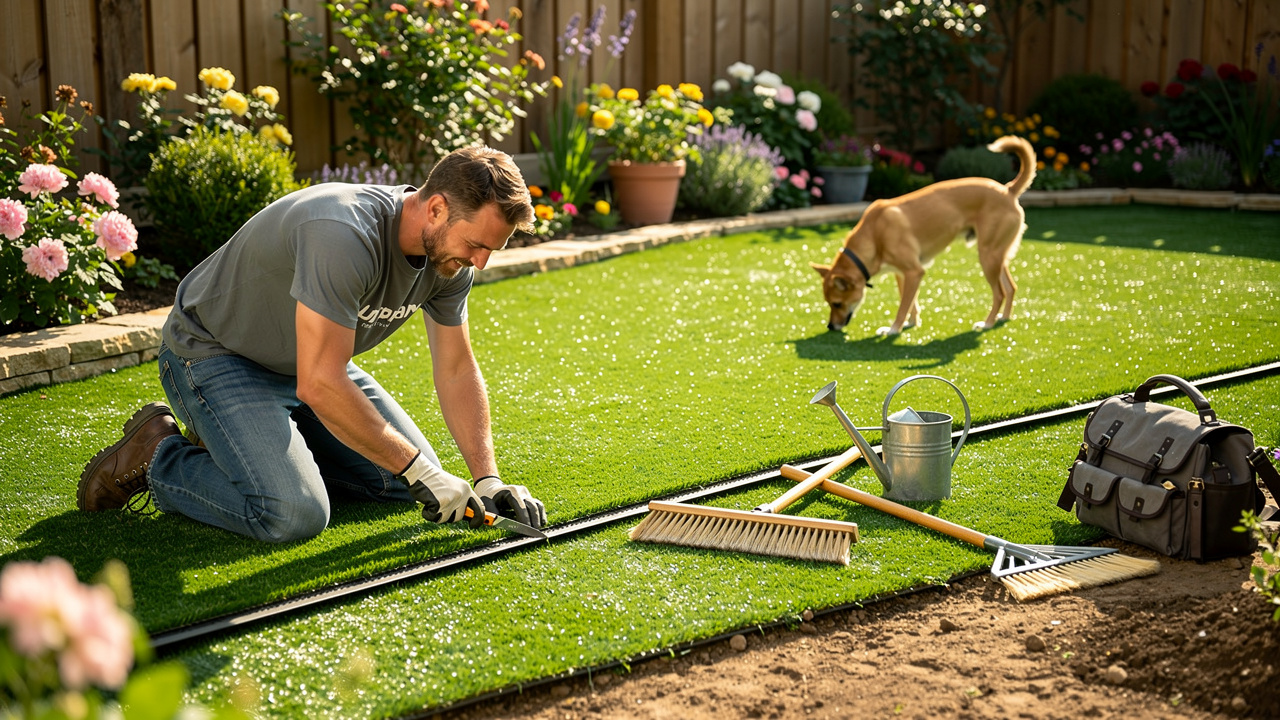
Install and Secure the Artificial Turf
To achieve a flawless artificial pet turf installation, it is paramount to pay attention to detail. Begin by rolling out the synthetic grass over the prepared base, ensuring that the grass is oriented in the same direction to maintain a consistent appearance across the installation.
Next, utilize a utility knife to trim the edges of the grass, ensuring clean cuts to prevent fraying. Without precise measurements, you risk gaps or overlaps that can compromise the installation’s integrity.
To maintain the grass in position, use 4-6 inch galvanized steel nails or staples around the perimeter. Space the nails approximately every 12 inches for optimal stability, particularly in high-traffic areas where durability is essential.
If your project involves multiple pieces of grass, employ seam tape and adhesive to join the edges. Ensure that seams are tight and aligned to achieve a seamless appearance, which is vital for both aesthetics and functionality.
Depending on the grass type, incorporating infill material such as sand or rubber is essential to assist the blades in standing upright and offering cushioning. For residential lawns, a typical recommendation is to apply 1-2 pounds of infill per square foot. Distribute the infill uniformly over the surface and utilize a broom to work it in, making sure it permeates the grass fibers effectively. This step enhances the appearance and helps the grass last longer by keeping its structure intact. Additionally, it is advisable to order around 10% more infill than calculated to accommodate settling or miscalculations.
Clients like Scott Sachse have praised the professionalism and quality of the setup, highlighting the importance of attention to detail. Dick Bryant also emphasized how Hall’s Grass offered the best solution for his lawn requirements, demonstrating the company’s dedication to customer satisfaction. With more than 300 playground setups and a clientele of over 80,000 pleased customers globally, Hall’s authorized contractor status and partnership with architects guarantee adherence and technical precision in every project. Ultimately, the quality of your artificial pet turf installation can significantly affect its performance and longevity, making every step of the process crucial.

Finalize Installation and Maintain Your Turf
Regular inspections of synthetic grass are crucial to ensure its longevity and safety for pets and children. Following setup, it’s important to verify that all seams are secure and that there are no visible gaps or creases in the grass. Regular inspections help identify any signs of wear or damage early, allowing for prompt repairs to prevent further deterioration and ensure a safe environment for pets and children. Dick Bryant needed a solution for his lawn issue, and Hall Turf‘s Brock assessed his needs and provided the best suggestion, showcasing the company’s commitment to quality.
It’s important to lightly water the grass after installation. This helps settle the infill, reduces potential odors from pet waste, and keeps the turf cool during hot days. During dry periods, a quick rinse with a garden hose can enhance the overall appearance of the grass and maintain its freshness. Scott Sachse expressed his appreciation for the outstanding work the company did in installing a putting green at his new residence, emphasizing the professionalism and responsiveness of the team.
To maintain a pristine look, regularly remove organic debris using a broom or blower. For pet owners, promptly picking up solid waste and rinsing the area with water is vital to prevent odors and maintain hygiene. Consider using enzyme-based cleaners for effective odor management, especially in pet zones. Les Boatright appreciated Brock’s detail-oriented approach and commitment to getting the job done on time and on budget, which highlights Hall Turf’s focus on meeting customer needs effectively.
Periodically brushing the grass with a stiff broom helps keep the blades upright and maintains a natural appearance. This practice is particularly important in high-traffic areas where the fibers may become flattened. Regularly examine the grass for any signs of wear or damage. Addressing any issues promptly can prevent further deterioration and ensure a safe environment for pets and children. The lifespan of synthetic grass typically ranges from 15 to 25 years in residential environments, depending on usage and maintenance practices. Keeping an eye on the turf’s condition will extend its lifespan.

Conclusion
Achieving a successful artificial pet turf installation in Kansas hinges on meticulous planning and execution. By understanding the unique characteristics of your yard, from soil type to drainage patterns, homeowners can lay the groundwork for a durable and visually appealing landscape. Each step in the preparation, installation, and maintenance process plays a vital role in achieving a long-lasting outdoor space that meets both aesthetic and functional needs.
Throughout the article, key strategies were highlighted, including:
- Assessing soil conditions
- Developing a comprehensive drainage plan
- Ensuring proper site preparation before the turf is laid
The importance of meticulous installation techniques, such as securing seams and using infill, cannot be overstated. With Hall Turf’s expertise, homeowners can ensure compliance with local regulations while achieving high-quality results.
Taking the time to carefully install artificial turf not only beautifies your yard but also supports sustainability and lowers water usage. With Hall Turf’s proven track record of over 80,000 satisfied customers and a commitment to excellence, homeowners can feel confident in their choice of artificial pet turf. Transform your outdoor space into a low-maintenance area that pets and families will enjoy for years. For further inquiries or to begin your installation journey, contact Hall Turf at (816) 555-7890 or via email at info@hallturf.com.
Frequently Asked Questions
What should I evaluate before installing artificial turf in my yard?
Before installing artificial turf, you should evaluate your soil type (sandy, clayey, or loamy), check for existing vegetation that needs removal, observe drainage patterns, measure the installation area, and consider sunlight exposure.
Why is it important to assess soil type?
Assessing soil type is crucial because sandy soils drain well but may need additional support, while clay soils hold moisture and often require better drainage solutions to avoid water buildup.
How can I identify drainage needs in my yard?
To identify drainage needs, look for areas prone to water accumulation, especially low spots where water tends to pool after heavy rains, and evaluate the soil conditions to determine if additional drainage solutions are necessary.
What drainage solutions can I consider for my yard?
Effective drainage solutions include French drains, perforated pipes, or gravel trenches. The choice should align with your yard’s layout and soil conditions for optimal performance.
How should I plan the slope for drainage?
Establish a slight slope (1-2%) in the installation area to facilitate water runoff, ensuring that water drains away from the grass and any structures.
What maintenance is required for synthetic turf?
Regular maintenance includes cleaning, brushing, and inspecting for signs of wear to keep the synthetic turf in optimal condition.
How can I measure the area for artificial turf installation?
Accurately measure the dimensions of the installation site, taking into account any irregular shapes or obstacles that could affect the layout.
How does sunlight exposure affect grass selection?
Sunlight exposure influences grass selection, as some varieties thrive in full sun while others are better suited for shaded environments. This is important for ensuring healthy growth.
What should I do after installing drainage materials?
After installing drainage materials, conduct a water test by pouring water in different areas to confirm efficient drainage and make necessary adjustments to address any pooling issues.
Who can assist with navigating local regulations for turf installation in Kansas City?
Hall Turf can help navigate local regulations and ensure your installation meets all standards, including compliance with new subgrade regulations in Kansas City.
List of Sources
- Assess Your Yard’s Unique Characteristics
- Essential Synthetic Turf Details for Homeowners in Kansas City – Hall Turf | Artificial Turf Installation Kansas City KS & MO (https://hallturf.com/essential-synthetic-turf-details-for-homeowners-in-kansas-city)
- Soil Survey Geographic Database (https://coast.noaa.gov/digitalcoast/data/ssurgo.html)
- The Growing Popularity of Synthetic Turf (https://marshalrenee.com/blog/the-growing-popularity-of-synthetic-turf)
- Synthetic Turf News | News & Blog | Synthetic Turf International (https://synthetic-turf.com/news-blog)
- Develop a Comprehensive Drainage Plan
- Top 9 Yard Drainage Solutions for Kansas City Homes – High Flow Drainage Solutions (https://highflowdrainagesolutions.com/yard-drainage-solutions)
- What is Artificial Turf Drainage & Why is It Important? | SGW Houston (https://sgwtexas.com/houston/resources/technology/drainage)
- How To Install Proper Drainage Under Artificial Grass For Long-Lasting Results (https://turftekusa.com/blog/how-to-install-proper-drainage-under-artificial-grass-for-long-lasting-results)
- Artificial Grass Drainage: Bases, Slope & Perforations (https://litagrass.com/blogs/lita-artificial-grass-blog/artificial-grass-drainage-bases-slope-perforations?srsltid=AfmBOopmV4TvW4O6CCT8nkyQFGZueUuhp-fvnXKdv3bwegldQdDxfggT)
- Synthetic Turf, Drainage & Flooding | Ask JW | Synthetic Grass Warehouse (https://syntheticgrasswarehouse.com/company/ask-an-expert/ask-jw/synthetic-turf-drainage-flooding)
- Prepare the Site for Turf Installation
- Artificial Turf Versus Natural Grass: A Case Study of Environmental Effects, Health Risks, Safety, and Cost (https://mdpi.com/2071-1050/17/14/6292)
- Understanding the Artificial Turf Installation Process (https://integriturf.com/glossary/understanding-the-artificial-turf-installation-process)
- How Much Is Artificial Turf Installed? Key Cost Insights for Homeowners – Hall Turf | Artificial Turf Installation Kansas City KS & MO (https://hallturf.com/how-much-is-artificial-turf-installed-key-cost-insights-for-homeowners)
- 4 Best Practices for Artificial Grass Outdoor Installation Now (https://californiaturfco.com/4-best-practices-for-artificial-grass-outdoor-installation-now)
- Synthetic Turf Council Technical Guidelines (https://syntheticturfcouncil.org/page/guidelines)
- Install and Secure the Artificial Turf
- Artificial Grass, Market Trends, Business Insights, and Analysis (https://installartificial.com/how/artificial-grass-business-insights-market-trends)
- How Much Infill for Artificial Grass: A Homeowner’s Guide – Hall Turf | Artificial Turf Installation Kansas City KS & MO (https://hallturf.com/how-much-infill-for-artificial-grass-a-homeowners-guide)
- Infill’s Impact on Artificial Grass Performance & Longevity (https://artificialturfexpress.com/blog/artificial-grass-infill-performance-longevity)
- Cost of Artificial Grass | Synthetic Grass Warehouse (https://syntheticgrasswarehouse.com/resources/maintenance-care/artificial-grass-cost)
- Finalize Installation and Maintain Your Turf
- Artificial Grass Maintenance Tips | Synthetic Turf of Puget Sound (https://syntheticturfofpugetsound.com/synthetic-turf-care-and-maintenance-tips)
- Artificial Turf Maintenance Tips – Page 2 – Hall Turf | Artificial Turf Installation Kansas City KS & MO (https://hallturf.com/category/artificial-turf-maintenance-tips/page/2)
- How to Care for Artificial Turf | US Turf (https://usturfsandiego.com/news/how-to-care-for-turf)
- Tips for Artificial Grass Maintenance [Extend Longevity] (https://groundsguys.com/blog/artificial-grass-maintenance-tips)
- How To Maintain & Care For Your Synthetic Grass | SGW (https://syntheticgrasswarehouse.com/resources/maintenance-care)