
Introduction
A raised putting green can transform an ordinary backyard into a golfer’s paradise, providing both aesthetic appeal and practical benefits. This guide offers homeowners a comprehensive, step-by-step approach to installation, covering every phase-from site preparation to maintenance. The challenge, however, lies in navigating the complexities of installation and upkeep. How can one ensure that their green not only looks great but also performs well over time?
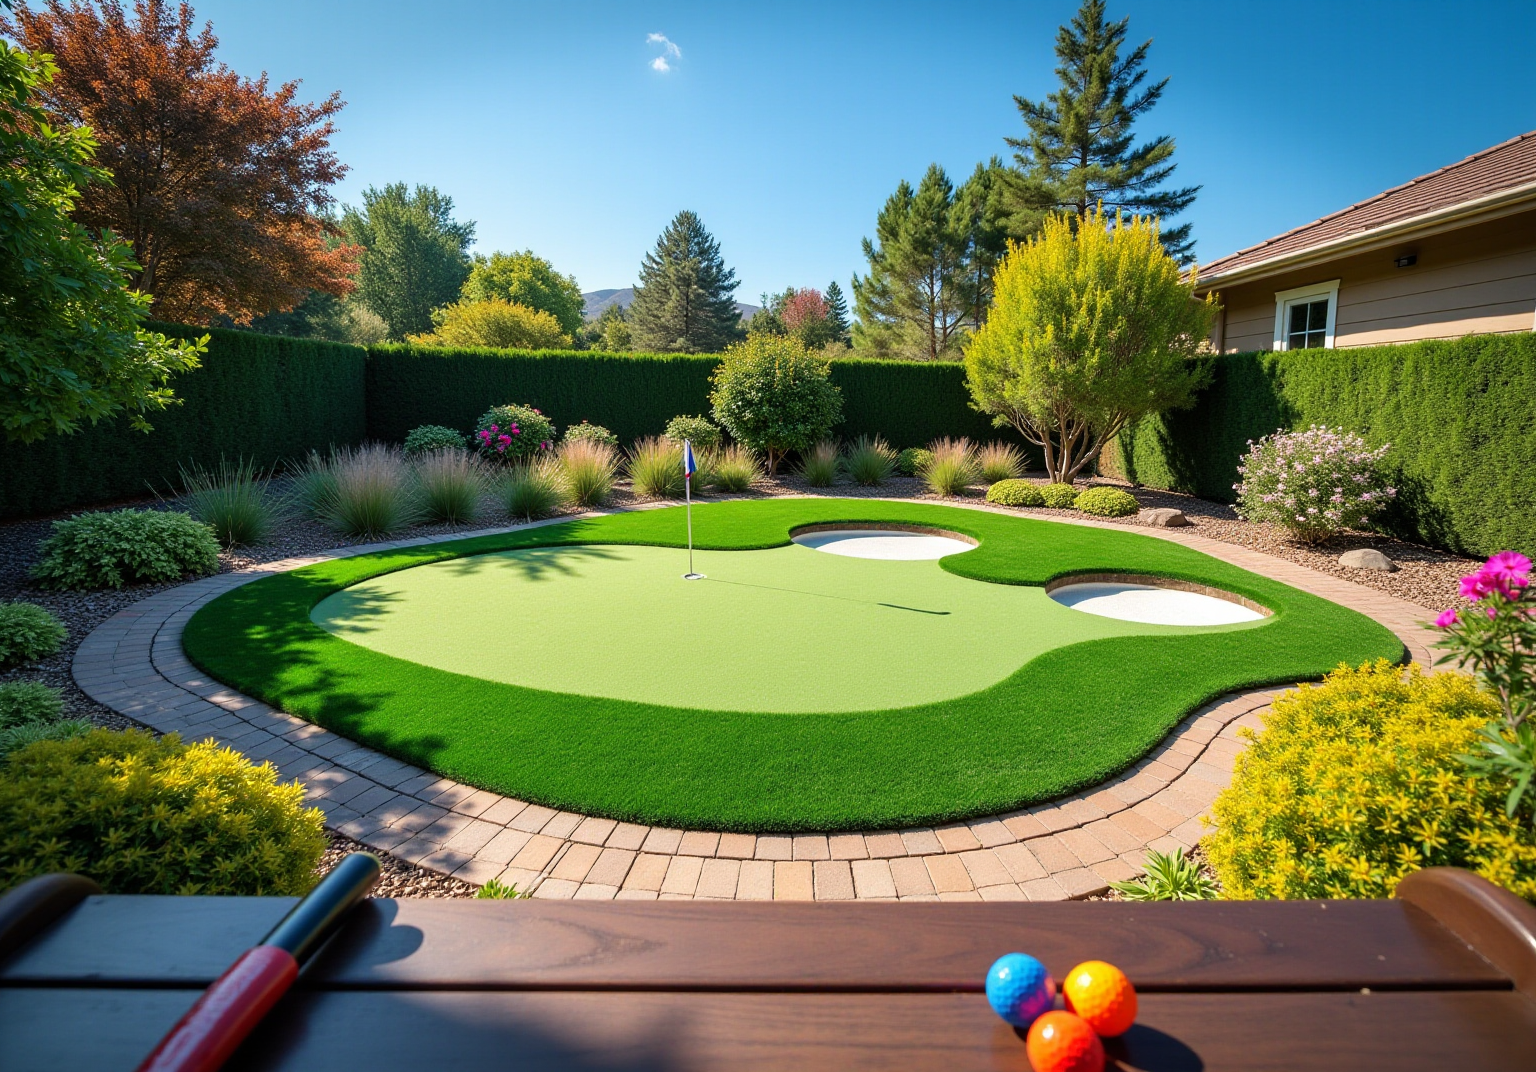
Understand the Basics of Raised Putting Greens
A raised putting green elevates the turf surface above the surrounding terrain, providing several advantages that enhance both functionality and aesthetics. Key benefits include:
- Improved Drainage: Elevating the green significantly minimizes the risk of water pooling, ensuring a playable surface even after heavy rainfall. Industry statistics indicate that proper drainage is vital for maintaining optimal conditions and preventing disruptions in playability.
- A raised putting green serves as a striking focal point in your yard, enhancing the overall visual attractiveness of your landscape. Its elevation allows for creative landscaping designs that complement existing features, making your outdoor space more inviting. As one satisfied customer remarked, “The installation transformed my yard into a beautiful recreational area.”
- Customization: Homeowners can customize their practice area to fit their specific yard layout and personal preferences. This customization ensures that the green integrates seamlessly with other outdoor elements, creating a tailored recreational space that includes a raised putting green. A homeowner noted, “Brock assisted me in designing a putting area that perfectly suits my yard and style.”
Before installation, consider the following factors:
- Space Requirements: Ensure adequate space for the green and any surrounding features, allowing for both functionality and accessibility.
- Soil Type: The underlying soil must support proper drainage and stability for the turf, which is essential for the longevity of the lawn.
- Maintenance Needs: Be aware that elevated surfaces may require different upkeep practices compared to conventional flat areas, including adjustments in watering and care routines to maintain optimal conditions.
As specialists in the area indicate, “Proper installation of a raised putting green is essential to prevent problems such as wrinkling and inadequate drainage.” Professional services, such as those provided by Hall Lawn, ensure quality and longevity. This underscores the importance of engaging with professionals like Brock, who has been recognized for his professionalism and attention to detail, to achieve the best results.

Prepare Your Site and Gather Necessary Tools
To prepare for your raised putting green, follow these essential steps:
-
Select the Location: Choose a flat area that receives ample sunlight and is free from large trees that could cast shade. Proper sunlight exposure is crucial for maintaining healthy turf, as shaded areas can hinder growth and affect playability. Eric Fullerton emphasizes, “Selecting a location in your yard with good sunlight is essential for grass growth.”
-
Clear the Area: Remove any existing grass, plants, or debris from the selected site to create a clean surface.
-
Gather Tools: Ensure you have the following tools ready for installation:
- Shovel
- Rake
- Level
- Tape measure
- Landscape fabric
- Turf cutter or utility knife
- Compactor or tamper
- Stakes and string for layout
-
Mark the Area: Use stakes and string to outline the dimensions of your putting space, ensuring it fits well within your yard’s layout and complements existing landscaping.
-
Check Drainage: Assess the drainage conditions to ensure water will flow away from the green. Proper drainage is vital to prevent pooling and maintain the integrity of the turf. Industry standards recommend a minimum slope of 1-2% for effective drainage.
With Brock’s expertise, you can be assured of a project that incorporates a raised putting green to meet your needs. Satisfied customers like Dick Bryant and Scott Sachse have experienced this firsthand. Brock’s attention to detail and commitment to customer satisfaction ensure that your project will be completed on time and within budget.

Follow the Step-by-Step Installation Process
To successfully install your raised putting green, follow these steps:
- Preparation: Start by digging out the marked area to a depth of 4 to 6 inches. Ensure the base is level to promote drainage and stability. A well-prepared base is essential for effective drainage and support for the grass.
- Drainage: If necessary, add drainage pipes or a gravel layer to facilitate water flow away from the green. This prevents water accumulation that could harm the grass. Proper drainage is crucial to avoid future issues.
- Create a Base: Fill the excavated area with a mixture of crushed stone and sand, compacting it thoroughly to establish a stable base. This base should be at least 4 inches deep to effectively support the grass, ensuring longevity.
- Weed Barrier: Position landscape fabric over the base to inhibit weed growth, ensuring a clean and low-maintenance surface.
- Install the Surface: Roll out the turf over the prepared base, ensuring it fits snugly without any wrinkles or gaps that could affect playability. Attention to detail during this step is essential for achieving a quality surface on the green.
- Secure the Edges: Use landscape staples or adhesive to firmly fasten the borders of the grass to the base, preventing lifting or fraying over time.
- Cup Placement: Mark and cut holes for the putting cups, ensuring they are set at the correct depth to maintain a realistic putting experience. Proper placement of the cups is vital for an authentic feel.
- Add Infill: If necessary, incorporate infill material into the grass to enhance its performance and stability, ensuring the surface remains resilient and functional.
- Final Touches: Brush the turf to stand the fibers upright, creating a smooth and even playing surface that mimics the feel of a professional lawn. Clients have commended Hall Turf for their professionalism and the quality of their installations, ensuring that your lawn area will enhance your backyard and provide a lasting, pleasant space for practice.

Maintain Your Raised Putting Green for Longevity
To maintain your raised putting green in optimal condition, follow these guidelines:
- Regular Brushing: Use a stiff-bristled broom to brush the grass fibers every couple of weeks. This practice keeps the fibers upright, ensuring a smooth roll and preventing matting, which is crucial for performance. Clients have noted that regular maintenance improves playability.
- Debris Removal: Regularly clear leaves, twigs, and other debris from the surface. Weekly removal is vital to prevent mold and weed growth, ensuring a clean and functional playing area. Homeowners have found that consistent cleaning enhances their experience.
- Check for Damage: Inspect the turf regularly for signs of wear or damage. Addressing any issues promptly helps prevent further deterioration and extends the lifespan of your raised putting green. Customers have praised Hall for their durable products that withstand the test of time.
- Watering: Depending on the climate, lightly mist the grass to keep it cool and maintain its vibrant appearance, especially during hot weather. This simple step can enhance the overall look and feel of your green, as highlighted by users who appreciate the lushness.
- Infill Maintenance: Periodically check and replenish infill materials to ensure the surface remains stable and performs well. Proper infill management is critical for playability, a feature that many Hall Turf customers have found enhances their playing experience.
- Seasonal Care: Adjust your maintenance practices according to seasonal changes. For instance, increase brushing frequency in the spring and fall to accommodate varying weather conditions and usage patterns. Additionally, performing a deep clean at least two to three times a year is essential to maintain the turf’s condition and performance.
By adhering to these guidelines, you can ensure that your raised putting green remains in excellent condition, providing a beautiful and functional area for years to come. Homeowners have reported that proper maintenance not only preserves the aesthetics of their lawns but also enhances overall performance, making it a worthwhile investment, ensuring that every putting green installation is a source of pride and enjoyment.

Conclusion
Creating a raised putting green in your backyard enhances not only your golfing experience but also the aesthetics and functionality of your outdoor space. Understanding the advantages of raised putting greens – such as improved drainage, visual appeal, and customization options – allows homeowners to transform their yards into beautiful recreational areas tailored to their preferences.
The installation process involves key steps, including:
- Site preparation
- Proper drainage
- Careful laying of synthetic grass
All critical for achieving a successful outcome. Each phase, from selecting the right location to maintaining the green, ensures that the putting surface remains both playable and visually stunning. Regular maintenance practices, such as:
- Brushing
- Debris removal
- Seasonal care
Are essential for preserving the quality and longevity of the green.
Ultimately, investing time and effort into installing and maintaining a raised putting green not only enhances your golfing practice but also adds significant value to your home. With the right approach and professional guidance, like that offered by Hall Turf, homeowners can enjoy a beautiful and functional putting green that serves as a source of pride and enjoyment for years to come. Embrace the opportunity to create a personal oasis that combines leisure and beauty in your own backyard.
Frequently Asked Questions
What is a raised putting green?
A raised putting green is an elevated turf surface above the surrounding terrain that offers various advantages, including improved drainage and enhanced aesthetic appeal.
What are the benefits of a raised putting green?
Key benefits include improved drainage, which minimizes water pooling and ensures playability after rainfall; aesthetic appeal, as it serves as a focal point in landscaping; and customization, allowing homeowners to design the shape and size to fit their yard and preferences.
How does a raised putting green improve drainage?
Elevating the green significantly reduces the risk of water pooling, with effective drainage systems capable of reducing water accumulation by up to 50%, which is crucial for maintaining optimal conditions for play.
Can I customize the design of my raised putting green?
Yes, homeowners can customize the shape and size of their practice area to fit their specific yard layout and personal preferences, ensuring that it integrates well with other outdoor elements.
What space requirements should I consider before installing a raised putting green?
It is important to ensure adequate space for the green and any surrounding features to allow for both functionality and accessibility.
How does soil type affect the installation of a raised putting green?
The underlying soil must support proper drainage and stability for the turf, which is essential for the longevity of the lawn.
What maintenance needs should I be aware of for a raised putting green?
Elevated surfaces may require different upkeep practices compared to flat areas, including adjustments in watering and care routines to maintain optimal conditions.
Why is professional installation important for raised putting greens?
Proper installation is essential to prevent issues such as wrinkling and inadequate drainage. Engaging with experienced installers ensures quality and longevity for the raised putting green.
List of Sources
- Understand the Basics of Raised Putting Greens
- The Science of Golf Greens: Understanding Drainage and Performance (https://southwestgreens.com/blog/the-science-of-golf-greens-understanding-drainage-and-performance)
- usga.org (https://usga.org/content/usga/home-page/course-care/water-resource-center/bmp-case-studies.html)
- backninegreens.com (https://backninegreens.com/blog/why-backyard-putting-greens-are-the-new-must-have-for-luxury-homeowners)
- Prepare Your Site and Gather Necessary Tools
- Top Backyard Putting Green Trends for 2026 Revealed (https://artificialturfexpress.com/blog/backyard-putting-green-design-trends)
- How To Make Your Backyard Putting Green Dream a Reality (https://usga.org/content/usga/home-page/course-care/green-section-record/62/issue-17/how-to-make-your-backyard-putting-green-dream-a-reality.html)
- usga.org (https://usga.org/content/usga/home-page/course-care/specialty-articles/usga-putting-green-construction.html)
- bethelfarms.com (https://bethelfarms.com/blogs/bethel-blog/how-to-build-your-own-backyard-putting-green)
- turfsupcanada.com (https://turfsupcanada.com/transform-your-backyard-the-ultimate-golfers-guide-to-professional-quality-putting-greens)
- Follow the Step-by-Step Installation Process
- 5 Backyard Putting Green Installation Mistakes & How to Fix Them (https://aglgrass.com/blogs/backyard-putting-green-mistakes)
- How To Make Your Backyard Putting Green Dream a Reality (https://usga.org/content/usga/home-page/course-care/green-section-record/62/issue-17/how-to-make-your-backyard-putting-green-dream-a-reality.html)
- usga.org (https://usga.org/content/usga/home-page/course-care/specialty-articles/usga-putting-green-construction.html)
- DIY Putting Green Installation: A Step-by-Step Guide (https://artificialturfexpress.com/blog/installing-the-best-putting-greens-in-your-yard-the-ultimate-diy-guide)
- Maintain Your Raised Putting Green for Longevity
- Artificial Turf Maintenance Guide | Cleaning & Care Tips (https://fieldturflandscape.com/maintenance/artificial-turf-maintenance-guide)
- agsturf.com (https://agsturf.com/artificial-turf-news/How-to-Keep-Your-Artificial-Turf-Putting-Green-in-Top-Shape-0320.html)
- Tour Greens | Putting Green Maintenance (https://tourgreens.com/putting-green-maintenance.html)
- cascadegreens.com (https://cascadegreens.com/how-often-should-you-maintain-your-artificial-turf)
- Artificial Putting Green Maintenance: Year-Round Care Guide (https://aglgrass.com/blogs/artificial-putting-green-maintenance)