
Introduction
Transforming a backyard into a lush, green oasis with artificial turf presents an appealing opportunity for homeowners. This DIY turf installation guide provides a clear, step-by-step approach that enables individuals to take charge of their outdoor spaces, ensuring a pristine lawn throughout the year.
However, challenges may arise during any home improvement project. For instance, what if the ground isn’t level, or the seams fail to hold? This article explores essential preparation techniques, necessary tools, and troubleshooting tips to effectively navigate the installation process and achieve a flawless finish.
Prepare the Ground for Turf Installation
- Measure and Mark the Space: Start by using stakes and string to outline the designated area for installation. This visual aid ensures accurate measurements and helps in planning the layout effectively.
- Excavate the Area: Excavate the area to a depth of 3 to 4 inches, ensuring the complete removal of grass, roots, and debris. This step is essential for establishing a clean and stable base for the grass.
- Install a Weed Barrier: Lay down a weed barrier across the entire area to prevent unwanted vegetation from growing beneath the turf. This barrier is crucial for maintaining the aesthetic and structural integrity of your installation.
- Fill the Excavated Area: Fill the excavated area with a base material, such as crushed stone or decomposed granite. Spread the material evenly and compact it thoroughly using a plate compactor to achieve a solid foundation. Aim for a thickness of 2 to 3 inches to prevent sagging or shifting of the grass.
- Level the Ground: Use a level to ensure the ground is even. Address any dips or bumps, as these can lead to problems once the grass is installed. Maintaining a slight gradient of about 1 inch of slope per 8 to 10 feet away from structures will facilitate proper drainage.
With proper preparation, as demonstrated by satisfied clients like Dick Bryant and Scott Sachse, you can ensure a successful DIY turf install that meets your needs for a lawn, garden, or pet area. Brock’s attention to detail and commitment to quality will help you achieve the best results for your project.

Gather Essential Tools and Materials
Collecting the right tools and supplies is essential. Here’s what you’ll need:
-
Tools Needed:
- Shovel: Essential for digging out and removing existing grass and debris.
- Rake: Used to even out the ground and uniformly spread substances across the surface.
- Plate Compactor: Important for compacting the base material to create a stable foundation.
- Utility Knife: Necessary for cutting the grass to the desired size and shape.
- Hammer or Mallet: Used to fasten the grass with landscape nails or spikes.
- Measuring Tape: Ensures accurate measurements for a precise fit.
- Wheelbarrow: Facilitates the transportation of materials to the installation site.
-
Materials Required:
- Turf: Select the appropriate type based on your specific needs, such as color and texture, ensuring you find the perfect fit for your backyard. As Dick Bryant noted, “Brock came out, evaluated my needs and came up with the best solution. I went with his advice and the recommendation was perfect!”
- Weed Barrier Fabric: Prevents weeds from growing through the grass, ensuring a clean appearance.
- Base Material: Crushed stone or decomposed granite is recommended for creating a solid sub-base.
- Adhesive: Essential for securely joining pieces of grass together, ensuring a seamless look.
- Landscape Nails or Spikes: Used to firmly secure the grass in place, typically spaced every 6 to 12 inches around the perimeter.
The setup expenses for synthetic grass usually vary from $5 to $15 per square foot, based on the components and intricacy of the project. Investing in quality tools and materials can significantly enhance the durability and appearance of your new lawn when you undertake a DIY turf install.
Newest Equipment for 2025: As of 2025, consider utilizing advanced tools like heavy-duty seam rollers and specialized grass cutters to enhance efficiency and accuracy during setup. With Hall Turf’s products, including installation services and safe playground surfaces, you can achieve a stunning and functional outdoor area. As Scott Sachse shared, “They recently installed a putting green at our new home, and they did an exceptional job. Brock is extremely professional, timely, and responsive.”

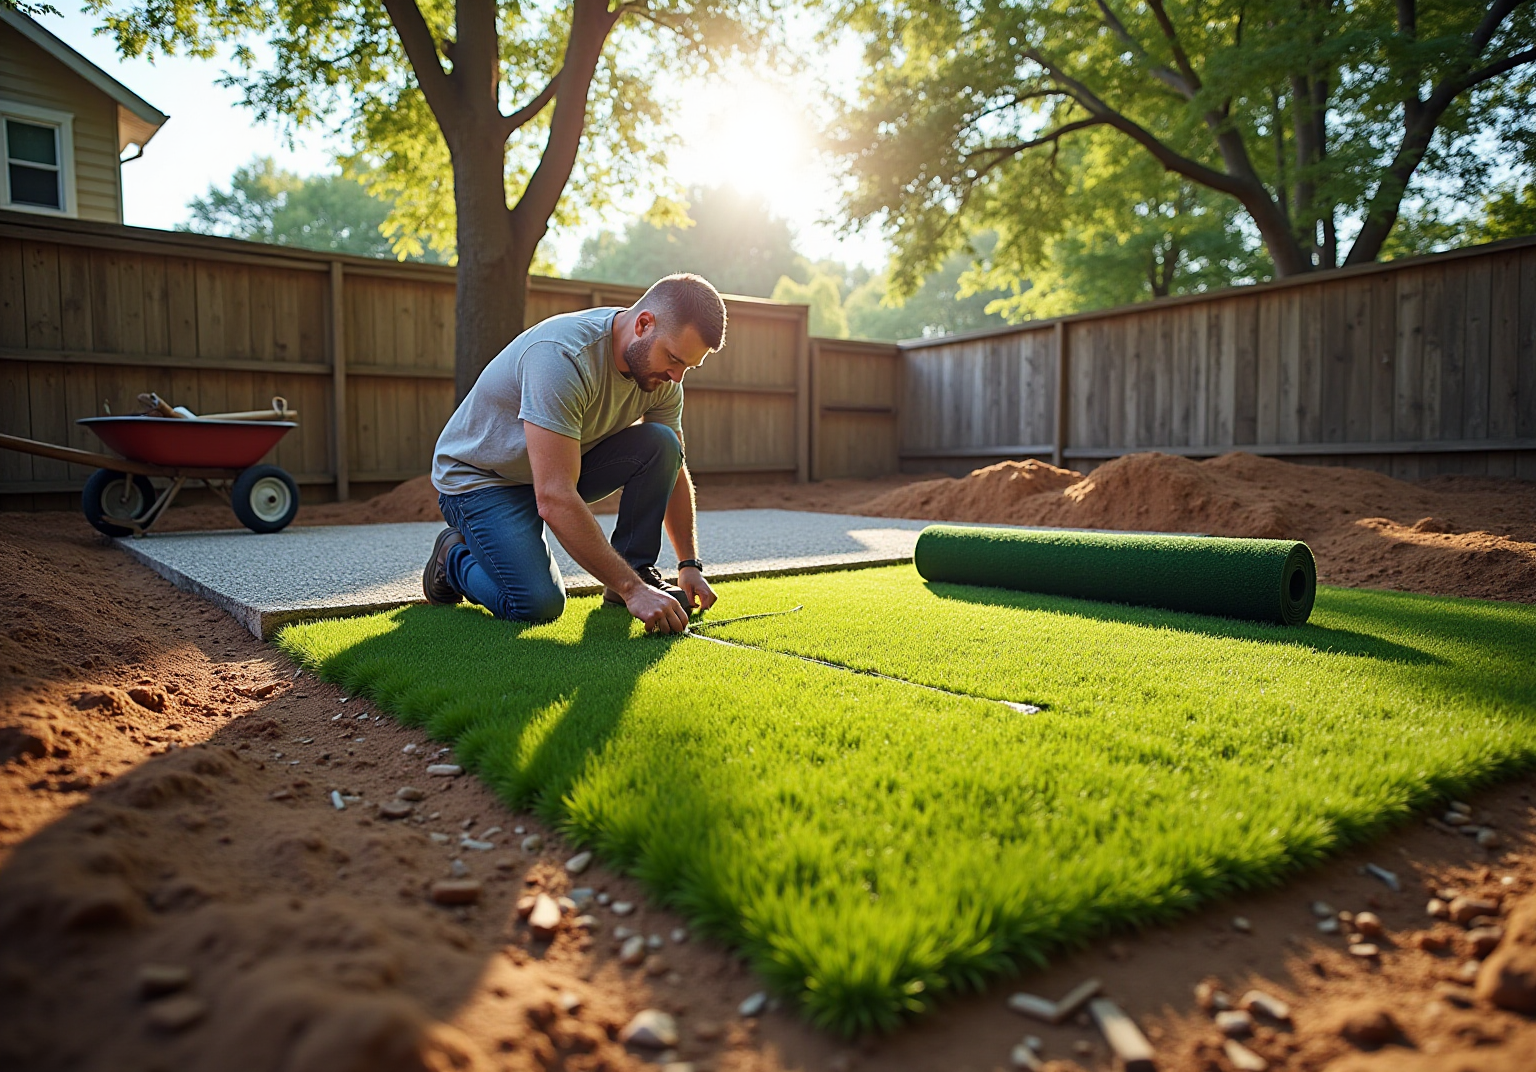
Follow Step-by-Step Installation Instructions
- Lay Out the Surface: Start by rolling out the turf in your designated area, allowing it to acclimate to the temperature. This step is essential as it improves drainage and ensures a smooth installation.
- Cut the Grass to Fit: Use a utility knife to trim the edges of the grass for a proper fit. Ensure your cuts are straight and clean to achieve better alignment and a polished look.
- Secure the Ground: Begin securing the ground by placing stakes around the perimeter, spacing them approximately 6 inches apart. This will keep the grass firmly in place during the installation process.
- Join Pieces: If your project involves multiple pieces of grass, utilize seaming tape and adhesive to join them effectively. Align the fibers carefully to create a seamless appearance that enhances the overall aesthetic.
- Add Infill (if necessary): Depending on the type of grass you are using, you may need to add infill. This helps the blades stand upright and provides cushioning. Spread the infill evenly across the surface for optimal results.
- Brush the Grass: Finally, use a broom to brush the fibers upright, ensuring a natural and vibrant appearance. This finishing touch enhances the visual appeal of your newly laid grass.
Recent trends indicate that DIY setups are becoming increasingly popular, with homeowners often completing smaller sections (300 to 500 square feet) in under a day. However, it is important to recognize that a DIY project can take twice as long as hiring professionals, especially in irregularly shaped yards. Engaging with the installation process can also facilitate a smoother experience, ensuring that your outdoor space meets your expectations.
Troubleshoot Common Installation Issues
- Wrinkling: If your turf roll it out in the sun to warm it up. Once warmed, gently stretch the grass to smooth out the wrinkles, restoring its flat appearance.
- Bumps and dips: If you notice bumps or dips after installation, it may be necessary to raise the grass and modify the underlying base material. This adjustment will help create a level surface, enhancing both aesthetics and functionality. Proper surface preparation is crucial for ensuring a successful installation and avoiding these issues from the start.
- Water pooling: Water pooling on the surface indicates potential drainage issues. During the inspection, check the grading of the base to ensure there is a slight slope away from structures, facilitating drainage and preventing water accumulation. As George Davies observes, “If you see water gathering on the surface of your grass, it frequently indicates it has nowhere to go.”
- Seam failure: If seams are not holding, reapply adhesive and press the seams together firmly. Using weights can help keep them in place until the adhesive fully cures, ensuring a strong bond.
- Weeds: The appearance of weeds may suggest that the turf was not installed correctly. To address this, ensure the barrier is properly positioned, and consider applying a weed killer to the affected areas to manage growth effectively. Regular maintenance practices, such as checking for weeds and addressing them promptly, are essential for keeping your turf looking its best.

Conclusion
In conclusion, successfully installing artificial turf at home is a rewarding endeavor that requires careful planning and execution. By following the step-by-step guide outlined in this article, homeowners can transform their yards into vibrant, low-maintenance spaces ideal for recreation, relaxation, or play.
Key steps include:
- Preparing the ground by measuring and excavating the area
- Laying a weed barrier
- Compacting the sub-base to create a solid foundation
Having the right tools and materials is essential for a smooth installation process, as is adhering to best practices when laying out and securing the turf. Common installation issues, such as uneven surfaces or drainage problems, can be effectively addressed with the troubleshooting tips provided, ensuring a long-lasting and aesthetically pleasing result.
Embracing the DIY approach to turf installation empowers homeowners to create their ideal outdoor environments while fostering a sense of accomplishment. With the right knowledge and preparation, anyone can achieve a professional-quality result that enhances their property and enjoyment of outdoor spaces. Whether for a putting green, playground, or pet area, taking the plunge into DIY turf installation is a fulfilling project that can yield beautiful, lasting results.
Frequently Asked Questions
What is the first step in preparing for turf installation?
The first step is to measure and mark the space by using stakes and string to outline the designated area for installation, ensuring accurate measurements and effective planning of the layout.
How deep should I excavate the area for turf installation?
You should excavate the area to a depth of 3 to 4 inches to ensure the complete removal of grass, roots, and debris, establishing a clean and stable base for the grass.
Why is it important to install a weed barrier?
Installing a weed barrier is crucial to prevent unwanted vegetation from growing beneath the turf, maintaining the aesthetic and structural integrity of your installation.
What materials can be used for the sub-base in turf installation?
Base materials such as crushed stone or decomposed granite can be used for the sub-base.
How should the sub-base be prepared?
The sub-base should be filled evenly with the chosen material and compacted thoroughly using a plate compactor to achieve a solid foundation, aiming for a compaction density of about 90% to prevent sagging or shifting of the grass.
How can I ensure the ground is level before installing turf?
Use a level to check for evenness and address any dips or bumps, as these can lead to drainage issues and uneven surfaces. It’s also important to maintain a slight gradient of about 1 inch of slope per 8 to 10 feet away from structures for proper drainage.
Who can provide expert guidance for turf installation?
Hall Turf offers expert guidance for turf installation, with satisfied clients like Dick Bryant and Scott Sachse highlighting their attention to detail and commitment to quality for various projects, including putting greens, playgrounds, or pet areas.
List of Sources
- Prepare the Ground for Turf Installation
- lawnpop.com (https://lawnpop.com/how-to-prepare-the-ground-before-laying-artificial-grass)
- Artificial Turf Industry News & Updates – Mighty Grass (https://mightygrass.com/news)
- Artificial Grass News | American Syn-Turf Industry Updates (https://americansynturf.com/news)
- 13wham.com (https://13wham.com/news/local/brighton-debates-turf-field-installation-amid-stormwater-chemical-concerns-brighton-high-school)
- Gather Essential Tools and Materials
- lowes.com (https://lowes.com/n/how-to/install-artificial-grass)
- thisoldhouse.com (https://thisoldhouse.com/lawns/how-to-lay-artificial-turf)
- DIY Guide: Essential Tools for Installing (https://blog.artificialgrassrecyclers.com/diy-guide-tools-you-need-to-install-your-own-artificial-turf)
- mightygrass.com (https://mightygrass.com/artificial-grass-installation)
- syntheticturfnorthwest.com (https://syntheticturfnorthwest.com/a-helpful-guide-to-installing-synthetic-turf-diy)
- Follow Step-by-Step Installation Instructions
- Articles (https://synlawn.com/articles)
- How Long Does Synthetic Grass Installation Take? – ForeverLawn Northern Ohio (https://foreverlawnnohio.com/blog/how-long-does-synthetic-grass-installation-take)
- mrcleanturf.com (https://mrcleanturf.com/artificial-turf-trends-for-2025)
- Artificial Grass, Market Trends, Business Insights, and Analysis (https://installartificial.com/how/artificial-grass-business-insights-market-trends)
- bhg.com (https://bhg.com/artificial-turf-11710690)
- Troubleshoot Common Installation Issues
- Artificial Grass Installation: Overcome Common Challenges (https://yavapailandscaping.com/overcoming-common-challenges-in-artificial-grass-installation)
- Problems With Artificial Grass (and Fixes) | US Turf (https://usturfsandiego.com/news/problems-with-artificial-grass)
- georgedaviesturf.co.uk (https://georgedaviesturf.co.uk/blog/common-artificial-turf-issues-how-to-solve-them?srsltid=AfmBOorBzkAyX6IgAwkp6dWvZyj4gcrrwlksosiTg7315XE3E3IDzCVV)
- syntheticturfnorthwest.com (https://syntheticturfnorthwest.com/common-mistakes-diy-artificial-turf-installers-make)
- fischerlandscapingusa.com (https://fischerlandscapingusa.com/artificial-turf-drainage-problems)