
Introduction
Transforming a yard with artificial grass presents an appealing opportunity to enhance outdoor spaces. It offers a lush, green appearance without the ongoing maintenance required by natural lawns. This guide outlines a clear, step-by-step approach to installing artificial grass, ensuring a flawless finish that elevates any landscape. Homeowners often seek to understand the critical steps necessary for a successful installation and how to avoid common pitfalls, ultimately achieving that perfect, low-maintenance yard.
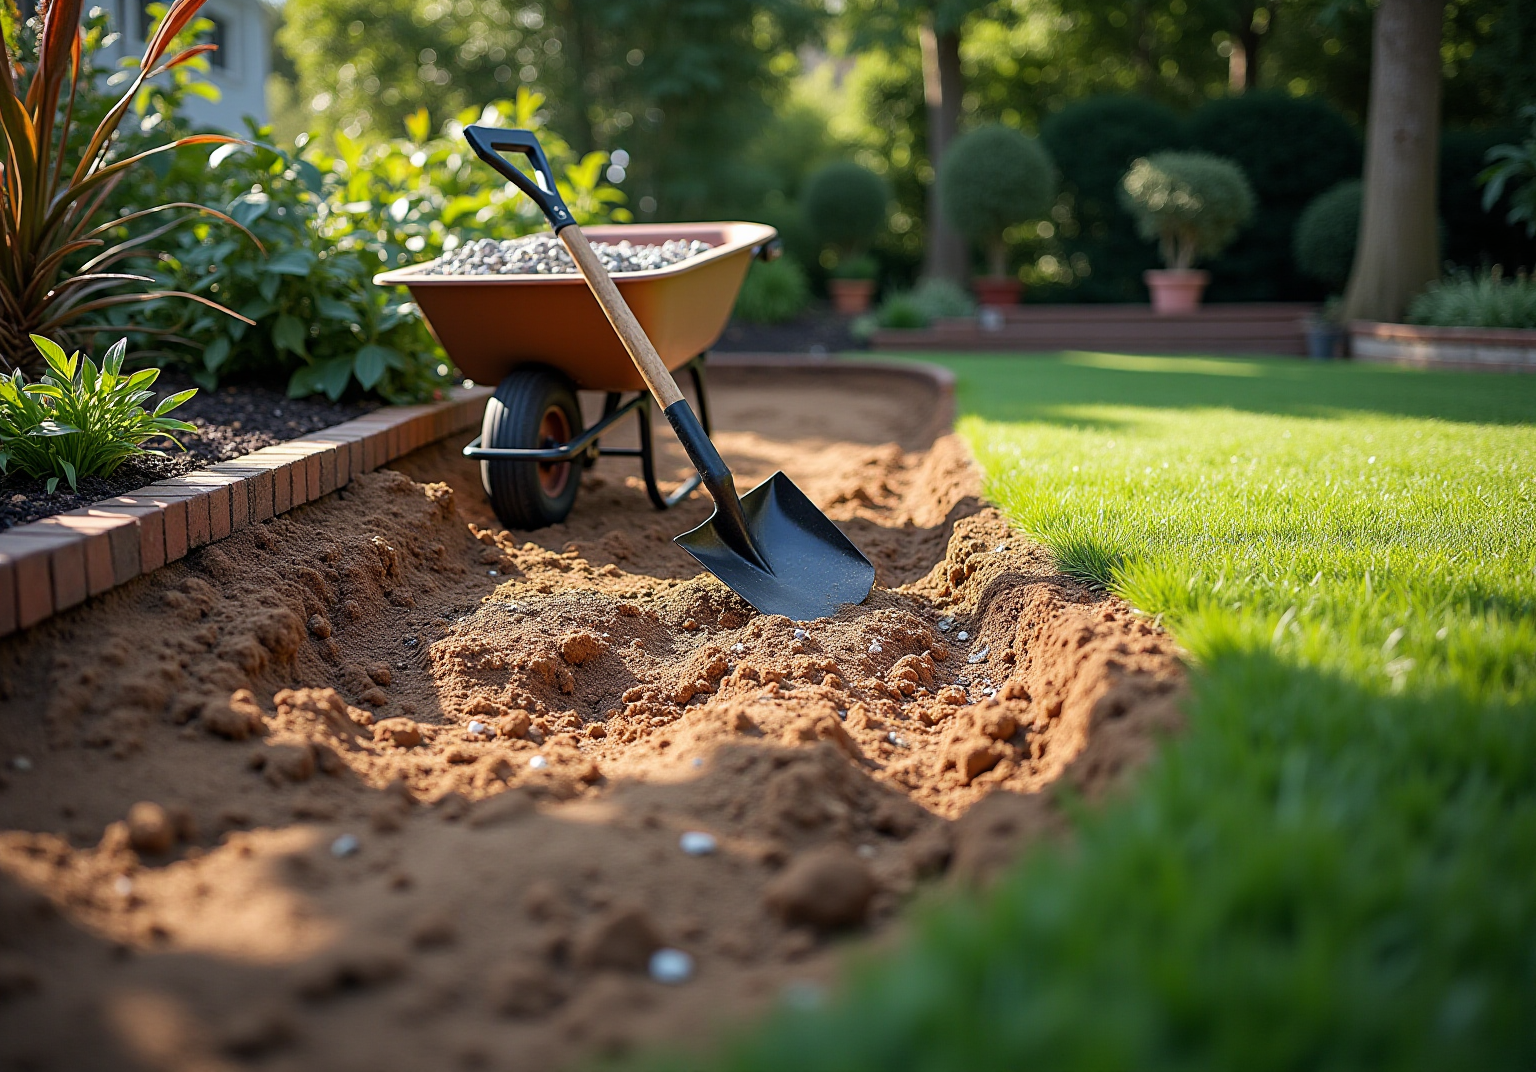
Prepare Your Yard for Installation
- Clear the Area: Start by removing any existing grass, weeds, and debris from the setup site. This step is essential for ensuring a clean surface for the grass. Use a shovel or spade to dig out the top 2-4 inches of soil, preparing the ground for the subsequent layers.
- Check for Drainage: Evaluate the area for proper drainage. If you observe water pooling in certain spots, it may be necessary to grade the soil to direct water away from the installation site. Efficient drainage is crucial, as stagnant water can lead to mold development and unpleasant odors, jeopardizing the durability of your synthetic grass.
- Level the Ground: Employ a rake to level the ground, filling in any low spots with soil to create a smooth, even surface. This step is vital to avoid bumps and dips in the completed grass, resulting in a . A well-leveled area also facilitates effective drainage, which is essential for maintaining the grass’s integrity.
- Compact the Soil: After leveling, compact the soil using a plate compactor or a hand tamper. This process establishes a strong foundation that prevents settling over time, ensuring the grass remains level and stable. A stable foundation is key to avoiding drainage issues and preserving the aesthetic appeal of your artificial lawn. Proper preparation can significantly enhance the setup process when you diy install artificial grass and improve the overall quality of your new grass.

Gather Essential Tools and Materials
- Tools Needed:
- Shovel: This tool is essential for removing existing grass, roots, and soil, allowing for excavation up to 2-1/2 inches deep to prepare the base.
- Rake: A rake is utilized to even the ground after excavation, ensuring a smooth surface for grass installation.
- Plate Compactor or Hand Tamper: These tools are crucial for compressing the soil, establishing a solid and stable base for the grass.
- Utility Knife: This tool is necessary for cutting the grass to size, enabling accurate fitting around edges and obstacles.
- Measuring Tape: Important for accurately measuring the area, ensuring proper grass placement.
- Hammer: Used to secure the grass with 40-D 5 inch non-galvanized nails or staples, placed every 2-3 square feet around the perimeter.
- Wheelbarrow: A wheelbarrow is useful for , enhancing the setup process.
- Lawn Roller: This tool assists in smoothing and leveling the base layer prior to laying grass, providing a uniform surface.
- Carpet Kicker: Essential for stretching and securing artificial grass during installation, ensuring it is pulled taut.
- Materials Required:
- Artificial Grass: Select the appropriate type based on specific needs, such as pet-friendly options or landscape turf.
- Vegetation Barrier Fabric: This material is suggested to prevent unwanted plants from growing through the grass, ensuring a tidy and low-maintenance lawn. Secure the weed barrier with 6-inch galvanized nails or landscape anchors every few feet.
- Base Material: Crushed stone or gravel is essential for providing drainage and stability beneath the grass.
- Infill Material: Sand or rubber granules enhance the surface’s durability and appearance, keeping blades upright and resembling natural grass.
- Seaming Tape and Adhesive: These materials are essential for connecting sections of grass together, ensuring a seamless and professional finish.
- AirDrain System: Consider installing this system to create a 1-inch air void that lowers surface temperature and improves drainage.

Install Your Artificial Grass: Step-by-Step Instructions
- Lay the Base Material: Start by spreading a 2-4 inch layer of crushed stone or gravel over the prepared area. Rake it evenly and compact it thoroughly to create a solid foundation that ensures proper drainage and stability for the grass.
- Install the Plant Barrier: Next, lay down a plant barrier fabric over the compacted base. This step is crucial to prevent weeds from growing through the grass, ensuring a clean and low-maintenance surface.
- Roll Out the Turf: Unroll the artificial grass and lay it over the prepared area. Allow the grass to acclimate for a few hours to reduce wrinkles and ensure a smooth installation.
- Cut the Grass: Use a utility knife to of the grass to fit the area precisely. Ensure that the seams are tight and aligned properly to maintain a seamless appearance.
- Secure the Surface: Fasten the material around the perimeter and at seams using landscape nails or staples, spacing them about 3-6 inches apart. This will keep the grass securely in place and prevent movement.
- Add Infill: Finally, spread infill material evenly across the surface of the turf. This helps to weigh it down, maintain its shape, and enhance durability. Use a broom to work the infill into the grass fibers, ensuring they stand upright for a natural look.
Successful setups often emphasize the importance of a well-prepared foundation. Projects that adhered to these guidelines have reported a significant reduction in maintenance issues and improved longevity of the turf. On average, a DIY install artificial grass setup can take between 1-3 days for small areas, depending on the project’s complexity. By investing time in proper preparation and execution, homeowners can achieve a beautiful, low-maintenance lawn that enhances their outdoor space.

Troubleshoot Common Installation Issues
- Uneven Surface: If you observe bumps or dips after installation, it is essential to inspect the base for proper compaction. To address this issue, carefully lift the grass and re-level the base, ensuring it is flat and to prevent future complications.
- Water Pooling: The presence of standing water on the surface indicates inadequate drainage. It is crucial to check the grading of the base; it should have a slight slope of 1-2% to facilitate effective water runoff. Adjustments may be necessary, and incorporating drainage materials can also help mitigate pooling problems.
- Seam Separation: If seams are separating, verify that they were secured correctly using adhesive and seaming tape. For enhanced security, consider using 40D 5” nails every 4-6 inches to secure the seams. If needed, reapply adhesive and press the seams together firmly to restore integrity and prevent further separation.
- Plant Growth: The emergence of unwanted vegetation suggests that the barrier may not have been installed correctly. Ensure the barrier is intact, allowing for water runoff while preventing plant growth. If weeds persist, consider using a weed killer or manually removing them to maintain the lawn’s appearance.
- Grass Discoloration: If the grass color diminishes, it may be attributed to low-quality materials. Ensure that high-quality synthetic grass designed for UV resistance is used. If fading occurs, applying a UV protectant can help preserve the color and extend the lifespan of your turf. Additionally, be mindful that artificial grass can stretch and shrink with temperature changes, so it is advisable to leave adequate space around the edges during installation.

Conclusion
Transforming a yard with artificial grass is not just a project; it’s an investment in a lush, green space that requires minimal maintenance. Homeowners who follow the outlined steps can achieve a successful installation that significantly enhances their outdoor environment. Proper preparation – ranging from clearing the area to compacting the soil – is crucial, as it lays the foundation for a durable and visually appealing lawn.
Key considerations include:
- The necessity of a well-prepared base
- The essential tools and materials needed for installation
- A detailed step-by-step process to ensure optimal results
Additionally, addressing common installation issues provides valuable insights that help maintain the integrity of the grass over time. By adhering to these guidelines, homeowners can significantly reduce the likelihood of encountering problems, resulting in a beautiful and functional lawn.
Ultimately, dedicating time and effort to a DIY artificial grass installation not only enhances the appearance of a yard but also promotes a low-maintenance lifestyle. Embracing this project can yield long-lasting benefits, making it a worthwhile endeavor for any homeowner aiming to improve their outdoor space.
Frequently Asked Questions
What is the first step in preparing my yard for synthetic grass installation?
The first step is to clear the area by removing any existing grass, weeds, and debris from the setup site. This ensures a clean surface for the grass.
How deep should I dig into the soil when preparing the site?
You should dig out the top 2-4 inches of soil to prepare the ground for the subsequent layers.
Why is it important to check for drainage before installation?
Checking for drainage is important because stagnant water can lead to mold development and unpleasant odors, which can jeopardize the durability of your synthetic grass.
What should I do if I find water pooling in certain spots?
If you observe water pooling, it may be necessary to grade the soil to direct water away from the installation site.
How can I ensure that the ground is level before installing synthetic grass?
You can level the ground by using a rake to fill in any low spots with soil, creating a smooth, even surface.
Why is it necessary to compact the soil after leveling?
Compacting the soil establishes a strong foundation that prevents settling over time, ensuring the grass remains level and stable.
What tools can I use for compacting the soil?
You can use a plate compactor or a hand tamper to compact the soil effectively.
How does proper preparation affect the installation of artificial grass?
Proper preparation enhances the setup process and improves the overall quality of your new grass, ensuring it remains visually appealing and functional.
List of Sources
- Prepare Your Yard for Installation
- How To Prepare Your Home for Artificial Grass Installation: 5 Expert Tips – SGW Colorado (https://sgwcolorado.com/blog/2025/08/28/how-to-prepare-your-home-for-artificial-grass-installation-5-expert-tips)
- How to Install Artificial Turf on Dirt | US Turf (https://usturfsandiego.com/news/how-to-install-artificial-turf-on-dirt)
- The Essential Drainage Guide for Successful Artificial Turf Installation – SGW Bay Area (https://sgwbayarea.com/blog/the-essential-drainage-guide-for-successful-artificial-turf-installation)
- The Importance Of Proper Drainage In Artificial Turf Installation — OKANAGAN OUTDOOR & INTERIORS CO. (https://ooic.ca/information-rocky-mountain-rebel-renovations/the-importance-of-proper-drainage-for-artificial-turf)
- Gather Essential Tools and Materials
- DIY Guide: Essential Tools for Installing (https://blog.artificialgrassrecyclers.com/diy-guide-tools-you-need-to-install-your-own-artificial-turf)
- Artificial Grass Install Accessories That Should Be in Every Installer’s Toolkit – SGW Phoenix (https://sgwarizona.com/phoenix/blog/artificial-grass-install-accessories-that-should-be-in-every-installers-toolkit)
- 5 Tools That Contractors Installing Artificial Grass Should Use | Purchase Green Artificial Grass (https://purchasegreen.com/blog/crucial-tools-contractors-installing-artificial-grass-should-use)
- What Infill to Use for Turf | Elite Turf Supply (https://eliteturfsupply.com/blogs/top-tools-and-equipment-every-contractor-needs-for-turf-installation)
- A Step-by-Step Guide to Installing Artificial Turf Grass (https://lowes.com/n/how-to/install-artificial-grass)
- Install Your Artificial Grass: Step-by-Step Instructions
- How to Install Artificial Grass on Soil | US Turf (https://usturfsandiego.com/news/how-to-install-artificial-grass-on-soil)
- A Step-By-Step Guide to Installing Artificial Turf | Southwest Greens of Florida (https://swgreens.com/blog/artificial-turf-installation-step-by-step-guide)
- How to Install Artificial Turf: Step-by-Step Guide | US Turf (https://usturfsandiego.com/news/how-to-install-artificial-turf)
- Synthetic Turf Installation Market Strategies: Trends and Outlook 2026-2034 (https://datainsightsmarket.com/reports/synthetic-turf-installation-1462129)
- Troubleshoot Common Installation Issues
- The 7 Common Mistakes When Installing Artificial Turf (https://integriturf.com/common-installation-mistakes)
- Artificial Turf Gone Wrong: Setup Errors To Avoid (https://turftekusa.com/blog/artificial-turf-gone-wrong-setup-errors-to-avoid)
- Fixing 5 Challenges in Commercial Artificial Turf Installations (https://velcro.com/news-and-blog/2024/07/fixing-5-challenges-in-artificial-turf-installation)
- 7 Common Artificial Grass Problems and How to Fix Them (https://ccgrass.com/problems-with-artificial-grass)
- Top Synthetic Turf Installation Problems and Solutions (https://siteone.com/en/articles/turf-care/top-synthetic-turf-installation-problems-and-solutions)