
Introduction
Transforming outdoor spaces with astro turf can be a complex endeavor that demands meticulous planning. This guide outlines the essential steps for successful installation, from creating a tailored turf plan to completing the project with proper edging and infill.
With various factors to consider, including:
- Local climate conditions
- Drainage solutions
- Material choices
Homeowners must understand how to achieve a professional finish that lasts. By addressing these considerations, homeowners can create a durable and attractive outdoor environment.
Develop a Turf Plan
To ensure a successful grass installation, it is essential to evaluate the space thoroughly before proceeding with any plans. Start by measuring the area set aside for grass placement, considering the dimensions, shape, and any existing features such as trees, pathways, or slopes that may affect the installation process. Local climate and soil conditions in Kansas and Missouri will influence your planning.
Next, clearly identify the primary use of the grass. Consider the intended use – be it for pets, children, or aesthetics – as this will guide your choice of grass type and features. For instance, pet grass should be durable and easy to clean, while playground surfaces must include safety features to protect children during play.
Select the suitable type of artificial lawn based on its intended purpose. Polyethylene turf is known for its durability and resemblance to natural grass, making it a popular choice for various applications. Hall Grass provides a variety of choices customized to particular requirements, ensuring you discover the ideal match for your project. As a licensed contractor, Hall Turf adheres to industry standards and provides certified products for peace of mind.
Incorporate effective drainage solutions in your plan to prevent water pooling. This may involve grading the area or installing drainage systems to ensure proper water flow and surface integrity. Built-in drainage systems are essential to enhance safety and reduce maintenance needs.
Develop a detailed design of the grass setup. Mark where seams will be located and how the turf will be oriented to minimize visible seams and enhance the overall aesthetic appeal. This step is crucial for achieving a professional appearance. Scott Sachse highlights Hall Turf’s professionalism and meticulous attention to detail, ensuring a smooth setup process.
Compile a comprehensive list of all necessary materials, including the grass itself, base materials, tools, and any additional features like edging or infill. This preparation will enable a smoother setup process and help prevent delays. Furthermore, take into account the average expense of artificial turf setup in Kansas City, which can differ depending on the type of turf and the complexity of the project. Clients such as Dick Bryant have commended Hall for their comprehensive assessments and customized suggestions, ensuring that each project is completed punctually and within budget. With more than 300 playground setups and a clientele of over 80,000 pleased customers, Hall Turf is dedicated to providing outstanding results. With a commitment to quality and customer satisfaction, Hall Turf ensures that every project meets the highest standards of excellence.

Prepare the Base for Installation
Proper preparation is crucial for a successful grass installation. Begin by removing any existing grass, weeds, and debris from the installation site. This step creates a clean slate for your surface. It ensures effective drainage and prevents future unevenness.
Next, excavate the soil by digging out approximately 3 to 4 inches. This depth is crucial for adequate drainage and helps prevent the grass from sinking, enhancing its durability.
After that, fill the excavated area with a base material, such as crushed stone or gravel. Distribute it uniformly to a depth of about 2 to 3 inches, ensuring the material is well-spread to support the grass effectively.
Then, utilize a plate compactor to thoroughly compact the base material. This step is crucial to avoid settling and to establish a stable base for the grass, which is necessary for preserving a level surface.
Once compacted, check the surface for levelness. Use a rake to level any irregular spots, ensuring a flat surface for the grass installation. Regularly checking the surface with a level is necessary to maintain uniformity across the area.
If desired, lay down a weed barrier fabric over the compacted base to prevent weeds from growing through the grass. This additional step can minimize maintenance needs and enhance the aesthetic quality of your artificial grass area. Ignoring these steps may result in expensive repairs and ongoing maintenance issues.

Install and Cut the Artificial Grass
When installing astro turf nearest to me, careful attention to detail is required to ensure a seamless and professional finish.
- Unroll the Grass: Begin by unrolling the artificial grass over the prepared base. Allow it to acclimate to the temperature for a few hours to reduce curling.
- Position the Grass: Place the grass in the preferred direction, making sure that the fibers are oriented the same way for a consistent look.
- Cut the Grass: Use a sharp utility knife to cut the grass to fit the area. Make precise cuts along edges and around obstacles, guaranteeing a snug fit. For optimal results, cut off three tufts prior to making a seam to maintain a clean edge.
- Join Seams: If your installation requires multiple sections of grass, align the seams carefully. Use seam tape and adhesive to secure the edges together, ensuring they are flat and seamless. Avoid 90° seams due to differences in tuft spacing and yarn shape, which can lead to visible seams.
- Fasten the Grass: Utilize landscape staples or nails to attach the grass to the ground. Place them every 6 to 12 inches along the edges and seams to prevent shifting. For added stability, weigh down the wood strips with bags of infill for 45-60 minutes per seam.
- Trim Excess Grass: After securing, trim any surplus grass along the edges for a clean finish. Ensure that the edges are neat and aligned with any borders or pathways. Brushing the seams helps to hide the seam line and lift the synthetic grass blades into a more natural position.
By choosing Hall Grass for installing astro turf nearest to me, you gain the advantage of over 15 years of experience and a licensed contractor’s expertise. As Scott Sachse remarked, ‘Brock and his team did an exceptional job on our putting green setup.’ They were professional, timely, and responsive. Similarly, Les Boatright shared, ‘Brock was always on-time and followed through on his commitments, delivering a fantastic end product on time and on budget.’ This commitment to quality ensures that your outdoor space will not only look great but also stand the test of time.

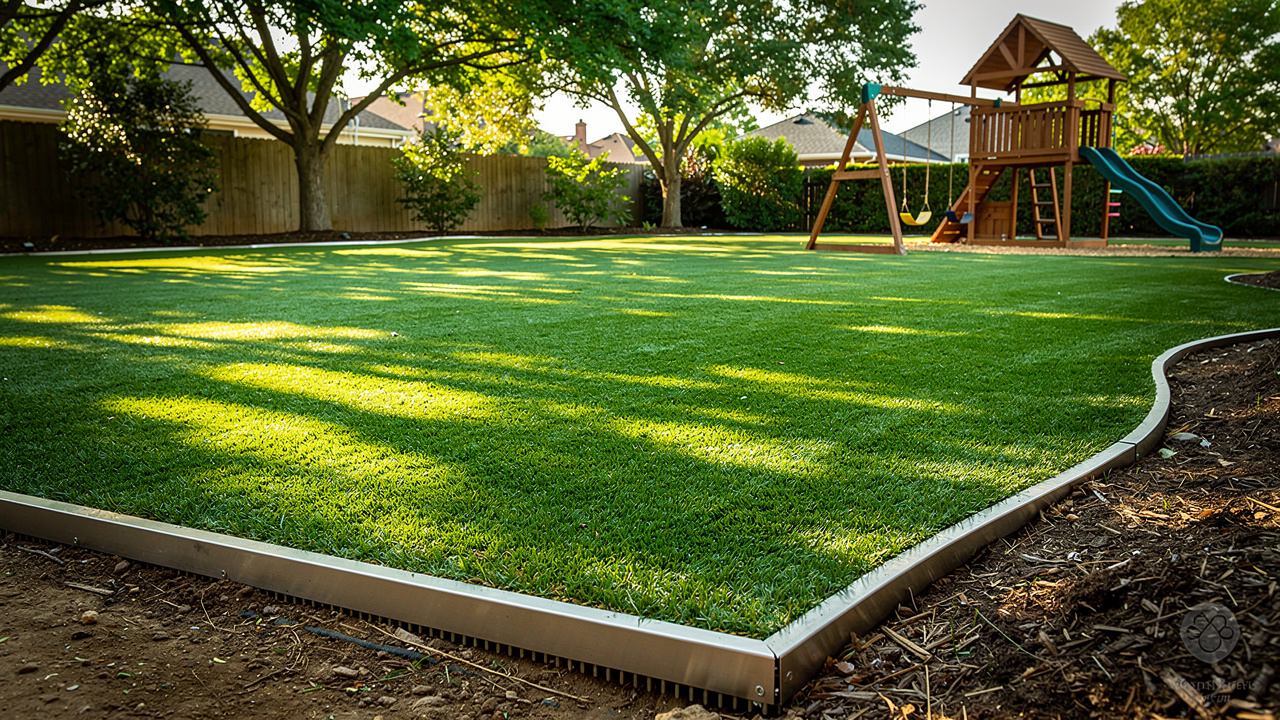
Finalize Installation with Edging and Infill
Careful attention to detail is essential when installing astro turf nearest to me to ensure durability and aesthetic appeal.
- Install Edging: Choose a suitable edging material, such as durable steel or aluminum, and install it around the perimeter of the grass. This helps maintain the grass in position and provides a neat appearance, preventing it from shifting, especially in high-traffic areas.
- Secure the Edging: Use landscape stakes to fasten the edging every 2-3 feet, ensuring it is firmly in place. This step is crucial for maintaining a neat appearance and the longevity of the installation.
- Add Infill: Distribute infill material, such as sand or rubber granules, evenly over the surface of the grass. Aim for 1 to 2 pounds of infill per square foot, depending on the specific application of the grass. This helps weigh down the grass, supports the blades, and improves drainage, which contributes to the installation’s durability.
- Brush the Grass: Use a stiff-bristle broom to brush the infill into the grass fibers. This step helps raise the blades and gives the grass a more natural look, which is especially important for residential lawns and play areas.
- Final Inspection: Walk around the installation to check for any loose edges or areas that need additional infill. Make any necessary adjustments to ensure a professional finish and enhance the overall aesthetic.
- Maintenance Tips: Make it a habit to brush the surface and clear away debris to keep your lawn looking fresh. Consider rinsing the turf occasionally to remove dust and allergens, maintaining a clean and inviting outdoor space.
Customer Testimonials: Many homeowners have praised Hall Grass for their exceptional service. For instance, Scott Sachse noted, “Brock is extremely professional, timely, and responsive. The crew was beyond professional, polite, and courteous.” Similarly, Les Boatright expressed satisfaction with the project, stating, “I am extremely happy with the end product and Brock’s ability to get the job done, on time and on budget.” These testimonials reflect Hall Turf’s commitment to quality and customer satisfaction.
Average Lifespan: With proper maintenance, synthetic grass can last over a decade, making it a worthwhile investment for homeowners.
Effective Infill Methods: For best performance, target 1 to 2 pounds of infill per square foot, based on the specific application of the grass. This will help minimize wear and tear, ensuring the surface remains functional and visually appealing.
Best Materials for Securing Turf Edging: Consider using durable materials like steel or aluminum for edging, as they provide excellent stability and weather resistance, particularly in high-traffic areas.
Importance of Infill: Infill is essential for maintaining the shape and performance of artificial turf. It provides cushioning, enhances drainage, and prevents the fibers from matting, ensuring a safe and attractive surface for pets and children alike.
Investing in quality installation and maintenance, including installing astro turf nearest to me, can significantly enhance the longevity and enjoyment of your outdoor space.

Conclusion
Achieving a durable and visually appealing outdoor space with astro turf hinges on meticulous planning and execution. By following the outlined steps – from developing a comprehensive turf plan to finalizing the installation with proper edging and infill – homeowners can ensure a professional finish that meets their specific needs.
Key considerations include:
- Evaluating the installation area
- Selecting the right type of artificial grass
- Ensuring effective drainage solutions
The importance of meticulous base preparation cannot be overstated, as it lays the foundation for a long-lasting installation. Testimonials from satisfied customers like Scott Sachse and Les Boatright underscore Hall Turf’s dedication to quality and customer satisfaction, reinforcing the value of choosing a licensed contractor with extensive experience in the field.
When you invest in quality astro turf installation, you’re not just improving your outdoor space; you’re creating a safe and functional environment for your family and pets. With Hall Turf’s expertise and dedication to excellence, clients can enjoy a beautiful, low-maintenance lawn for years to come. For inquiries or to discuss your project, reach out to Hall Turf at (816) 555-7890 or via email at info@hallturf.com.
Frequently Asked Questions
What is the first step in developing a turf plan?
The first step is to thoroughly evaluate the space by measuring the area designated for grass placement, considering dimensions, shape, and existing features like trees, pathways, or slopes.
How do local climate and soil conditions affect turf planning?
Local climate and soil conditions in Kansas and Missouri influence the planning process, as they determine the suitability of different grass types and installation methods.
What factors should be considered when identifying the primary use of the grass?
Consider the intended use of the grass, such as for pets, children, or aesthetics, as this will guide the choice of grass type and necessary features.
What type of artificial lawn is recommended for durability and resemblance to natural grass?
Polyethylene turf is recommended for its durability and natural appearance, making it suitable for various applications.
How does Hall Turf ensure compliance and quality in their products?
Hall Turf is a licensed contractor that adheres to industry standards and provides certified products, ensuring peace of mind for clients.
What drainage solutions should be incorporated into the turf plan?
Effective drainage solutions, such as grading the area or installing drainage systems, should be included to prevent water pooling and enhance safety.
Why is it important to develop a detailed design of the grass setup?
A detailed design helps mark seam locations and turf orientation, minimizing visible seams and enhancing the overall aesthetic appeal of the installation.
What materials should be compiled for the turf installation?
A comprehensive list of necessary materials should include the grass, base materials, tools, and any additional features like edging or infill.
How does Hall Turf ensure timely and budget-friendly project completion?
Hall Turf conducts comprehensive assessments and provides customized suggestions, which have been praised by clients like Dick Bryant for ensuring projects are completed on time and within budget.
What is Hall Turf’s experience in the industry?
Hall Turf has completed over 300 playground installations and has a client base of over 80,000 satisfied customers, demonstrating their dedication to quality and customer satisfaction.
List of Sources
- Develop a Turf Plan
- Artificial Turf Market Size And Share | Industry Report, 2033 (https://grandviewresearch.com/industry-analysis/artificial-turf-market)
- Synthetic Turf Market Size & Share, Growth Trends 2026-2035 (https://gminsights.com/industry-analysis/synthetic-turf-market)
- Planning and Designing Your New Artificial Turf Field (https://trackandturf.com/blog/planning-and-designing-your-new-artifical-turf-field)
- Kansas City Artificial Turf Installation | Southern Turf (https://southernturfco.com/kansas-city)
- Your Step-by-Step Guide to Artificial Turf Installation Near You – Hall Turf | Artificial Turf Installation Kansas City KS & MO (https://hallturf.com/your-step-by-step-guide-to-artificial-turf-installation-near-you)
- Prepare the Base for Installation
- How to Install Artificial Turf – RCP Block & Brick (https://rcpblock.com/installation-artificial-turf.html)
- Master Aggregate for Artificial Grass: Essential Installation Tips – Hall Turf | Artificial Turf Installation Kansas City KS & MO (https://hallturf.com/master-aggregate-for-artificial-grass-essential-installation-tips)
- 4 Steps to Prepare the Base for Artificial Grass Installation – Hall Turf | Artificial Turf Installation Kansas City KS & MO (https://hallturf.com/4-steps-to-prepare-the-base-for-artificial-grass-installation)
- Master Ground Prep: DIY Turf Installation Made Easy (https://artificialturfexpress.com/blog/the-diyers-guide-to-ground-prep-for-turf-installation-and-accessories)
- Install and Cut the Artificial Grass
- News – Xtreme Green Synthetic Turf (https://xgreensynthetic.com/news)
- Seaming Artificial Grass: Everything You Need To Know (2024) (https://bellaturf.ca/blog/seaming-artificial-grass-everything-you-need-to-know)
- Best Artificial Turf Installers in New York City – Reviews & Quotes (https://installartificial.com/best/ny/new-york-city)
- How to Seam Artificial Grass | NexGen Lawns (https://nexgenlawns.com/how-to-seam-artificial-grass?srsltid=AfmBOooLyGkv0JVgR0tMItCvZRB2R32I5_mBV9nDuNO62sKYLtxg03s8)
- The Seaming Techniques You Need To Know to Install Artificial Grass Like a Pro | Synthetic Grass Warehouse (https://syntheticgrasswarehouse.com/blog/the-seaming-techniques-you-need-to-know-to-install-artificial-grass-like-a-pro)
- Finalize Installation with Edging and Infill
- Do You Need Infill for Artificial Grass? 5 Key Considerations – Hall Turf | Artificial Turf Installation Kansas City KS & MO (https://hallturf.com/do-you-need-infill-for-artificial-grass-5-key-considerations)
- What is Artificial Grass Infill and Why Do You Need It? (https://themotzgroup.com/sport_blog/what-is-artificial-grass-infill-and-why-do-you-need-it)
- The Importance of Synthetic Turf Edging | Ask JW | Synthetic Grass Warehouse (https://syntheticgrasswarehouse.com/company/ask-an-expert/ask-jw/the-importance-of-synthetic-turf-edging)
- Why Turf Infill Matters for Artificial Grass | US Turf (https://usturfsandiego.com/news/why-turf-infill-is-important)
- 5 Steps to Perfect Your Synthetic Turf Edge Detail – Hall Turf | Artificial Turf Installation Kansas City KS & MO (https://hallturf.com/5-steps-to-perfect-your-synthetic-turf-edge-detail)