
Introduction
Homeowners often find turf installation to be a complex task that can significantly enhance their outdoor spaces. This comprehensive guide offers a step-by-step approach, equipping readers with the essential knowledge and tools needed for a successful installation. Successfully navigating these challenges results in a durable and attractive lawn.
Prepare the Ground for Turf Installation
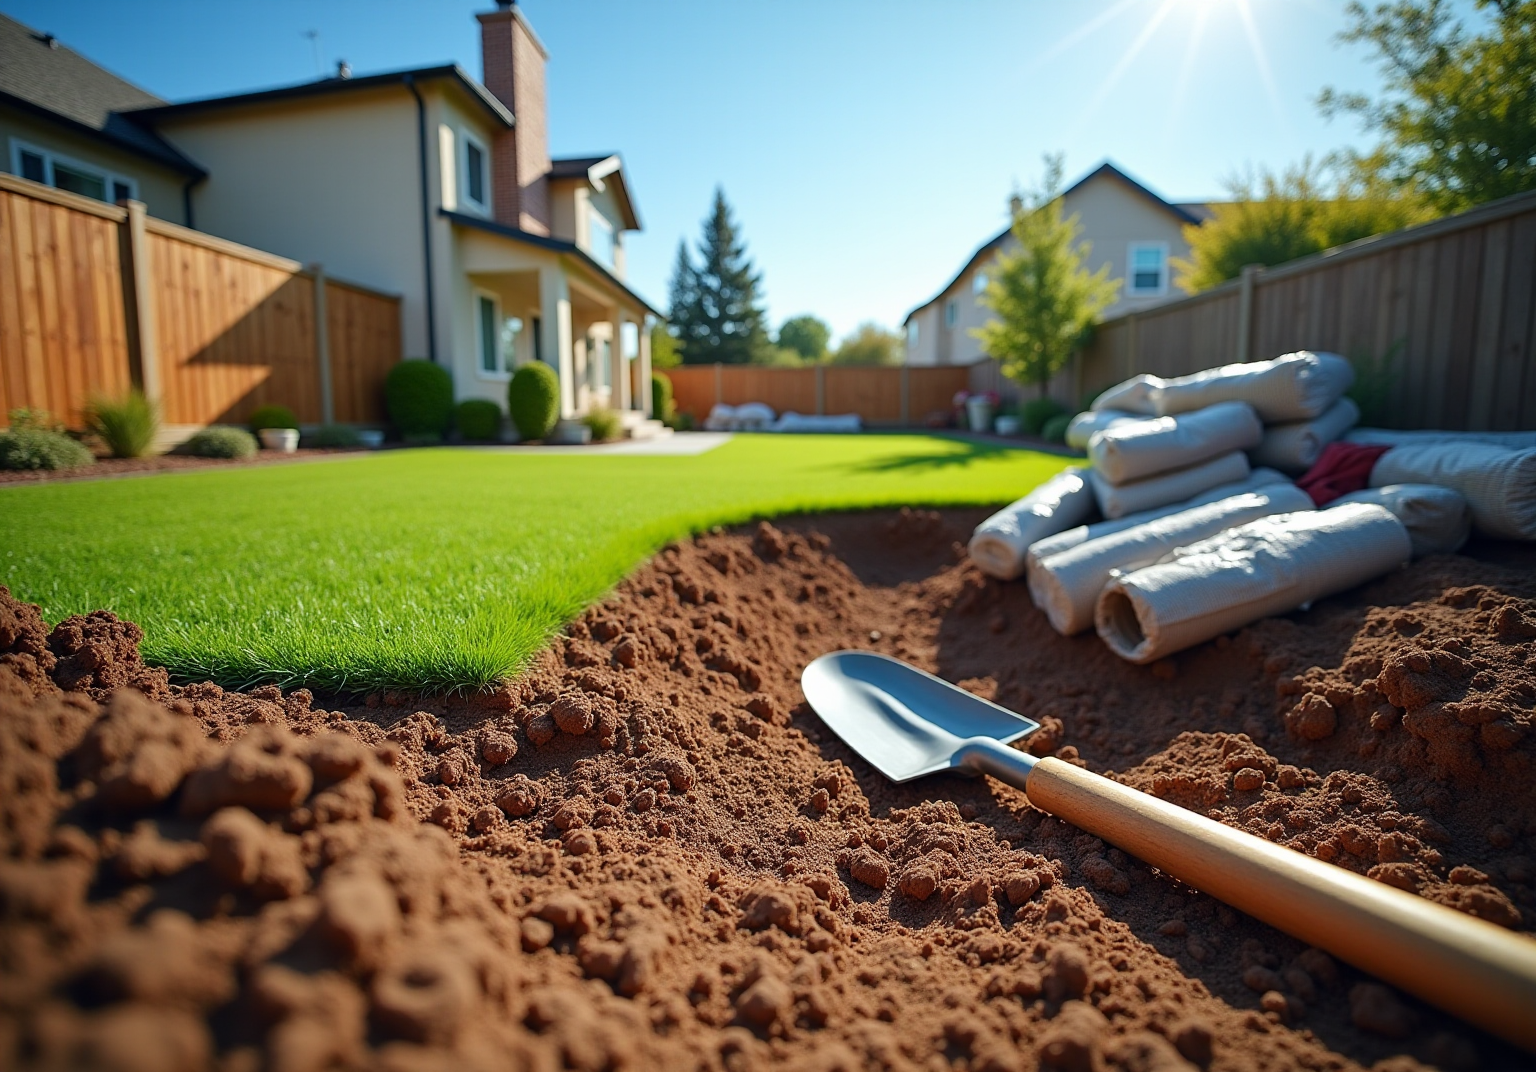
To ensure a successful turf installation, it is crucial to prepare the site meticulously. Start by removing any existing grass, weeds, and debris from the installation site. Neglecting this step can lead to ongoing maintenance challenges.
Next, excavate the soil by digging down approximately 3 to 4 inches to create space for the base materials. This depth is vital for drainage and keeps the grass from sitting too high, which can cause uneven wear and water buildup.
After that, level the ground using a rake to fill in any low spots with soil, creating a smooth, even surface. A well-leveled ground is essential for the stability of the turf installation.
Then, compact the soil thoroughly with a plate compactor or hand tamper. Achieving a density of at least 95% is essential to prevent settling after the grass is installed. Failure to achieve this density may result in an unstable grass surface over time.
Following this, install a permeable plant barrier fabric over the leveled area to prevent unwanted growth from coming through the turf. Make sure the barrier covers the whole area and is secured to stay effective, allowing drainage while stopping plant growth.
Next, add a layer of crushed stone or gravel, about 2 to 3 inches thick, over the weed barrier. This layer assists in drainage and offers a stable base for the grass, enhancing its longevity and performance.
Finally, compact the base material thoroughly to ensure it is firm and stable. Proper compaction is essential for preventing future problems with the grass surface, such as buckling or uneven wear. Additionally, ensure the area has a slight slope of approximately 1-2% away from structures to facilitate drainage. Without proper preparation, the longevity and performance of the turf installation may be compromised.

Gather Essential Tools and Materials
Successful turf installation hinges on having the right tools and materials, especially when partnering with Hall Turf, a leader in artificial grass solutions in Kansas City. Here’s what you’ll need:
-
Tools Needed:
- Shovel: Essential for digging and moving soil to prepare the site.
- Rake: Utilized to level the ground and evenly distribute materials for a smooth foundation.
- Plate Compactor: Essential for compressing the base material, guaranteeing a solid and stable foundation for the grass.
- Utility Knife: Necessary for making precise cuts to fit the grass to the desired area.
- Hammer or Mallet: Utilized to secure the turf with nails or stakes, ensuring it stays in place.
- Measuring Tape: Important for accurately measuring the setup area to avoid waste.
- Wheelbarrow: Facilitates the transportation of materials to and from the installation site.
-
Materials Required:
- Artificial Turf: Select the appropriate type based on specific needs, such as pet turf or playground turf, to ensure functionality and aesthetics. Hall Turf offers a variety of options tailored to your project requirements.
- Weed Barrier Fabric: Essential for preventing weed growth beneath the grass, enhancing longevity and appearance.
- Crushed Stone or Gravel: Forms the base layer, providing drainage and stability; a three to four-inch layer is recommended for optimal performance.
- Infill Material: Options such as sand or rubber granules are utilized to weigh down the grass and provide cushioning, enhancing comfort and durability. Choosing the right type based on specific needs is crucial for performance.
- Seaming Tape and Adhesive: Necessary for securely joining pieces of grass together, ensuring a seamless appearance without protruding fasteners.
- Landscape Staples: Used to secure the edges of the turf, preventing lifting and ensuring a neat finish. These should measure four to six inches in length for proper setup.
-
Optional Items:
- Knee Pads: Provide comfort during installation, especially when working on the ground for extended periods.
- Grass Broom: Assists in brushing the grass fibers upright after setup, improving the visual attractiveness and functionality of the lawn.
Without the right tools and materials, achieving a successful turf installation can be challenging. With Hall Turf’s guidance, you can navigate the complexities of installation with confidence. This shows just how valuable expert guidance can be for achieving the best results.

Execute the Turf Installation Process
- Lay the Grass: Begin by rolling out the artificial grass over the prepared area, ensuring it fits snugly against the edges. Allow the grass to relax for a few hours to eliminate any creases, which can affect the final appearance. Many homeowners struggle with maintaining a lush, green lawn, leading them to seek reliable solutions.
- Cut the Grass: Utilize a utility knife to trim the edges of the grass for a precise fit. It’s essential to cut along the seams to achieve a clean finish, which enhances the overall look of the installation. Choosing a knowledgeable professional can significantly enhance the quality and appearance of your turf installation.
- Secure the Grass: To keep the grass in place, use landscape staples or nails, placing them every 6 to 12 inches around the perimeter. This ensures that the surface remains securely anchored, preventing movement over time. Investing in professional turf installation not only ensures a visually appealing lawn but also contributes to its longevity and performance.
- Join Seams: If your installation involves multiple sections of grass, employ seaming tape and adhesive to join them effectively. Align the fibers carefully to create a seamless appearance, which is crucial for aesthetic appeal.
- Add Infill: Evenly distribute infill material over the surface of the grass. This step is essential for offering stability and cushioning, improving the surface’s performance. Use a broom to work the infill into the grass fibers thoroughly.
- Brush the Grass: After infilling, use a grass broom to brush the fibers upright. This not only gives the surface a natural appearance but also aids in distributing the infill evenly, ensuring optimal performance.
- Final Inspection: Conduct a thorough walk-around of the installation to identify any loose areas or uneven spots. Make necessary adjustments to ensure a smooth, professional finish, which is essential for long-lasting results.

Troubleshoot Common Installation Issues
Addressing common issues with artificial grass requires a systematic approach to ensure longevity and performance.
- Uneven Surface: To address uneven turf, first examine the foundation for low spots. Fill these areas with extra infill or foundational material, then compact the surface again to ensure stability. A well-compacted foundation is crucial to prevent low spots and uneven surfaces, as many artificial grass issues stem from the underlying system.
- Wrinkles or Creases: When wrinkles appear, gently stretch the surface and secure it to keep it in place. For ongoing problems, remove the affected section, re-level the base, and reinstall the grass to achieve a smooth finish. Proper turf installation techniques can help avoid these issues from the start.
- Plant Growth: Should unwanted plants appear through the grass, confirm that the barrier against them was placed properly. A premium plant barrier is crucial to stop unwanted vegetation from spreading through the grass. If needed, apply a targeted weed killer around the edges to control unwanted plant growth.
- Infill Issues: For uneven infill distribution, use a broom to redistribute it evenly across the ground surface. Ensure that the infill type and amount are suitable for your specific grass to maintain its performance. Inadequate infill can result in matted grass and premature wear.
- Seam Issues: If seams are noticeable or parting, inspect the adhesive utilized for fitting. Reapply seam tape and adhesive as needed, ensuring that the turf fibers are aligned properly for a seamless appearance. Proper seam alignment is crucial for maintaining the aesthetic quality of the installation.
- Drainage Issues: Water pooling on the surface indicates potential grading issues that must be resolved. Adjust the base material to facilitate adequate drainage away from the turf, preventing moisture accumulation that can lead to long-term issues. Addressing drainage issues promptly can prevent long-term damage to the turf installation.

Conclusion
Achieving a successful turf installation requires careful planning and execution, but it is within reach for dedicated homeowners. Successful installation depends on careful preparation, appropriate tools and materials, and a systematic approach to each step. By grasping the key aspects of ground preparation, selecting suitable materials, and adhering to a structured installation process, homeowners can create a beautiful and durable artificial lawn.
The article outlines essential steps for preparing the ground, including:
- Removing existing vegetation
- Leveling the soil
- Installing a proper drainage base
It emphasizes the importance of gathering the right tools and materials, such as:
- Artificial turf
- Weed barriers
- Infill materials
to ensure a seamless installation. Homeowners often face challenges such as uneven surfaces and drainage issues during installation. This ongoing maintenance is crucial for keeping the lawn in top shape for years to come.
Ultimately, investing in a professional-quality turf installation can transform outdoor spaces, providing a lush, green lawn that requires minimal upkeep. By following the outlined steps and utilizing expert resources, homeowners can achieve not only aesthetic appeal but also the long-term performance of their artificial grass. This proactive approach not only enhances the beauty of outdoor spaces but also significantly boosts property value.
Frequently Asked Questions
Why is site preparation important for turf installation?
Site preparation is crucial to ensure a successful turf installation, as neglecting it can lead to ongoing maintenance challenges and compromised turf performance.
What steps should be taken to prepare the site for turf installation?
The steps include removing existing grass, weeds, and debris, excavating the soil to a depth of 3 to 4 inches, leveling the ground, compacting the soil, installing a permeable plant barrier fabric, adding a layer of crushed stone or gravel, and ensuring proper compaction of the base material.
How deep should the soil be excavated before turf installation?
The soil should be excavated to a depth of approximately 3 to 4 inches to create space for the base materials and ensure proper drainage.
What is the purpose of leveling the ground before installing turf?
Leveling the ground creates a smooth, even surface, which is essential for the stability of the turf installation and helps prevent uneven wear and water buildup.
How can I ensure the soil is adequately compacted?
The soil should be compacted thoroughly using a plate compactor or hand tamper, achieving a density of at least 95% to prevent settling after the grass is installed.
What is the role of the permeable plant barrier fabric in turf installation?
The permeable plant barrier fabric prevents unwanted growth from coming through the turf while allowing for drainage, ensuring the longevity and effectiveness of the turf.
How thick should the layer of crushed stone or gravel be when preparing the site?
The layer of crushed stone or gravel should be about 2 to 3 inches thick, providing drainage and a stable base for the grass.
Why is it important to have a slight slope away from structures during turf installation?
A slight slope of approximately 1-2% away from structures facilitates drainage, which is essential for preventing water buildup and ensuring the longevity of the turf installation.
List of Sources
- Prepare the Ground for Turf Installation
- How Much Base for Artificial Turf: Essential Steps for Homeowners (https://californiaturfco.com/how-much-base-for-artificial-turf-essential-steps-for-homeowners)
- delaturf.com (https://delaturf.com/post/what-is-the-best-base-to-put-under-artificial-grass)
- xggrass.com (https://xggrass.com/news/2026-to-2030-the-artificial-turf-industry-ent-85312068.html)
- grandviewresearch.com (https://grandviewresearch.com/horizon/outlook/artificial-turf-market/united-states)
- How to Choose the Right Base for Artificial Grass (https://realturf.com/us/what-sub-base-is-best-for-your-artificial-grass)
- Gather Essential Tools and Materials
- Don’t Start Your Artificial Turf Installation Without These Important Install Tools – SGW Las Vegas (https://sgwnevada.com/las-vegas/blog/2023/07/31/dont-start-your-artificial-turf-installation-without-these-important-install-tools)
- Elite Turf Supply (https://eliteturfutah.com/blogs/top-tools-and-equipment-every-contractor-needs-for-turf-installation)
- 5 Tools That Contractors Installing Artificial Grass Should Use | Purchase Green Artificial Grass (https://purchasegreen.com/blog/crucial-tools-contractors-installing-artificial-grass-should-use)
- Artificial Grass News | American Syn-Turf Industry Updates (https://americansynturf.com/news)
- thisoldhouse.com (https://thisoldhouse.com/lawns/install-artificial-grass)
- Execute the Turf Installation Process
- Advancements in Turf Technology: What’s New in 2025? – Turft – Turf & Game Court Installation Specialists (https://turft.com/advancements-in-turf-technology-whats-new-in-2025)
- gogreensynturf.com (https://gogreensynturf.com/2026/04/29/artificial-turf-increases-home-value-data)
- What’s Trending in Turf? 2026’s Most Unique Artificial Grass Landscape Ideas – OC Turf & Putting Greens (https://octurfandputtinggreens.com/whats-trending-in-turf-2026s-most-unique-artificial-grass-landscape-ideas)
- Troubleshoot Common Installation Issues
- smartturf.com (https://smartturf.com/most-artificial-grass-problems-start-with-installation)
- Top Synthetic Turf Installation Problems (and Solutions) (https://siteone.com/en/articles/turf-care/top-synthetic-turf-installation-problems-and-solutions)
- xihyturf.com (https://xihyturf.com/artificial-turf-grass-installation-mistakes.html)
- artificialturfexpress.com (https://artificialturfexpress.com/blog/best-artificial-turf-installation-5-diy-problems-to-watch-out-for)
- Fake Grass Installation Mistakes (and Ways to Avoid Them) (https://southwestgreens.com/blog/fake-grass-installation-mistakes-and-ways-to-avoid-them)