
Introduction
Transforming a yard into a lush, green oasis is a goal for many homeowners. However, achieving the perfect turfed backyard can often seem daunting. This guide outlines the essential steps for installing artificial turf and emphasizes the benefits of a well-maintained lawn, including:
- Reduced water usage
- Minimal upkeep
Yet, what if the installation does not proceed as expected? By examining common pitfalls and their solutions, this article provides readers with the knowledge necessary for a successful transformation, encouraging them to envision their ideal outdoor space.
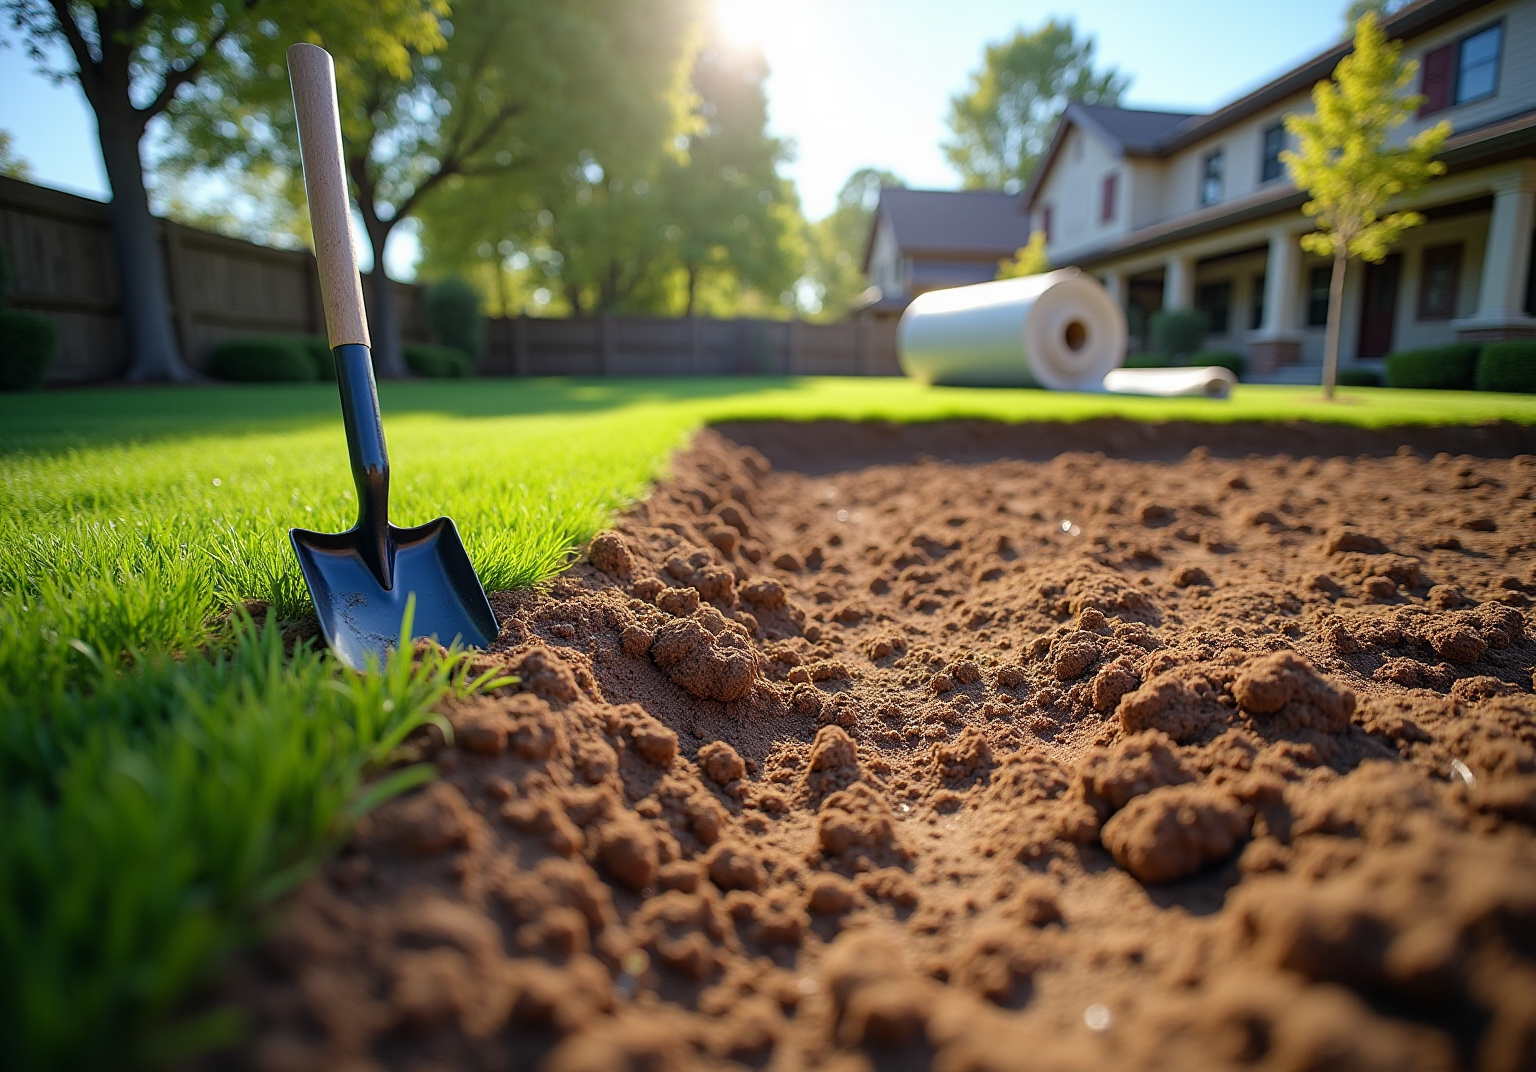
Prepare Your Backyard for Turf Installation
- Clear the Area: Begin by removing any existing grass, weeds, and debris from the designated grass zone. Utilize a shovel or sod cutter to extract the top 2-4 inches of soil, creating a clean slate for your new grass.
- Level the Ground: After clearing, employ a rake to level the ground. Fill in any low spots with soil to ensure a flat surface. This step is crucial, as uneven ground can lead to drainage issues and an unappealing final appearance. Proper leveling is vital for the longevity of your grass installation, as it prevents complications such as water retention and uneven wear.
- Install a Weed Barrier: Lay down a weed barrier fabric to inhibit weeds from growing through the grass. This will help maintain the appearance of your lawn and reduce maintenance efforts in the future, ensuring a clean and attractive surface.
- Add Base Material: Spread a layer of crushed stone or gravel (approximately 2-3 inches) over the area. This base will provide necessary drainage and stability for the turf in the turfed backyard. Compact the base material using a tamper to ensure it is firm and level, which is essential for a successful installation.
- Check Drainage: Verify that the area has proper drainage. If necessary, create a slight slope away from structures to prevent water pooling. This is critical for preserving the lifespan of your grass, as effective drainage helps avert issues such as flooding and surface damage.
Reflecting on your grass installation, consider the positive experiences of our clients. For instance, Dick Bryant noted how the individual assessed his needs and provided the ideal solution for his turf problem. Scott Sachse expressed gratitude for the exceptional work performed on his new putting green, highlighting the professionalism and courteous nature of the team. Les Boatright appreciated Brock’s detail-oriented approach and creativity, ensuring the project was completed on time and within budget. These testimonials illustrate Hall’s commitment to delivering expert artificial grass solutions tailored to your landscaping needs.

Install the Artificial Turf: Step-by-Step Process
- Roll Out the Surface: Begin by unrolling the synthetic grass and placing it over the prepared ground. Allow it to acclimate for a few hours to minimize creasing and ensure it lays flat. Customers like Dick Bryant have observed that adhering to expert guidance during this phase yields optimal results.
- Cut the Grass to Fit: Utilize a utility knife to trim the edges of the grass for a precise fit in the designated area. Ensure a slight overhang remains for tucking under edges later. Brock’s meticulous attention to detail guarantees that this step is executed with precision, as noted by satisfied clients.
- Secure the Ground: Fasten the grass to the ground using landscape staples or adhesive. Position staples every 12 inches along the seams and edges to maintain the grass’s position. Scott Sachse commended the professionalism of the crew during this crucial installation phase.
- Seam the Grass: For installations involving multiple sections of grass, employ seam tape and adhesive to connect them. Fold back the edges of the sod, apply the seam tape, and press the edges back down to achieve a seamless appearance. Brock’s expertise in this area has been recognized by clients who value the flawless finish.
- Add Infill: After securing the grass, evenly distribute infill material, such as silica sand or rubber granules, across the surface. This step helps weigh down the grass and keeps the blades upright. Use a broom to ensure an even distribution of the infill, contributing to a professional look.
- Final Touches: Brush the surface with a stiff-bristled broom to lift the fibers and create a natural appearance. Tuck any overhanging edges under borders or hardscapes for a polished finish. Les Boatright’s satisfaction with the final product exemplifies the quality that Hall Turf strives to deliver.

Maintain Your Turf for Longevity and Aesthetics
- Regular Cleaning: To maintain cleanliness and prevent unpleasant odors, especially in homes with pets and children, rinse the surface with a hose regularly to remove dust, debris, and pet waste. Engaging a professional like Brock to assess your requirements can lead to tailored maintenance practices that suit your specific landscaping needs.
- Brush the Lawn: Employ a stiff-bristled broom or a grass rake to brush the grass fibers against the grain. This technique keeps the blades upright, ensuring a natural appearance. Regular brushing is considered the most critical maintenance task for synthetic grass, as noted by local specialists. Customers have commended Brock’s meticulous attention to detail, which ensures proper installation and simplifies maintenance.
- Check for Debris: Regularly inspect the surface for leaves, branches, or other debris. Promptly remove any large items to prevent matting and ensure proper drainage, which is vital for maintaining the turf’s integrity. Brock’s professional team is recognized for their thorough installation, which minimizes debris accumulation and enhances drainage.
- Address Stains Promptly: For any spills or stains, clean the area immediately with a mild soap solution and rinse thoroughly. Avoid using harsh chemicals that could damage the grass. Clients have reported that the maintenance advice provided has helped them keep their grass in excellent condition.
- Inspect for Damage: Periodically check for signs of wear or damage, such as loose seams or tears. Regular inspections are essential for early detection of damages, allowing for prompt repairs to prevent further deterioration. With Brock’s expertise, homeowners can be confident in the longevity of their grass setup, ensuring it remains in great shape for years to come.

Troubleshoot Common Turf Installation Issues
- Uneven Surface: Observing bumps or dips after setup indicates potential issues with the base layer’s compactness. To address this, lift the turf, re-level the base, and re-secure the turf. Proper surface preparation is essential to prevent complications, as uneven setups can lead to water pooling and subsequent damage. A case study on “Uneven Turf Installation” underscores the importance of ensuring a level surface to mitigate these issues.
- Poor Drainage: If water accumulates on the surface, it suggests that the base may not have been adequately sloped during installation. To rectify this, adjust the base or implement drainage solutions. Ensuring a solid and even sub-base during ground preparation is crucial for preventing drainage issues and enhancing the overall performance of the grass. Expert surface installers emphasize that proper base preparation is vital for successful installations.
- Wrinkling: The presence of wrinkles in the grass may indicate that it was not laid flat. Elevate the affected area, re-stretch the grass, and secure it again. Acclimating the surface before installation can help minimize this issue, ensuring a smoother finish and preserving the visual appeal of your grass.
- Seam Issues: Visible or separating seams may arise from inadequate adhesive application. Inspect the adhesive used and reapply seam tape and adhesive as necessary to ensure a tight bond between pieces. Adhering to proper installation standards is crucial to avoid common seam problems, as highlighted in various case studies.
- Infill Problems: An uneven infill layer can adversely affect the grass’s performance. Use a broom to evenly redistribute the infill across the surface. Regular brushing helps maintain an even layer, contributing to the grass’s longevity and aesthetic appeal. Selecting the appropriate infill is also essential for consistent performance, regardless of traffic levels. It is important to note that the average lifespan of artificial turf ranges from 15 to 25 years, making proper maintenance critical.

Conclusion
Transforming a yard into a perfect turfed backyard is a worthwhile investment that enhances both aesthetic appeal and long-term durability. By adhering to the necessary preparation, installation, and maintenance processes, homeowners can cultivate a lush, vibrant lawn that enriches their outdoor environment while minimizing upkeep.
Thorough preparation is crucial. This includes:
- Clearing the area
- Leveling the ground
- Installing a weed barrier to prevent future complications
The installation process requires precision in:
- Rolling out the turf
- Securing the turf to ensure a seamless appearance
Additionally, maintenance practices such as:
- Regular cleaning
- Inspections
are vital for preserving the grass’s integrity. Real-life testimonials underscore the positive outcomes of following these best practices, highlighting the satisfaction of clients who have successfully transformed their yards.
Ultimately, dedicating time and effort to the proper installation and maintenance of artificial turf not only enhances the beauty of a backyard but also contributes to its longevity. By embracing these steps, homeowners can create a stunning outdoor environment that provides enjoyment for years to come. For those looking to elevate their landscaping, now is the ideal moment to take action and realize that dream turfed backyard.
Frequently Asked Questions
What is the first step in preparing my backyard for turf installation?
The first step is to clear the area by removing any existing grass, weeds, and debris. Use a shovel or sod cutter to extract the top 2-4 inches of soil to create a clean slate for the new grass.
How do I ensure the ground is level before installing turf?
After clearing the area, use a rake to level the ground. Fill in any low spots with soil to ensure a flat surface, as proper leveling is crucial to prevent drainage issues and ensure an appealing final appearance.
Why is it important to install a weed barrier?
Installing a weed barrier fabric helps inhibit weeds from growing through the grass, maintaining the appearance of your lawn and reducing future maintenance efforts.
What type of base material should I add before turf installation?
You should spread a layer of crushed stone or gravel, approximately 2-3 inches thick, over the area. This base provides necessary drainage and stability for the turf.
How do I compact the base material for turf installation?
Use a tamper to compact the base material, ensuring it is firm and level, which is essential for a successful installation.
How can I check if the area has proper drainage?
Verify that the area has proper drainage by ensuring there is a slight slope away from structures to prevent water pooling. Effective drainage is critical for preserving the lifespan of your grass.
Are there any testimonials regarding turf installation services?
Yes, clients have shared positive experiences, such as Dick Bryant appreciating the tailored solutions, Scott Sachse expressing gratitude for the exceptional work on his putting green, and Les Boatright valuing the detail-oriented approach and timely completion of the project.
List of Sources
- Prepare Your Backyard for Turf Installation
- litagrass.com (https://litagrass.com/blogs/lita-artificial-grass-blog/artificial-turf-installer-checklist?srsltid=AfmBOoqaUkWDdJNObR5pwsKY6wpNBCK7HwFpSLBH0RwvgPncWsbgugJp)
- Considering synthetic turf? What homeowners should know before installation – News (https://blogs.ifas.ufl.edu/news/2025/07/15/considering-synthetic-turf-what-homeowners-should-know-before-installation)
- turft.com (https://turft.com/spring-2026-turf-installation-why-now-is-the-best-time-to-upgrade-your-yard-with-synthetic-grass)
- Plastic Turf Fields Are Taking Over America (https://nytimes.com/2025/07/26/business/artificial-turf-grass-sports.html)
- Maintain Your Turf for Longevity and Aesthetics
- agrowstar.com (https://agrowstar.com/markets/stocks.php?article=abnewswire-2026-1-28-professional-artificial-turf-cleaning-sets-new-standards-for-hygiene-and-performance)
- Keep Your Artificial Grass Fresh: 8 Easy Maintenance Tips (https://artificialturfexpress.com/blog/8-artificial-grass-maintenance-tips-to-extend-longevity)
- How to Maintain Your Artificial Grass All Year Round (https://synlawn.com/articles/how-to-maintain-artificial-grass)
- Maintaining and Cleaning Artificial Grass for Longevity: Expert Tips and Tricks | Smart Turf® Artificial Grass (https://smartturf.com/clean-maintain-artificial-grass)
- Artificial Turf Maintenance Guide | Cleaning & Care Tips (https://fieldturflandscape.com/maintenance/artificial-turf-maintenance-guide)
- Troubleshoot Common Turf Installation Issues
- justanswer.com (https://justanswer.com/home-improvement/f925c-faulty-job-done-install-synthetic-turf-10-2019.html)
- blog.azluxurylawns-tucson.com (https://blog.azluxurylawns-tucson.com/artificial-turf-cost-investment-strategy/why-artificial-turf-fails-and-how-professionals-prevent-it)
- Fixing 5 Challenges in Commercial Artificial Turf Installations (https://velcro.com/news-and-blog/2024/07/fixing-5-challenges-in-artificial-turf-installation)
- Solve Turf Troubles: 12 Common DIY Installation Issues Fixed (https://artificialturfexpress.com/blog/troubleshooting-guide-for-diy-installation-of-the-best-artificial-turf)
- Problems With Artificial Grass (and Fixes) | US Turf (https://usturfsandiego.com/news/problems-with-artificial-grass)