
Introduction
Creating a personal putting green at home can transform an ordinary backyard into a golfer’s paradise. This dedicated space not only offers opportunities for practice but also enhances leisure activities for homeowners. However, the journey from concept to completion can be daunting. It raises important questions regarding space, design, and maintenance. To ensure a successful installation that meets both aesthetic and functional goals, several essential steps must be taken.
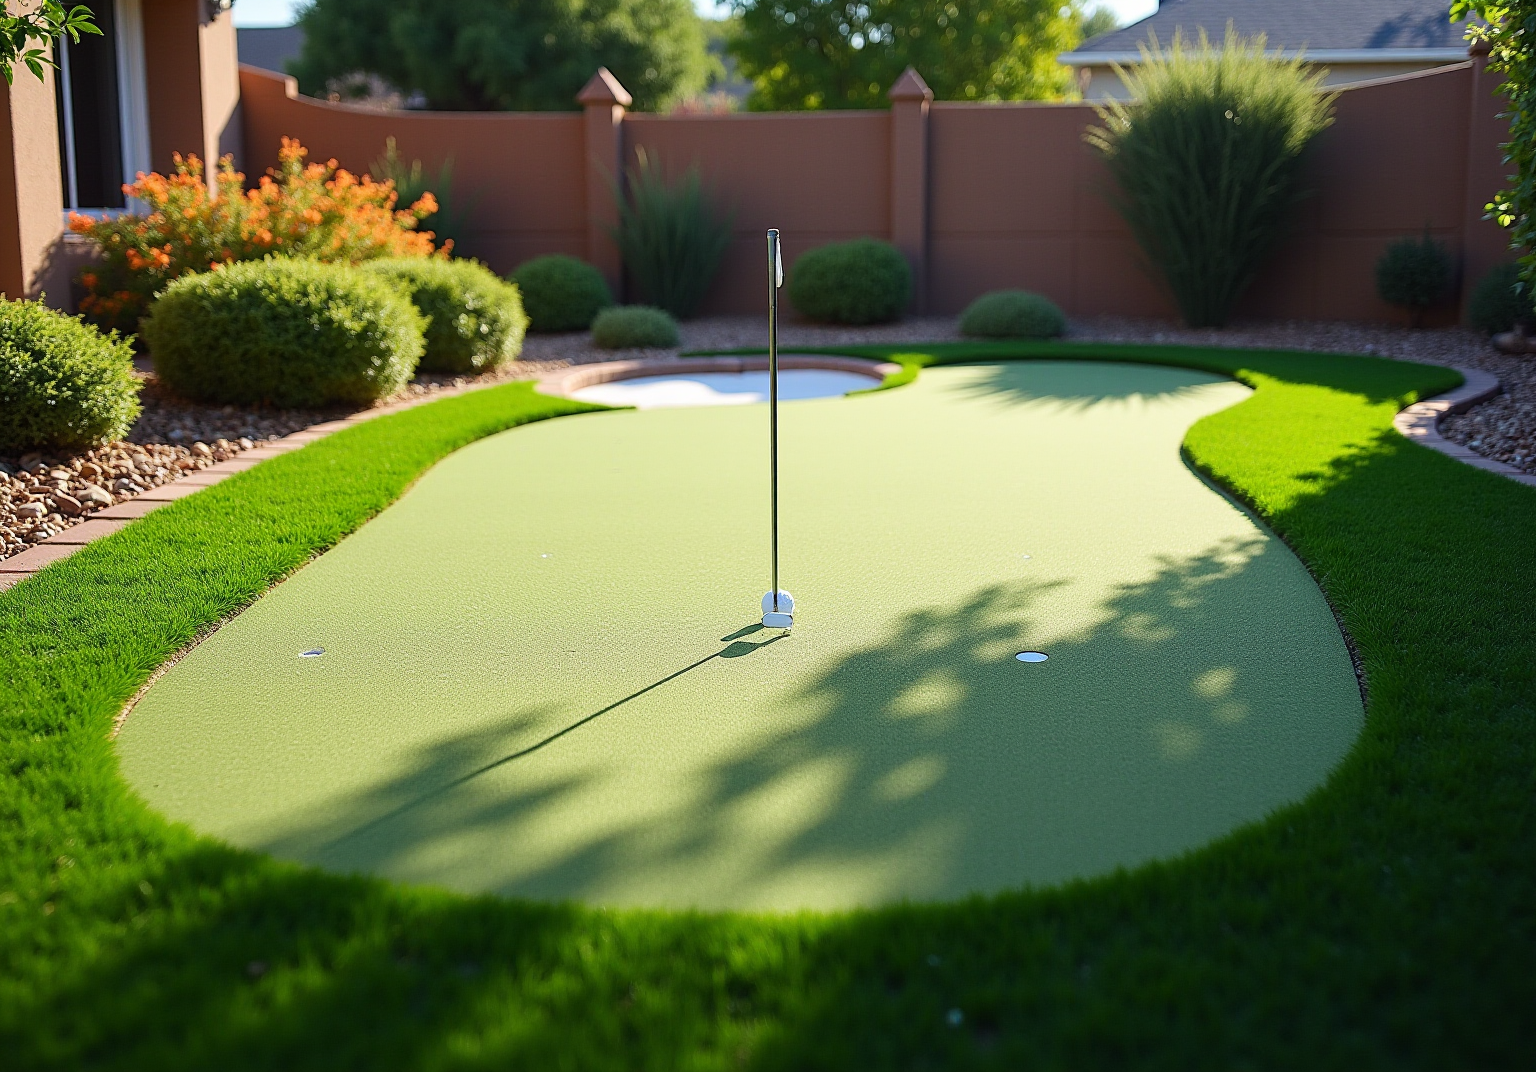
Assess Your Space and Define Your Goals
- Measure Your Yard: Begin by measuring the dimensions of the space designated for your putting green using a tape measure. For a basic setup, aim for at least 100-150 square feet, which is adequate for casual practice and can accommodate a small gathering. For context, the average yard is approximately 5,500 square feet, which can inform your design aspirations.
- Evaluate Sunlight and Drainage: Assess the sunlight exposure in your chosen area throughout the day. Adequate sunlight is vital for maintaining healthy grass. Additionally, investigate any drainage issues, as proper drainage is necessary to prevent water accumulation that could harm the turf.
- Define Your Goals: Clearly outline your objectives for the area. Whether for practice, entertainment, or enhancing your property, understanding your goals will inform your design choices. Landscape architects often emphasize the importance of aligning the area’s features with your intended use to maximize both enjoyment and functionality. As one architect noted, ‘Establishing your objectives is essential to guarantee that the putting green fulfills its intended function efficiently.’ Experts like Brock from Hall Turf can offer valuable insights, as he has a proven track record of assisting homeowners in achieving their desired outcomes with putting greens.
- Consider Accessibility: Ensure that the site of your putting green is easily accessible for both maintenance and use. Being close to your home can significantly enhance your enjoyment and convenience, making it easier to incorporate into your daily routine.
- Visualize the Design: Draft a rough sketch of your putting area layout, including potential hole placements and contours. This visualization will help you understand how the foliage integrates into your design and allows for adjustments before installation. Remember that larger areas may necessitate more complex drainage solutions and higher installation costs, which are important considerations in your planning.
Plan the Layout and Design Features
- Select the Form: Begin by choosing a shape for your putting green. Common options include circular, oval, or freeform designs. It is essential that the selected shape complements your yard’s overall layout and maximizes available space. Homeowners have found that collaborating with professionals, such as Brock, can assist in selecting the most suitable shape tailored to their specific yard dimensions and personal preferences.
- Incorporate Contours: To enhance the challenge and realism of your putting surface, consider adding slopes and undulations. Utilize a garden hose or string to outline these features, allowing for visualization of their impact on play before finalizing your design. Clients have commended Brock for his expertise, ensuring that contours are both functional and aesthetically pleasing.
- Plan the Holes: Strategically plan the placement of at least two or three holes to facilitate training from various angles. Ensure sufficient spacing between holes to prevent interference, thereby allowing for a more versatile training experience. Brock’s expertise can guide you in determining placements that enhance your training regimen.
- Add Features: Improve the aesthetics of your putting green by incorporating elements such as sand traps, fringe areas, or water features. These additions not only beautify the space but also provide additional practice opportunities, simulating real-course conditions. Customers have noted that Hall Turf’s team excels in seamlessly integrating these features into the design, creating a cohesive appearance.
- Create a Blueprint: Develop a comprehensive plan that outlines all features, dimensions, and materials required for your putting green. This blueprint will serve as a guide throughout the installation process, ensuring that every aspect is accounted for and executed with precision. With Hall Turf’s assistance, you can be confident that your design will be both functional and aligned with your vision for an attractive layout.
Select Materials and Execute Installation
- Select the appropriate surface by choosing specifically designed for a putting green. Look for products that closely replicate the feel of natural grass, ensuring a smooth roll and a realistic play experience.
- Gather Necessary Tools: Assemble all necessary tools, including a shovel, rake, compactor, utility knife, and measuring tape. Having these tools ready will streamline your project and help avoid delays.
- Prepare the Base: Start by clearing the area of existing grass and debris. Level the ground and create a base layer, ideally 2 to 4 inches deep. Proper base construction is crucial for the stability and drainage, as it prevents water pooling that could damage the green.
- Install the Grass: Roll out the grass over the prepared base, ensuring it lays flat without wrinkles. Trim the grass to fit your desired design, and secure it using adhesive or landscape nails to keep it in place.
- Add finishing touches and consider adding features like sand traps or decorative landscaping elements. Ensure everything is securely positioned and visually appealing, enhancing both functionality and aesthetics.

Establish Maintenance Routines for Longevity
- Regular Cleaning: To maintain a pristine putting green, it is essential to perform regular cleaning. Using a vacuum or a soft broom effectively keeps the surface clean and prevents moisture buildup that can lead to mold. For instance, when Dick Bryant faced a lawn issue, Brock assessed his needs and provided the ideal recommendation, showcasing Hall Turf’s commitment to quality service.
- Brushing the Turf: Regular brushing, which ensures a natural appearance, is important. This practice also helps in evenly distributing infill material, vital for optimal performance and consistent ball roll. For larger lawns or those with heavy foot traffic, employing a mechanical power brush can enhance maintenance effectiveness. Scott Sachse witnessed this firsthand when Brock and his crew installed a putting green at his home, highlighting their expertise in maintaining high standards.
- Inspect for Damage: Regular inspections for damage, such as tears or loose seams, are necessary. Promptly addressing these issues is vital to prevent further deterioration and extend the lifespan of your putting green. Regular maintenance, as emphasized by Les Boatright’s experience with Brock, is also recommended to preserve the grass’s integrity and appearance over time.
- Watering: Depending on the grass variety, occasional watering may be required to keep the surface cool and clean. Additionally, regularly replenishing infill material is essential for maintaining the surface’s performance and cushioning. This practice ensures a consistent playing surface.
- Seasonal Adjustments: Tailor your maintenance routine to the seasons. In winter, gently remove snow and ice to avoid damage, while in summer, monitor for heat stress and adjust watering as necessary to keep the turf in optimal condition. Adhering to these seasonal guidelines will help preserve the quality of your putting green throughout the year.

Conclusion
In conclusion, creating a small putting green at home can significantly enhance your outdoor space, transforming it into a personal oasis for relaxation and practice. By assessing your yard, planning an effective layout, selecting quality materials, and establishing a maintenance routine, homeowners can enjoy a functional and aesthetically pleasing putting green that enriches their lifestyle.
Key steps in this process include:
- Measuring the space
- Understanding sunlight and drainage needs
- Defining your goals for the putting area
Thoughtful design considerations, such as contours, hole placements, and surrounding features, can elevate both the challenge and enjoyment of your green. Additionally, selecting appropriate materials and executing a meticulous installation are crucial for achieving a durable and high-performing surface.
The benefits of having a putting green extend beyond mere practice; it provides a unique opportunity to engage with family and friends while enhancing the beauty of your landscape. By embracing these steps, you not only ensure a successful installation but also foster a deeper appreciation for the game and the outdoor environment. Consider creating your own putting green to enjoy countless hours of fun and relaxation right in your backyard.
Frequently Asked Questions
How should I start planning my golf area?
Begin by measuring the dimensions of the space designated for your golf area using a tape measure. Aim for at least 100-150 square feet for a basic setup, which is sufficient for casual practice and can accommodate a small putting green.
What is the average size of a putting green on a U.S. golf course?
The average size of a putting green on a U.S. golf course is approximately 5,500 square feet, which can help inform your design aspirations.
Why is it important to evaluate sunlight and drainage for my golf area?
Adequate sunlight is vital for maintaining healthy grass, while effective drainage is crucial to prevent water accumulation that could harm the turf.
How can I define my goals for the putting green area?
Clearly outline your objectives for the small putting green area, whether for practice, entertainment, or enhancing your landscape. Understanding your goals will inform your design choices and maximize both enjoyment and functionality.
Why is consulting with experts beneficial when planning a golf area?
Consulting with experts, like landscape architects, can provide valuable insights and tailored recommendations to help homeowners achieve their desired outcomes for their golf area.
What should I consider regarding accessibility for my golf area?
Ensure that the site of your golf area is easily accessible for both maintenance and use. Being close to your home can enhance your enjoyment and convenience.
How can I visualize the design of my putting area?
Draft a rough sketch of your putting area layout, including potential hole placements and contours. This will help you understand how the foliage integrates into your overall yard design and allows for adjustments before installation.
List of Sources
- Assess Your Space and Define Your Goals
- How To Make Your Backyard Putting Green Dream a Reality (https://usga.org/content/usga/home-page/course-care/green-section-record/62/issue-17/how-to-make-your-backyard-putting-green-dream-a-reality.html)
- texasturfusa.com (https://texasturfusa.com/austin-landscape-design/the-perfect-backyard-putting-green-size-a-golfers-guide)
- syntheticturfnorthwest.com (https://syntheticturfnorthwest.com/what-to-know-when-installing-a-putting-green-in-your-yard)
- shawgrass.com (https://shawgrass.com/about/news-blog/backyard-putting-greens-what-you-need-to-know)
- backninegreens.com (https://backninegreens.com/blog/why-backyard-putting-greens-are-the-new-must-have-for-luxury-homeowners)
- Plan the Layout and Design Features
- texasturfusa.com (https://texasturfusa.com/austin-landscape-design/the-perfect-backyard-putting-green-size-a-golfers-guide)
- Designing the Ultimate Backyard Putting Green That Matches Your Landscape (https://southwestgreens.com/blog/designing-the-ultimate-backyard-putting-green-that-matches-your-landscape)
- Backyard Putting Green Design: Best Tips & Ideas (https://aglgrass.com/blogs/backyard-putting-green-design)
- bestputtinggreensandturfpalmdesert.com (https://bestputtinggreensandturfpalmdesert.com/blog/designing-a-multi-hole-layout-for-private-putting-greens)
- 2026’s Biggest Artificial Turf Putting Green Design Trends – OC Turf & Putting Greens (https://octurfandputtinggreens.com/2026s-biggest-artificial-turf-putting-green-design-trends)
- Select Materials and Execute Installation
- synlawngolf.com (https://synlawngolf.com/blog/how-to-build-a-putting-green?srsltid=AfmBOopRbH1KAYo2i4TqD6pYeAvl76kaFGAAxZPsTpko8YGtP4MESD_h)
- syntheticturfnorthwest.com (https://syntheticturfnorthwest.com/what-to-know-when-installing-a-putting-green-in-your-yard)
- linkedin.com (https://linkedin.com/pulse/united-states-golf-putting-green-market-size-application-2025-ntw8e)
- Synthetic Turf Market | Global Market Analysis Report – 2036 (https://futuremarketinsights.com/reports/synthetic-turf-market)
- lowes.com (https://lowes.com/n/how-to/install-artificial-grass)
- Establish Maintenance Routines for Longevity
- Artificial Putting Green Maintenance: Year-Round Care Guide (https://aglgrass.com/blogs/artificial-putting-green-maintenance)
- How to Maintain Your Artificial Grass All Year Round (https://synlawn.com/articles/how-to-maintain-artificial-grass)
- wintergreengrass.com (https://wintergreengrass.com/10-tips-for-maintaining-an-artificial-grass-putting-green)
- Artificial Turf Maintenance Guide | Cleaning & Care Tips (https://fieldturflandscape.com/maintenance/artificial-turf-maintenance-guide)
- How to Keep Artificial Turf Clean Year-Round | US Turf (https://usturfsandiego.com/news/how-to-keep-artificial-turf-clean)