
Introduction
Creating a personal putting green in your backyard is not merely a dream for golf enthusiasts; it is a feasible project that can transform outdoor spaces into a golfer’s paradise. This guide outlines the essential tools, materials, and techniques required to establish a durable and visually appealing turf putting green. However, the challenge lies in navigating the complexities of installation and maintenance to ensure a long-lasting and enjoyable experience. What are the key elements that can significantly impact the success of this backyard project?
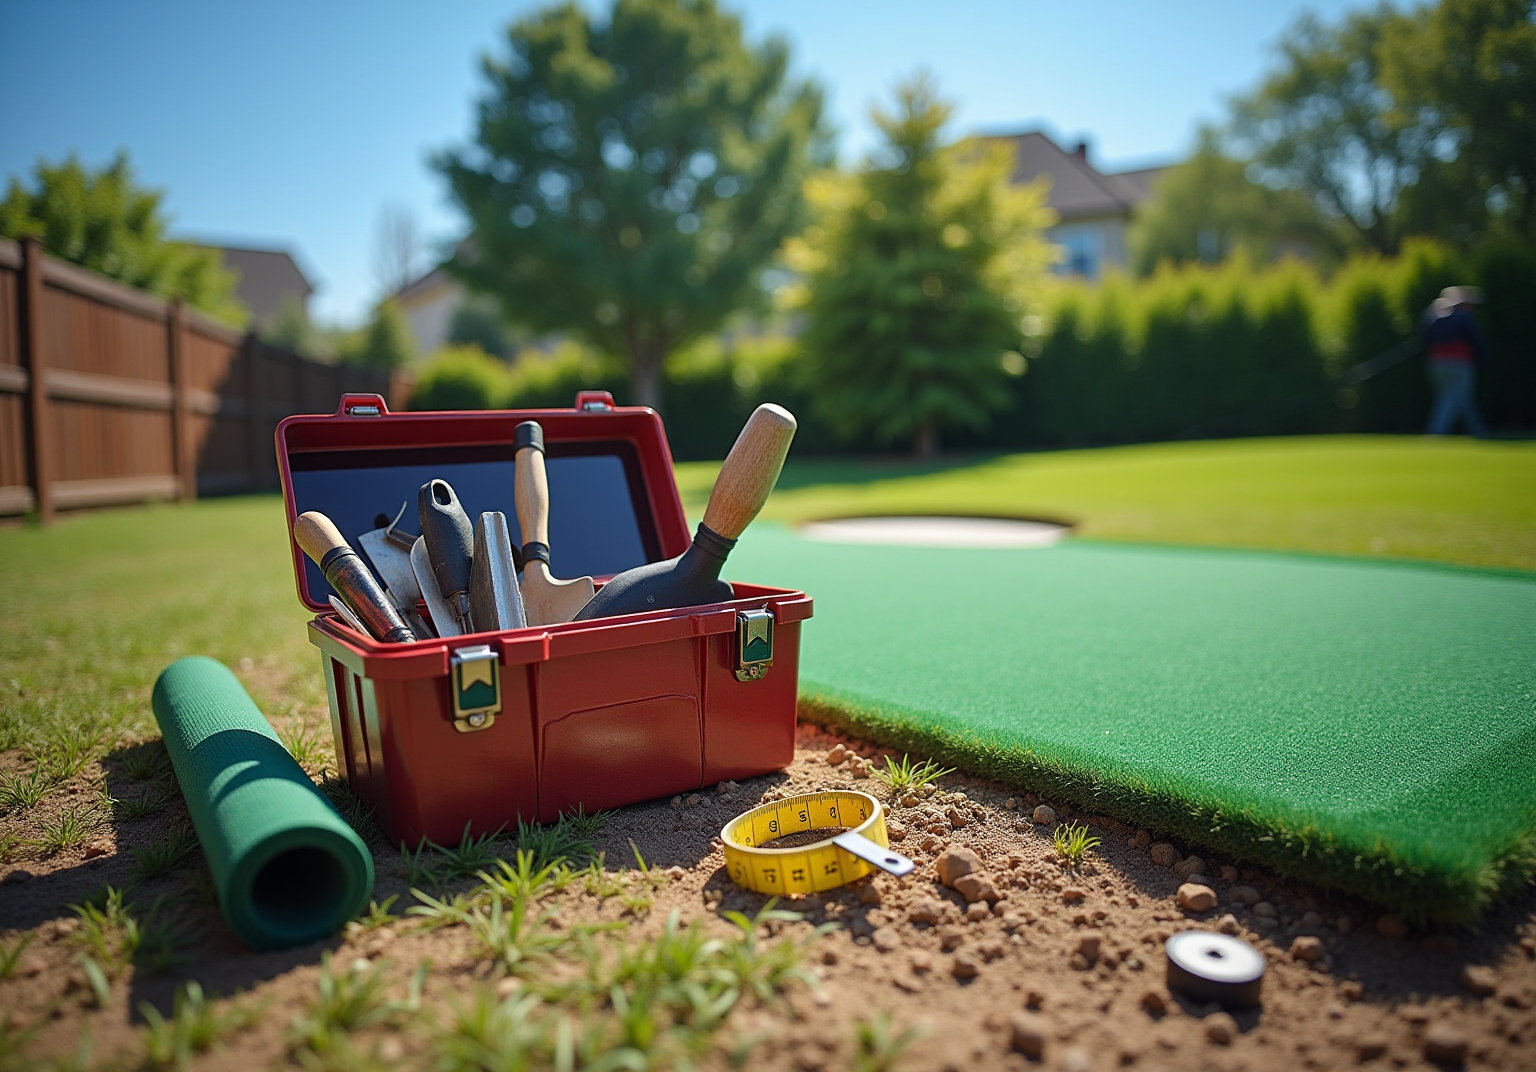
Gather Essential Tools and Materials for Installation
To successfully install your backyard putting green, it is essential to gather the following tools and materials:
-
Tools:
- Shovel: This tool is crucial for digging and moving soil, especially when removing the existing lawn.
- Rake: A rake is used to level the ground and clear away debris, ensuring a smooth surface for installation.
- Tamper: Important for compacting the base material, which is vital for stability.
- Tape Measure: Necessary for accurate measurements of your green; it is advisable to add 12 to 24 inches to your measurements for flexibility.
- Utility Knife: Ideal for trimming the grass to the correct size, ensuring a precise fit.
- Landscape Staples: These are used to secure the grass in place, preventing shifting over time.
- Broom: Useful for cleaning the surface after setup, helping to maintain a neat appearance.
- Sturdy Pick: Recommended for removing larger rocks and tree stumps during site preparation.
- Carpet Kicker: Essential for ensuring the surface is pulled taut during installation.
- Hammer or Mallet: Necessary for securing grass with nails, ensuring it remains in place.
- Drop Spreader: This tool is used for evenly distributing infill material across the grass.
-
Materials:
- Base Material: Typically, 1/4-inch to 3/8-inch unwashed crushed limestone serves as the base layer, providing drainage and support.
- Turf Surface: Choose a premium turf specifically created for a putting green to guarantee longevity and effectiveness, as advised by professionals such as Brock from Hall Turf.
- Infill Material: Silica sand is recommended to provide stability and a natural feel underfoot.
- Weed Barrier: This material helps prevent weed growth beneath the turf, although pet owners should consider alternatives.
-
Optional:
- Accessories: These accessories enhance your putting experience, improving gameplay and adding a professional touch to your green.
- Hoses: Use hoses to outline the shape of your green before digging, aiding in visualizing the layout.
Having these tools and materials prepared will simplify the setup procedure and lead to a successful result. As noted, “Using the right tools may mean the difference between turf that constantly needs repair and a well-maintained green.” With Hall Turf’s expertise, you can ensure a professional installation that meets your needs.

Plan and Design Your Backyard Putting Green Layout
To effectively plan and design your backyard putting green, adhere to these essential steps:
- Choose the Location: Identify a flat area in your yard that receives ample sunlight and is free from obstructions such as trees or large rocks. This ensures optimal playing conditions.
- Determine the Size: Typical backyard putting surfaces range from 10×10 feet to 20×30 feet. Assess your available area and decide how many holes you wish to include, noting that larger spaces can accommodate more diverse play.
- Outline the Shape: Utilize a hose or spray paint to outline your desired shape. Popular designs include circular, oval, or freeform layouts, allowing for creativity while maintaining functionality.
- Consider Contours: Introducing slight undulations can enhance the challenge. Plan for slopes and breaks that mimic those found on a real golf course, which can improve your putting skills.
- Plan for Drainage: Design your landscape with a slight slope away from your home to facilitate effective water runoff and maintain surface integrity.
- Sketch Your Design: Create a visual representation of your layout, detailing the placement of holes and any additional features like sand traps or fringe areas. This visual representation will guide your installation process and ensure all elements are well-integrated.
By meticulously planning your layout, you can create a backyard that features a putting green, which is not only functional but also enhances the aesthetic appeal of your outdoor area.

Install the Base and Lay Down the Turf
To successfully install your putting green, follow these steps:
- Preparation: Start by removing any existing grass and debris from the outlined area. Dig down approximately 3-5 inches to create a suitable base for your green.
- Base Material: Fill the excavated area with 2-4 inches of crushed stone. Compact the stone firmly using a tamper to ensure a stable and durable base.
- Install Drainage: If your area is prone to water retention, incorporate drainage pipes or gravel to facilitate proper water runoff.
- Level the Surface: Use a rake to even out the surface of the crushed stone, ensuring it is smooth and uniform for optimal installation of grass.
- Lay Down Turf: Roll out your turf over the prepared base, leaving some excess material around the edges for trimming.
- Secure the Grass: Use landscape staples to fasten the grass to the ground, placing them every 2-3 feet along the edges and seams to prevent shifting.
- Trim Excess Grass: After securing the grass, use a utility knife to trim along the edges for a neat finish.
- Add Infill: Finally, spread infill material evenly across the surface of the turf. This helps weigh it down and provides a natural feel underfoot.
By following these steps, you will create a strong base for your practice area that is intended to endure for years, enhancing both your skills and your golfing experience.

Maintain Your Putting Green for Long-Lasting Enjoyment
To maintain your putting green in excellent condition, follow these tips:
- Regular Cleaning: Consistently remove debris such as leaves, twigs, and dirt to keep the surface clean. A leaf blower or a stiff-bristled broom is effective for this task.
- Brushing: Brush the surface with a broom or specialized rake. This practice keeps the blades upright and preserves a natural appearance, enhancing playability.
- Inspect for Damage: Conduct routine inspections for signs of wear or damage, such as loose seams or lifted areas. Timely repairs can prevent further deterioration and costly fixes.
- Infill Maintenance: Periodically assess the infill material and replenish it as necessary to ensure optimal performance. Maintaining appropriate infill levels is essential for preserving the surface’s resilience and ball roll speed.
- Surface Rinsing: Occasionally rinse the surface with water to eliminate dust and pet waste, promoting a clean and hygienic playing area. Monthly rinsing is recommended to keep the grass in top condition, as noted in industry guidelines.
- Avoid Heavy Objects: Refrain from placing heavy furniture or equipment on the turf, as this can lead to indentations or damage that affects playability.
By implementing these maintenance suggestions, you can ensure that your backyard remains an attractive and practical space for years to come. With proper care, a turf putting green can last between 15 to 20 years, offering enjoyment and value. Industry studies indicate that regular maintenance—primarily brushing and debris removal—can extend the life of turf by up to 25%. Trust the expertise of Hall Turf, where professionals like Brock tailor turf solutions to your needs, as satisfied customers have experienced. For instance, Dick Bryant praised Brock’s ability to evaluate needs and provide perfect recommendations, while Scott Sachse highlighted the exceptional installation of his putting green and the professionalism of the crew. Les Boatright noted Brock’s detail-oriented approach and commitment to delivering on time and on budget, reinforcing the importance of regular maintenance for lasting enjoyment.

Conclusion
Creating a backyard putting green is not just an enriching project; it’s an investment in both functionality and enjoyment. By adhering to the detailed steps outlined in this guide, individuals can effectively transform their outdoor space into a personal golfing haven. Preparation is paramount – gathering essential tools and materials, along with meticulous planning and design, lays the groundwork for success. Each phase of the installation process is crafted to ensure a durable and aesthetically pleasing putting green that enhances playability and elevates the overall appeal of the yard.
Key insights discussed throughout this article highlight the necessity of selecting the right location, ensuring proper drainage, and understanding the ongoing maintenance required to keep the green in excellent condition. Regular cleaning, brushing, and timely inspections are vital for prolonging the life of the turf and ensuring a consistently enjoyable experience. The recommendations provided, including the use of quality materials and tools, reinforce the notion that investing time and resources into the initial setup yields significant long-term benefits.
Ultimately, the creation and maintenance of a backyard putting green transcends mere home improvement; it fosters a love for golf, encourages outdoor activities, and enhances property value. By embracing the steps outlined in this guide, individuals can achieve a successful installation that promises years of enjoyment. Whether for personal use or entertaining guests, a well-maintained putting green can become a cherished feature of any backyard.
Frequently Asked Questions
What tools are essential for installing a backyard putting green?
Essential tools include a shovel, rake, tamper, tape measure, utility knife, landscape staples, broom, sturdy pick, carpet kicker, hammer or mallet, and a drop spreader.
What is the purpose of each tool needed for the installation?
A shovel is used for digging and moving soil, a rake levels the ground, a tamper compacts the base material, a tape measure ensures accurate sizing, a utility knife trims grass, landscape staples secure the grass, a broom cleans the surface, a sturdy pick removes larger rocks, a carpet kicker pulls the surface taut, a hammer or mallet secures grass with nails, and a drop spreader evenly distributes infill material.
What materials are required for a backyard putting green installation?
Required materials include crushed stone (typically 1/4-inch to 3/8-inch unwashed crushed limestone for the base), a premium synthetic surface designed for turf putting greens, silica sand for infill, and weed barrier fabric to prevent weed growth.
Are there any optional accessories that can enhance the putting green?
Yes, optional accessories include putting cups and flags to improve gameplay and a professional appearance, as well as hoses to outline the shape of the green before digging.
Why is it important to gather the right tools and materials before installation?
Having the right tools and materials prepared simplifies the setup procedure and contributes to a successful installation, potentially leading to turf that lasts for a decade rather than requiring constant repair.
List of Sources
- Gather Essential Tools and Materials for Installation
- 5 Tools That Contractors Installing Artificial Grass Should Use | Purchase Green Artificial Grass (https://purchasegreen.com/blog/crucial-tools-contractors-installing-artificial-grass-should-use)
- How To Build a Backyard Putting Green (https://xgrass.com/how-to-build-putting-green.html)
- artificialgrassliquidators.com (https://artificialgrassliquidators.com/artificial-turf-installation-tools)
- DIY Guide: Essential Tools for Installing (https://blog.artificialgrassrecyclers.com/diy-guide-tools-you-need-to-install-your-own-artificial-turf)
- Plan and Design Your Backyard Putting Green Layout
- texasturfusa.com (https://texasturfusa.com/austin-landscape-design/the-perfect-backyard-putting-green-size-a-golfers-guide)
- Top Backyard Putting Green Trends for 2026 Revealed (https://artificialturfexpress.com/blog/backyard-putting-green-design-trends)
- bestputtinggreensandturfpalmdesert.com (https://bestputtinggreensandturfpalmdesert.com/blog/luxury-putting-green-trends-in-2026)
- Why Luxury Backyard Putting Greens Are Becoming Popular USA (https://backninegreens.com/blog/why-luxury-backyard-putting-greens-are-becoming-popular-in-the-usa)
- Install the Base and Lay Down the Turf
- Backyard Putting Green Cost | What to Expect & How to Save (https://aglgrass.com/blogs/backyard-putting-green-cost)
- stabuiltpavers.com (https://stabuiltpavers.com/how-much-does-a-backyard-putting-green-cost)
- 2026’s Biggest Artificial Turf Putting Green Design Trends – OC Turf & Putting Greens (https://octurfandputtinggreens.com/2026s-biggest-artificial-turf-putting-green-design-trends)
- angi.com (https://angi.com/articles/backyard-putting-green-cost.htm)
- Quote Me – InstallArtificial (https://installartificial.com/quote)
- Maintain Your Putting Green for Long-Lasting Enjoyment
- Artificial Putting Green Maintenance: Year-Round Care Guide (https://aglgrass.com/blogs/artificial-putting-green-maintenance)
- wintergreengrass.com (https://wintergreengrass.com/10-tips-for-maintaining-an-artificial-grass-putting-green)
- Artificial Putting Greens: How Long Do They Really Last? (https://syntheticgrassdfw.com/putting-greens/what-is-the-lifespan-of-an-artificial-dallas-putting-green-installation)
- californiaturfco.com (https://californiaturfco.com/master-artificial-putting-green-grass-care-for-lasting-performance)
- How to Clean and Maintain Putting Green Turf: A Seasonal Guide (https://backninegreens.com/blog/how-to-clean-and-maintain-putting-green-turf-seasonal-checklist)