
Introduction
Installing artificial grass on concrete surfaces can significantly enhance an otherwise dull area, transforming it into a vibrant, green oasis. This guide provides essential steps for achieving a seamless installation, ensuring that the artificial turf not only looks appealing but also performs effectively over time.
However, the installation process presents several challenges, including:
- The need for a flat surface
- The implementation of effective drainage solutions
Homeowners must navigate these complexities to achieve a flawless finish that enhances both aesthetics and functionality.
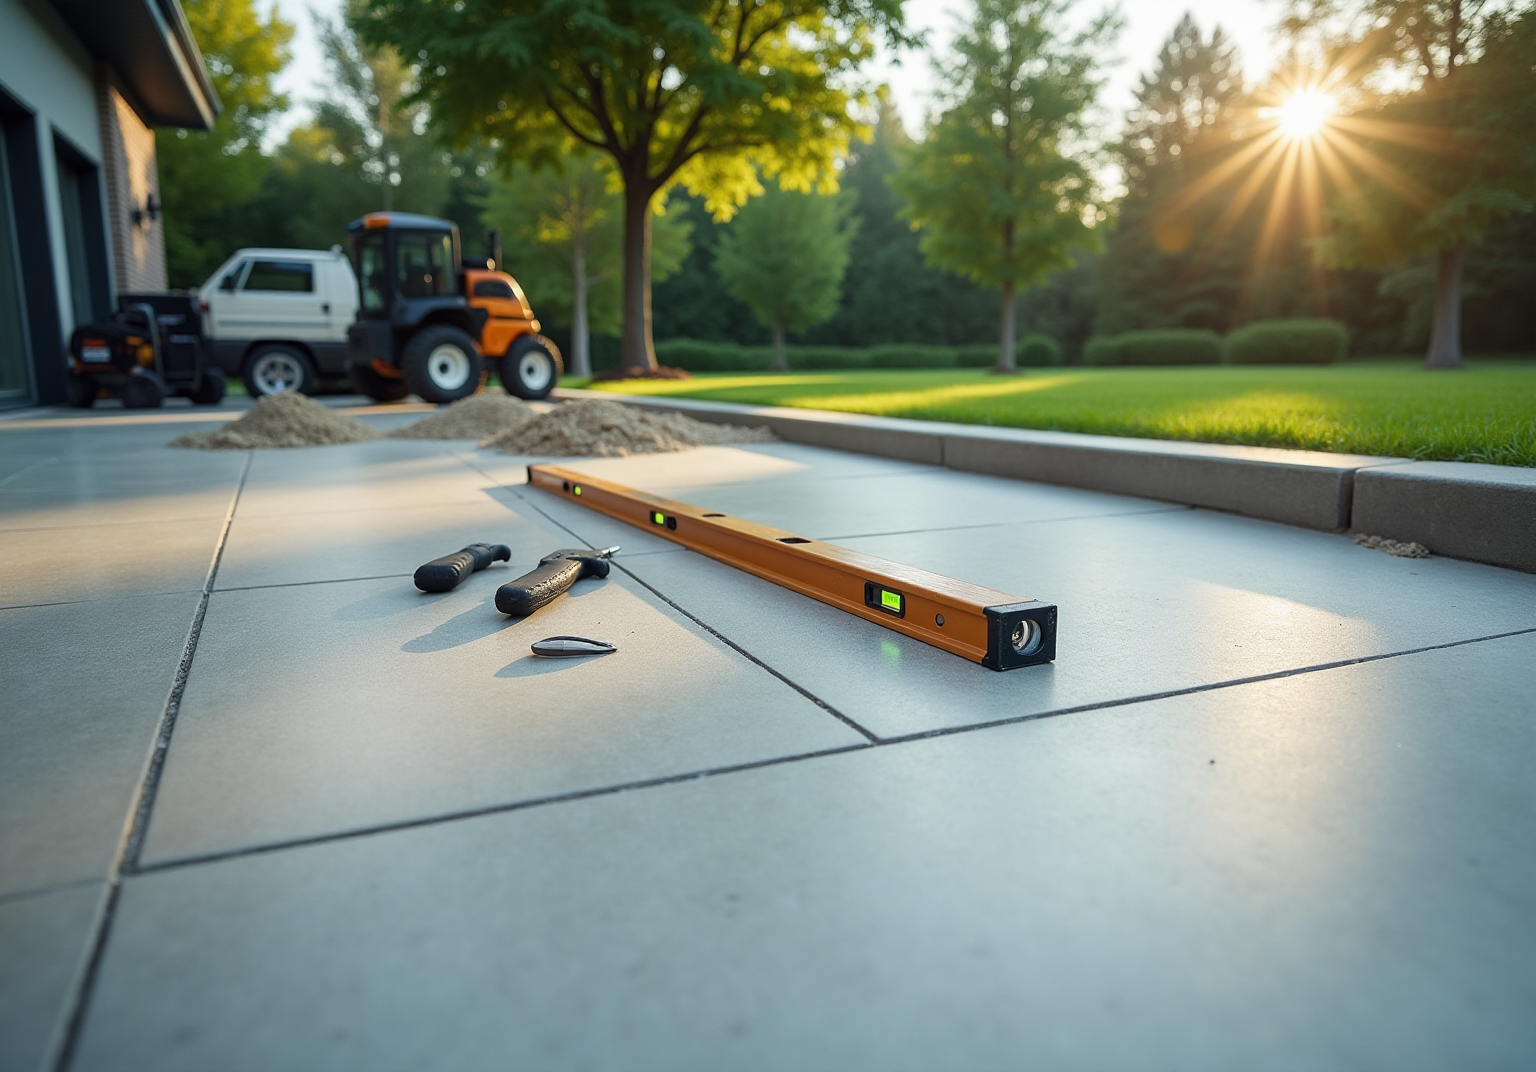
Create a Flat Concrete Surface
Begin by thoroughly inspecting the concrete area for any cracks, holes, or uneven spots. Significant cracks should be addressed using a , while rough spots can be smoothed out with a grinder or sander. To ensure a , utilize a long level or straight edge. If the area is not sufficiently flat, consider applying a to achieve the desired smoothness. It is essential to allow any repairs to cure fully before proceeding to the next steps in the setup process. Additionally, ensure the concrete area is to enhance the . This meticulous preparation is crucial for a , as it helps prevent future issues such as uneven wear and drainage problems. Industry experts emphasize that neglecting to clean the surface can compromise the integrity of the installation.

Consider Adding Drainage Solutions
Evaluate the necessity of drainage based on the specific location and anticipated water runoff. If drainage is deemed essential, consider the beneath the grass. that work in conjunction with their high-quality, , ensuring for your dogs and cats.
Furthermore, Hall Turf’s innovative from pet urine, enhancing the overall experience for both pets and homeowners. Alternatively, a , allowing water to flow through while providing cushioning.
It is crucial to ensure that any to facilitate proper water management and maintain a safe, clean environment for your pets. Long-term will also be addressed to ensure the for concrete setup.

Clean the Concrete Surface Thoroughly
Begin by using a pressure washer or a stiff broom to thoroughly remove all dirt, dust, and debris from the concrete area. Focus particularly on corners and edges, as these spots often collect grime. For any oil stains, , such as tri-sodium phosphate (TSP), and let it sit for 15 to 30 minutes before scrubbing. This approach effectively lifts stubborn stains, providing a .
Next, inspect the concrete area for any damage or irregularities, as addressing these issues is vital for . After cleaning, allow the surface to dry completely, which is essential for optimal adhesion of the . Additionally, incorporating , such as ensuring the concrete has slopes or drainage holes, will further enhance the longevity of the turf. This thorough preparation typically takes a few hours, depending on the extent of the cleaning required, but it is crucial for achieving a .

Unfold and Position Your Artificial Grass
Begin by carefully unrolling the over the prepared surface. Allow the to acclimate to the ambient temperature for at least 24 hours; this step is crucial as it helps and ensures a smoother installation. Position the with the fibers facing the desired viewing angle, typically away from the main sightline, to enhance its . Align the edges of the with any borders or adjacent surfaces for a . When working with multiple pieces of , to create a more and avoid visible joins that can detract from the overall aesthetic.
According to Will, an expert at NeoGrass, “If you don’t brush the turf, then the sand infill will sit on top of the fibres, flattening them down,” which underscores the . Notably, statistics indicate that 92% of setup requests originate from , highlighting the significance of this initial step for a smoother process. Neglecting acclimation can lead to , as evidenced by various case studies on the subject.

Cut the Grass to Fit Your Space
To achieve a precise fit for your , start with a , which is essential for making . , ideally measuring twice to confirm accuracy before proceeding with any cuts. When encountering obstacles like posts or edges, consider from cardboard. This allows you to outline the shape directly onto the ground, ensuring a . Always to prevent fraying of the fibers, which can compromise both the appearance and durability of your setup.
It is advisable to leave a for any necessary adjustments, as this can help accommodate minor discrepancies in measurements. and straight lines are crucial elements of a , significantly reducing the risk of waste and enhancing the overall aesthetic of your project.

Apply Adhesive at Gaps and Edges
Selecting a specifically designed for applications is crucial for achieving a . Start by applying the adhesive along the edges and seams with a caulking gun or a notched trowel to ensure even distribution. Firmly press the turf into the adhesive, taking care to eliminate any air pockets that could compromise the bond. For optimal results, follow the manufacturer’s guidelines regarding drying times and .
Typically, such as Turftak2 are recommended due to their strong, long-lasting bonds and flexibility in various weather conditions. Turftak2 provides a robust bond that remains elastic, which reduces the risk of cracking or seam failure. Experts emphasize that , including aligning seams and ensuring sufficient infill, significantly enhance the durability and appearance of the installation.
Additionally, using facilitates a fast and clean installation, further ensuring a seamless finish. Successful projects demonstrate that careful attention to adhesive application can lead to , particularly when using that withstands . The average drying time for adhesives like Turftak2 is around 24 hours, although this may vary based on .

Smooth Out Gaps with a Joint Roller
Once the adhesive has set, it is essential to use a to press down on the seams and edges of the grass. This tool should be rolled over the seams in multiple directions to ensure that even pressure is applied. Such action assists in and guarantees that the is securely attached. Turf professionals emphasize that “applying with a is crucial for and preventing future lifting of the seams.”
It is important to check for any and make adjustments as necessary to achieve a . On average, to spend about 30 minutes smoothing seams in a typical . Neglecting to use a effectively when installing can lead to , ultimately of your installation.

Apply Sand for Added Stability (Optional)
If preferred, a drop spreader can be used to evenly distribute a layer of across the surface of . After spreading, it is important to use a broom to work the sand into the fibers, and . This process not only helps keep the grass blades upright but also . Furthermore, , preventing water pooling and contributing to a safer outdoor space. It is essential to adhere to the based on the type of grass used.
At Hall Turf, we take pride in delivering expert , whether for a , , or pet area. As Dick Bryant noted, “Brock came out, evaluated my needs and came up with the best solution.” Scott Sachse also shared, “They recently installed a at our new home, and they did an exceptional job.” Our team, led by professionals like Brock, is dedicated to ensuring your project is completed on time and to your satisfaction.

Conclusion
Installing artificial grass on concrete surfaces requires careful attention to detail to achieve a durable and visually appealing result. By adhering to the outlined process-preparing the concrete, addressing drainage needs, and selecting appropriate materials-successful installation is attainable. Thorough preparation is crucial, as it establishes the foundation for the longevity and performance of the artificial turf.
Key steps include:
- Ensuring a flat concrete surface
- Thoroughly cleaning it
- Considering drainage solutions
All of which are fundamental to the installation process. Each phase, from unrolling and positioning the turf to applying adhesive and smoothing seams, is vital for achieving a seamless finish. Additionally, optional sand infill not only adds stability but also enhances the overall experience of the synthetic grass.
Ultimately, dedicating time and effort to these steps results in a beautiful and functional outdoor space, ensuring that the artificial grass remains in excellent condition for years. Whether for a pet area, playground, or aesthetic enhancement, following this guide will lead to a successful artificial grass installation that fulfills both practical needs and aesthetic desires.
Frequently Asked Questions
How should I prepare the concrete surface before installing artificial grass?
Begin by inspecting the concrete area for cracks, holes, or uneven spots. Address significant cracks with a concrete patching compound and smooth out rough spots using a grinder or sander. Use a long level or straight edge to ensure the surface is flat. If necessary, apply a self-leveling compound and allow all repairs to cure fully. Additionally, clean the area of dirt, debris, and loose materials to enhance the adhesion of the synthetic turf.
Why is it important to have a flat concrete surface for artificial grass installation?
A flat concrete surface is crucial for a successful installation of artificial grass as it helps prevent future issues such as uneven wear and drainage problems. Proper preparation ensures better adhesion and longevity of the synthetic turf.
What drainage solutions should I consider when installing artificial grass on concrete?
Evaluate the need for drainage based on the location and expected water runoff. If necessary, consider installing perforated pipes or a French drain system beneath the grass. Alternatively, a drainage mat can be used to allow water flow while providing cushioning. Ensure that any drainage solutions are installed before laying the turf to maintain proper water management.
How does Hall Turf’s drainage solution work with synthetic grass?
Hall Turf offers advanced drainage solutions that work with their high-quality, pet-safe synthetic surface to ensure effective water management. This helps create a comfortable environment for pets while mitigating issues related to water runoff.
What maintenance strategies should I consider for artificial grass installed on concrete?
Long-term maintenance strategies should be addressed to ensure the durability and performance of your artificial grass setup. Regular cleaning and inspection for any issues will help maintain the integrity of the installation and ensure a safe environment for pets.
List of Sources
- Create a Flat Concrete Surface
- Concrete Leveling Costs: The Ultimate Guide [2025 Prices] (https://a1concrete.com/concrete-repair-learning-center/concrete-leveling-costs)
- Concrete Quotes (https://garagejournal.com/forum/threads/concrete-quotes.189803)
- Leveling the Field: How to Ensure an Even Surface During Your Artificial Turf Installation | Synthetic Grass Warehouse (https://syntheticgrasswarehouse.com/blog/leveling-the-field-how-to-ensure-an-even-surface-during-your-artificial-turf-installation)
- How To Install Artificial Grass On Concrete Surfaces (https://turftekusa.com/blog/how-to-install-artificial-grass-on-concrete-surfaces)
- Moasure Case Studies (https://moasure.com/pages/case-studies)
- Consider Adding Drainage Solutions
- 5 Reasons ProGreen Leads End‑to‑End Synthetic Turf Drainage Design (https://progreen.com/5-reasons-progreen-leads-endtoend-synthetic-turf-drainage-design)
- Does Artificial Turf Drain Well? – Custom Park Surfacing (https://custompark.net/does-artificial-turf-drain-well)
- usfamilyturf.com (https://usfamilyturf.com/the-evolution-of-artificial-grass-technology-whats-new-in-2023)
- meckavosports.com (https://meckavosports.com/news-feed/the-hidden-role-of-drainage-in-long-lasting-turf-construction)
- Why Good Synthetic Grass Drainage is Key to Selling Synthetic Grass to Homeowners – SealTuft (https://sealtuft.com/news/5)
- Clean the Concrete Surface Thoroughly
- What You Should Know About Installing Artificial Grass on Concrete (https://us-turf.com/installation/commercial-artificial-grass-installation-on-concrete)
- How To Install Artificial Grass On Concrete Surfaces (https://turftekusa.com/blog/how-to-install-artificial-grass-on-concrete-surfaces)
- 6 Ways To Clean Oil Off Concrete (https://a1concrete.com/concrete-repair-learning-center/clean-oil-off-concrete)
- Removing Oil Stains from Concrete (https://ourcoop.com/news/rural-lifestyle/removing-oil-stains-from-concrete-1)
- 10 Tips for Laying Synthetic Turf on Concrete | NexGen Lawns (https://nexgenlawns.com/tips-for-laying-synthetic-turf-on-concrete?srsltid=AfmBOopExmtWetrRVjnECL2s0MQOJ8UUhV3uKy_VIMMKRil0QqiVPQjn)
- Unfold and Position Your Artificial Grass
- Top Trends in Artificial Turf for 2025: What to Expect – The Turf Yard (https://theturfyard.com/top-trends-in-artificial-turf-for-2025-what-to-expect)
- How to Install Artificial Grass on Concrete: The Pro Way (https://modernyardz.com/blogs/how-to-install-artificial-grass-on-concrete-the-pro-way)
- 18 Artificial Grass Installation Mistakes (and How to Solve Them) (https://neograss.co.uk/18-artificial-grass-installation-mistakes-and-how-to-solve-them)
- How to Lay Artificial Turf on Concrete: Expert Tips for Success (https://grasscompanyuk.com/blogs/news/how-to-lay-artificial-turf-on-concrete-expert-tips?srsltid=AfmBOopaRRRpYYetOu2J_xqoXzN62TufvayJTTYHMJY9zOiQ3523mU45)
- 5 Important Artificial Grass Installation Tips (https://openpr.com/news/4319628/5-important-artificial-grass-installation-tips)
- Cut the Grass to Fit Your Space
- Making the Cut: Expert Tips for Perfectly Cutting Your Artificial Turf Every Time | Synthetic Grass Warehouse (https://syntheticgrasswarehouse.com/blog/making-the-cut-expert-tips-for-perfectly-cutting-your-artificial-turf-every-time)
- How To Measure For Artificial Grass & Calculate Square Feet (https://ideal-turf.com/how-to-measure-for-artificial-grass)
- How to Calculate Artificial Turf Roll Length for Your DIY Project (https://installartificial.com/how/calculate-artificial-turf-roll-length)
- How to Cut Artificial Grass: A Step-by-Step Guide – CCGrass (https://artificialgrasslandscape.com/how-to-cut-artificial-grass-a-stepbystep-guide)
- How to Measure Artificial Grass: Your No-Nonsense Guide (https://modernlawn.co.uk/how-to-measure-artificial-grass-guide)
- Apply Adhesive at Gaps and Edges
- Synthetic Turf Installation | FIFA-Certified Adhesives (https://mapei.com/us/en-us/products-and-solutions/in-the-spotlight/synthetic-turf-installation-systems)
- What Is The Best Artificial Grass Adhesive For Bonding In All Weather Conditions? – Ureka (https://thenamethatsticks.com/how-to-advice/the-best-artificial-grass-adhesive-for-bonding-in-all-weather-conditions-turfstikk-pu500)
- archivemarketresearch.com (https://archivemarketresearch.com/reports/artificial-grass-adhesive-405845)
- The Complete Guide To Artificial Turf Glue | Chemique US (https://chemiqueadhesives.com/us/the-complete-guide-to-turf-glue)
- geegrass.com (https://geegrass.com/news/which-glue-for-instaling-articual-grass-41.html)
- Smooth Out Gaps with a Joint Roller
- Influence of the composition of artificial turf on rotational traction and athlete biomechanics – PubMed (https://pubmed.ncbi.nlm.nih.gov/30922172)
- TOP 10 REASONS TO ROLL by Dr. Thomas Nikolai, The Doctor of Green Speed – TRU-TURF (https://truturf.com/top-10-reasons-to-roll-by-dr-thomas-nikolai-the-doctor-of-green-speed)
- 18 Artificial Grass Installation Mistakes (and How to Solve Them) (https://neograss.co.uk/18-artificial-grass-installation-mistakes-and-how-to-solve-them)
- The Ultimate Guide to Artificial Turf Seaming – ReTurf (https://returf.com/artificial-turf-seaming?srsltid=AfmBOoojZD0LVvBUb4FCryMMzM9F7mO4ErEhzGiH2SFK5ybQSQ8_GdJ-)
- Nick Ogilvie Advancing Installation, Safety, and Long-Term Performance Standards Nationwide (https://wickedlocal.com/press-release/story/58938/nick-ogilvie-advancing-installation-safety-and-long-term-performance-standards-nationwide)
- Apply Sand for Added Stability (Optional)
- Top 8 Benefits of Adding Sand Infill to Artificial Grass (https://tudagrass.co.uk/blogs/news/top-8-benefits-of-adding-sand-infill-to-artificial-grass?srsltid=AfmBOoqYBMx7hSsWY-r369UpV_rbQLK5o7CIQpH6DrorlXwAB7FHMsYx)
- The Role of Sand Infill in Your Residential Grass Systems (https://syntheticturfnorthwest.com/the-role-of-sand-infill-in-your-residential-grass-systems)
- PROS AND CONS OF SAND INFILL FOR ARTIFICIAL TURF – Xtreme Green Synthetic Turf (https://xgreensynthetic.com/sand-infill)
- Maximize Your Artificial Grass Sand: Benefits and Best Practices (https://californiaturfco.com/maximize-your-artificial-grass-sand-benefits-and-best-practices)
- royalgrass.com (https://royalgrass.com/blogs/artificial-grass-infill-sand)