
Introduction
Transforming a yard into a vibrant green oasis with astroturf is an achievable goal, offering the satisfaction of a lush, maintenance-free lawn. This guide outlines the essential steps for a successful astroturf installation, enabling homeowners to attain a professional-looking result. However, it is crucial to be aware of common pitfalls that could derail the project. Understanding how to navigate the complexities of preparation, installation, and ongoing care is key to maintaining that pristine appearance.
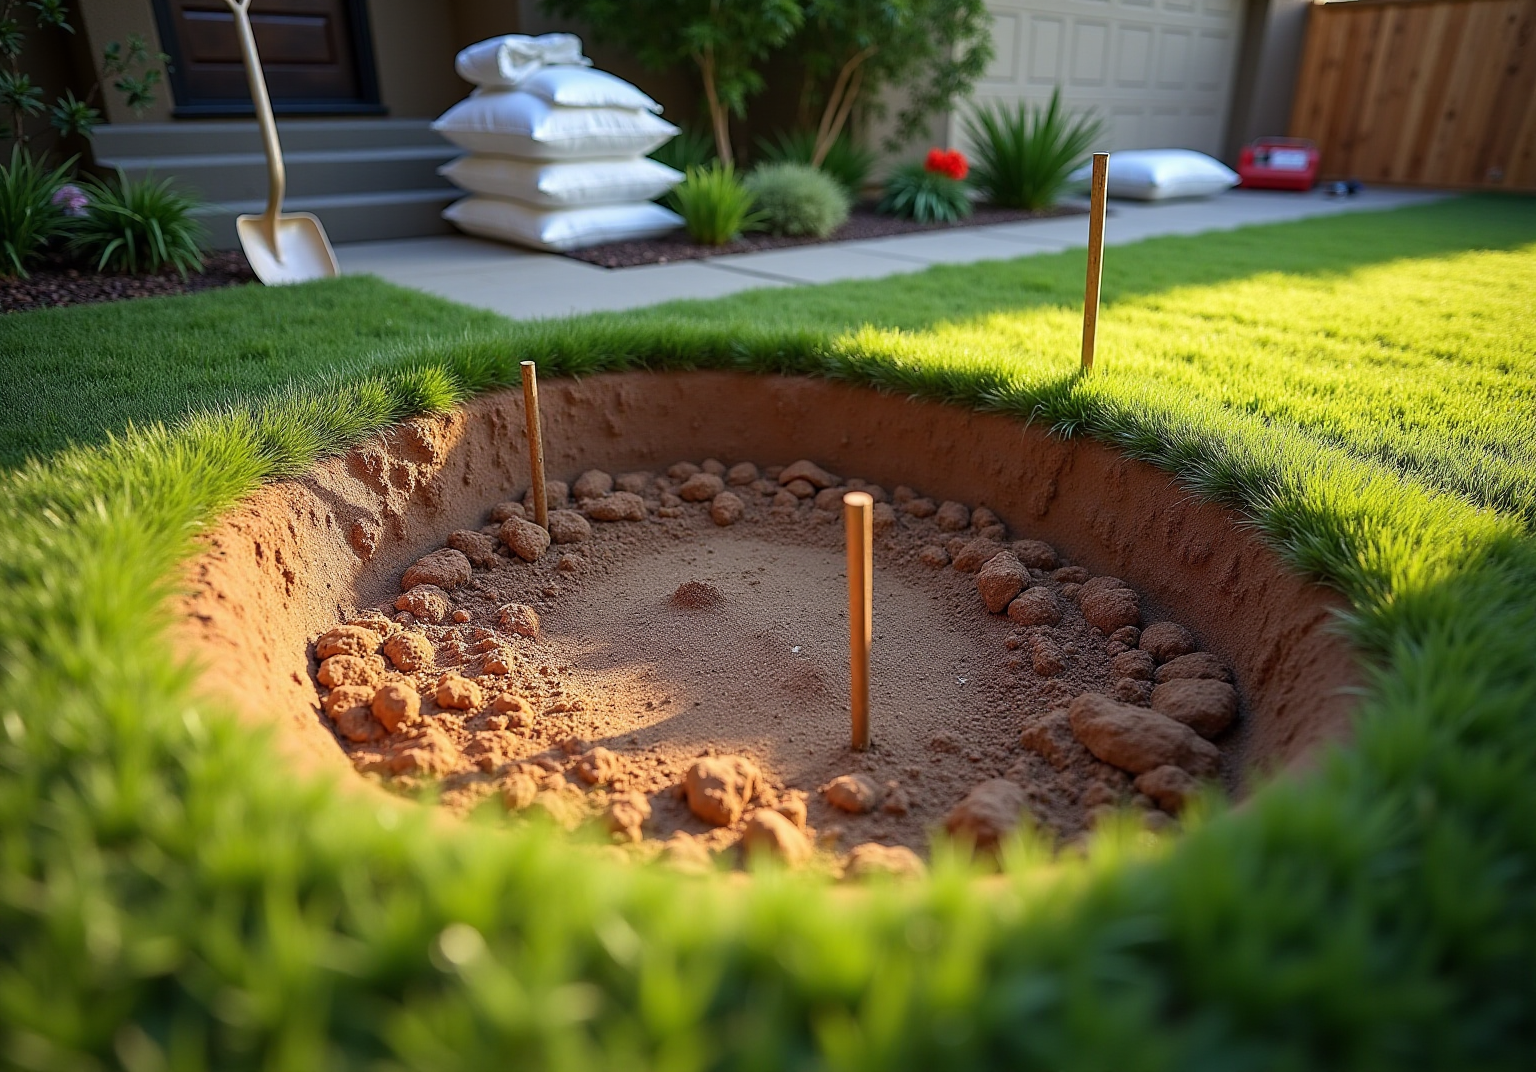
Assess and Clear the Installation Area
-
Identify the Area: Start by measuring the dimensions of the space designated for synthetic grass installation. Use stakes and string to clearly outline the area, ensuring accurate measurements.
-
Remove Existing Vegetation: Utilize a shovel or sod cutter to remove any grass, weeds, or plants. It is crucial to excavate at least 2 to 4 inches to eliminate roots that may resprout, which could compromise the integrity of the grass.
-
Clear Debris: Thoroughly remove rocks, sticks, and any other debris from the site. This step is essential for creating a smooth surface that will effectively support the turf.
-
Check for Drainage: Assess the location for proper drainage. If water tends to pool, consider grading the site to direct water away from the installation area, preventing future moisture accumulation issues.
-
Inspect for Levelness: Walk around the area to identify any uneven spots. Use a level to verify that the ground is even, as this will significantly impact the final appearance and functionality of the grass.
Landscaping professionals emphasize that a well-prepared base is vital for successful installation, as it minimizes the risk of sinking or pooling and enhances the overall durability of the artificial lawn.

Prepare the Base for Artificial Turf
-
Excavate the Area: Start by removing the top 2 to 4 inches of soil to create a level surface. This depth is crucial for supporting both the base material and the synthetic grass, ensuring stability and proper drainage.
-
Add Base Material: Use crushed stone or gravel as the foundational layer. Spread 2 to 3 inches of this material evenly across the excavated area. Crushed stone is particularly effective due to its durability and excellent drainage characteristics, which help prevent water accumulation beneath the grass.
-
Compact the Base: Utilize a plate compactor to thoroughly compact the base material. This step is essential, as proper compaction prevents settling and shifting over time, ensuring a solid foundation that can withstand heavy use. A well-compacted base is vital for maintaining the integrity of the grass during activities such as running and jumping.
-
Install a Weed Barrier: After compacting, lay down a weed barrier fabric over the base. This barrier is important for preventing weeds from growing through the grass, which can disrupt the appearance and functionality of your setup.
-
Level the Surface: Finally, rake the surface to achieve a smooth and level finish. Check for any low spots that may need additional material to ensure an even surface. Proper leveling is critical for effective drainage and the overall aesthetic of the astroturf install process.

Lay and Secure the Artificial Turf
-
Begin the astroturf install by rolling out the synthetic grass over the prepared base. Allow it to acclimate for at least 2-4 hours to minimize curling and ensure a better fit. This acclimation period is crucial as it helps the grass adjust to the environment, which is essential for a proper astroturf install and reduces the risk of future issues.
-
Cut to Fit: Use a utility knife to trim the edges of the grass to fit the designated area. Ensure to leave a slight overhang during the astroturf install to facilitate tucking under later for a polished look. This technique ensures that the surface fits snugly and presents a professional appearance for the astroturf install.
-
Secure the Grass: Anchor the grass to the ground using galvanized grass nails or staples. Position them every 6-12 inches along the edges and seams to ensure stability and prevent shifting. Utilizing high-quality materials, such as nylon-based grass, can enhance the durability and performance of an astroturf install. Clients have noted that Hall’s team is not only skilled but also professional and courteous, contributing to a smooth setup experience.
-
Join Seams: If your setup requires multiple sections of grass, employ seam tape and adhesive to join them. To achieve a seamless appearance that enhances the overall aesthetic, ensure that the seams are tight and aligned during the astroturf install. Consider using advanced seam tape designed for outdoor conditions during your astroturf install to improve longevity. Customers have commended Hall for their meticulous attention to detail, which is essential in this step.
-
Tuck Edges: Finally, fold the edges of the grass under any borders or edging to create a clean and finished appearance, ensuring that the installation is both functional and visually appealing. This step not only enhances the appearance but also protects the edges from wear and tear during the astroturf install. Homeowners have expressed satisfaction with the final product, highlighting Hall Turf’s commitment to delivering on time and within budget.

Finalize Installation with Seams and Infill
-
Apply Infill Material: Begin by evenly distributing infill material across the surface. Common choices for an astroturf install include silica sand or rubber granules, which not only weigh down the grass but also help keep the blades upright, enhancing both the appearance and functionality of the installation. For optimal performance, it is recommended to use an average of 2.5 to 3.5 lbs. of infill per square foot, depending on the specific application and expected traffic levels.
-
Brush the Grass: Use a stiff-bristled broom to brush the infill into the grass fibers. This technique ensures even distribution and helps maintain a natural appearance. Turf maintenance professionals stress that brushing after applying infill is essential to prevent matting of the grass blades, which can negatively impact both aesthetics and performance.
-
Check for Levelness: After brushing, inspect the surface for any uneven areas. If low spots are detected, add more infill as necessary to create a smooth, even surface that enhances the appearance and functionality of the astroturf install.
-
Secure Seams: Ensure that all seams are properly glued and secured. Check for any loose edges and re-secure them with nails or staples to achieve a seamless finish that appears natural and can withstand regular use following the astroturf install.
-
Final Inspection: Conduct a thorough walk-around of the installation to confirm that everything is secure and visually appealing. Make any final adjustments to ensure the surface meets your expectations for both functionality and aesthetics. Regular brushing and maintenance will keep the grass looking fresh and vibrant throughout the year.

Troubleshoot and Maintain Your Artificial Turf
-
Regular Cleaning: Start by rinsing the turf with a hose to remove dust and debris. For areas frequented by pets, it is essential to use an enzyme cleaner like ProStrength Animal™ to effectively eliminate odors and maintain a fresh environment. As Nick Ogilvie, founder of Product Solutions, notes, ‘Many solutions focus on masking odors rather than true cleaning and odor management.’
-
Inspect for Damage: Perform regular inspections to identify signs of wear, such as loose seams or lifted edges. Promptly addressing these issues is crucial to prevent further deterioration and to ensure the longevity of your grass.
-
Brush the Grass: Use a stiff broom regularly to brush the grass fibers. This practice not only keeps the blades upright but also enhances the natural appearance of the grass, contributing to its overall aesthetic appeal.
-
Check Drainage: Verify that the drainage system is functioning properly. If you notice any pooling water, investigate potential blockages and resolve them immediately to prevent water damage.
-
Replenish Infill: Over time, infill materials may settle or wash away. Regularly check the infill levels and replenish as necessary to maintain the turf’s performance and resilience against wear.

Conclusion
Successfully installing astroturf in your yard is not just about laying down grass; it requires careful planning and execution. The process encompasses several crucial steps, starting with assessing the installation area and culminating in the maintenance of the finished product. Each phase – clearing the site, preparing the base, laying the turf, and finalizing seams – is integral to achieving a durable and visually appealing lawn.
Thorough preparation is paramount. This includes:
- Removing existing vegetation
- Ensuring proper drainage
- Compacting the base
- Effectively securing seams
Regular maintenance, such as cleaning and checking for damage, is vital for prolonging the life of your artificial grass. By meticulously following these steps, homeowners can enjoy a lush, green lawn that demands minimal upkeep.
The significance of a well-executed astroturf installation cannot be overstated. It enhances the aesthetic appeal of your outdoor space while providing a functional area for recreation and relaxation. Embracing these best practices ensures that your artificial turf remains vibrant and resilient for years to come. Whether for a backyard, playground, or sports field, investing time and effort into proper installation and maintenance is essential for long-lasting enjoyment.
Frequently Asked Questions
What is the first step in preparing the installation area for synthetic grass?
The first step is to measure the dimensions of the designated space for synthetic grass installation and outline the area using stakes and string for accurate measurements.
How should existing vegetation be removed?
Existing grass, weeds, or plants should be removed using a shovel or sod cutter, excavating at least 2 to 4 inches to eliminate roots that may resprout.
Why is it important to clear debris from the installation site?
Clearing rocks, sticks, and other debris is essential for creating a smooth surface that will effectively support the turf.
What should be checked regarding drainage before installation?
It is important to assess the location for proper drainage. If water tends to pool, grading the site may be necessary to direct water away from the installation area.
How can I ensure the installation area is level?
Walk around the area to identify uneven spots and use a level to verify that the ground is even, as this affects the final appearance and functionality of the grass.
What is the importance of preparing a well-compacted base for artificial turf?
A well-compacted base prevents settling and shifting over time, ensuring a solid foundation that can withstand heavy use and maintain the integrity of the grass.
What materials should be used for the base layer when preparing for artificial turf?
Crushed stone or gravel should be used as the foundational layer, spread evenly across the excavated area to provide durability and effective drainage.
How do I compact the base material?
A plate compactor should be used to thoroughly compact the base material, which is essential for preventing settling and ensuring stability.
What is the purpose of installing a weed barrier?
A weed barrier fabric is laid over the compacted base to prevent weeds from growing through the grass, maintaining the appearance and functionality of the installation.
How can I achieve a smooth and level surface before installing synthetic grass?
Rake the surface to achieve a smooth finish and check for any low spots that may need additional material to ensure an even surface for effective drainage and aesthetics.