
Introduction
Transforming a backyard into a personal golf oasis presents both opportunities and challenges for enthusiasts. With the right installation of fake grass, homeowners can enjoy a low-maintenance putting green that enhances both their outdoor space and their golfing skills. Navigating the installation process can be challenging without proper guidance. Identifying potential challenges during installation and planning solutions can ensure a smooth process.
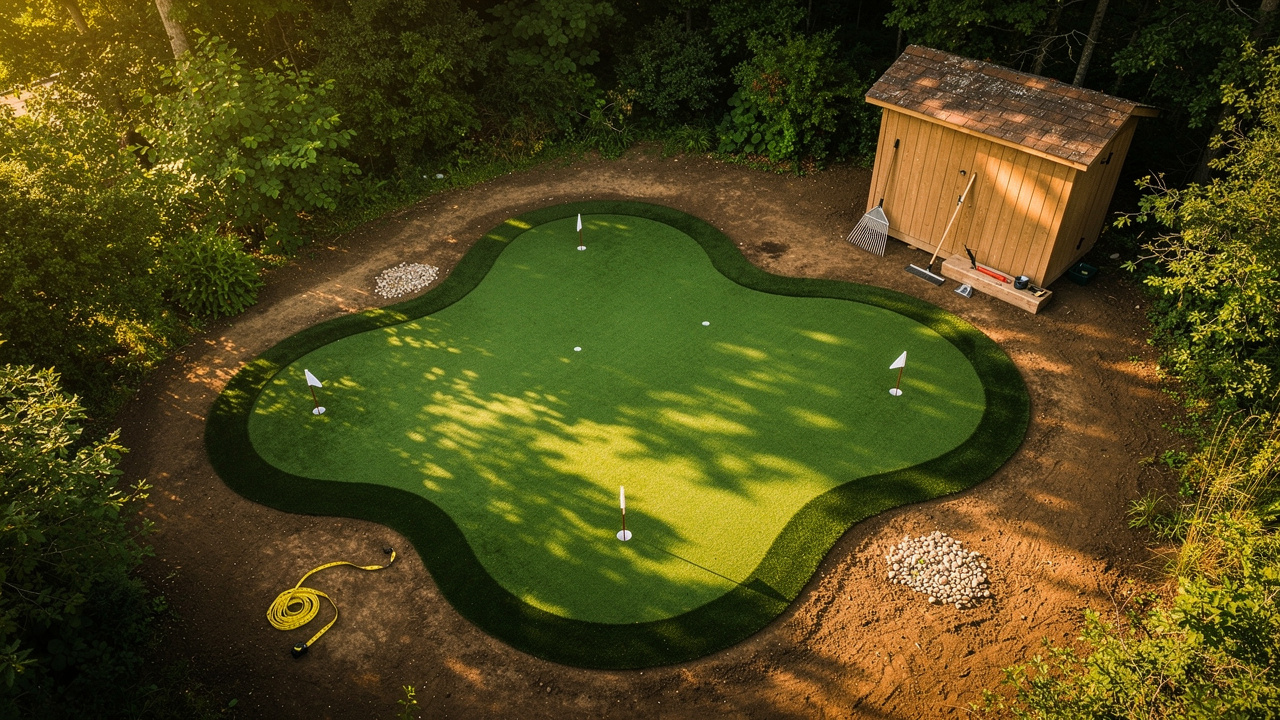
Choose Location and Design for Your Putting Green
Choosing the right location for your golf area is crucial for its success. Identify a flat area that receives ample sunlight and is free from overhanging branches. This site should preferably be distant from busy areas to reduce wear and tear on the grass. Dick Bryant found the right solution for his turf issue when Brock from Hall Turf assessed his needs and recommended the ideal turf type.
Ensure the selected spot has adequate drainage to prevent water pooling. Consulting with a landscaping expert like Brock can provide valuable insights into the soil and drainage conditions that are vital for maintaining your golf area’s quality.
Create a layout for your golf surface, incorporating features like slopes, undulations, or multiple holes to enhance playability. Utilizing CAD software or graph paper can help achieve precision in your design. Scott Sachse commended Brock’s outstanding effort on his new lawn, emphasizing the team’s professionalism and meticulousness in the installation of top-notch turf.
Determine the dimensions of your putting surface. A usual size varies from 500 to 1,000 square feet for optimal functionality, permitting a small area of about 10-15 feet in diameter, but modify according to your available space and design preferences. Les Boatright expressed his satisfaction with the end product and Brock’s ability to deliver on time and within budget, showcasing Hall Turf’s commitment to quality.
Utilize design software or applications to envision how the golf area will blend into your yard. This step can facilitate adjustments before installation begins, ensuring the final product meets your expectations. Ultimately, the right preparation and design can lead to a golf area that enhances your outdoor experience.

Prepare the Base for Installation
To create a successful putting green, careful preparation of the site is crucial. Begin by removing any existing grass, plants, and debris from the selected site. Utilize a shovel or sod cutter for efficient removal, ensuring a clean workspace for the installation.
Next, excavate the soil to a depth of 3 to 5 inches, depending on the type of base material you plan to use. This depth is essential for accommodating the base layer and the grass, providing a solid foundation for your putting green.
After excavation, use a rake to level the area, ensuring it is smooth and even. Proper leveling is essential to prevent water accumulation on the surface, which can harm the grass over time.
Lay down a high-quality weed barrier fabric to prevent weeds from growing through the grass. This barrier is essential for preserving the integrity of your lawn, as it prevents sunlight from reaching possible weed seeds in the soil, greatly diminishing the likelihood of weed growth.
Add a layer of crushed stone or gravel, approximately 2 to 4 inches thick, to the excavated area. Compact this layer using a plate compactor to create a stable base that enhances drainage and stability. It’s important to compact the base for fake grass for golf to ensure it is smooth and even, providing a solid foundation.
After compacting, use a level to ensure the surface is even. Make any necessary adjustments to achieve a flat surface, which is essential for the performance of your golf area. However, homeowners should be aware that occasional weeds might still emerge at the edges, necessitating regular upkeep.
Brock and his team at Hall take pride in their professionalism and meticulous attention to detail, ensuring every installation meets high standards. Homeowners like Scott Sachse have praised the exceptional job done on their putting greens, reflecting Hall’s commitment to quality and customer service. Ultimately, investing in proper installation and maintenance will ensure a long-lasting and enjoyable putting green experience.

Install the Artificial Turf
Achieving a flawless installation of fake grass for golf is crucial for optimal putting performance. Begin by unrolling the artificial grass over the prepared base, ensuring that it is laid in the same direction to maintain a consistent appearance. Allow the grass to relax for several hours to eliminate any creases, which will assist in achieving a smooth installation.
Next, utilize a utility knife to trim the edges of the grass, ensuring it fits the shape of your putting green precisely. Clean, straight edges are crucial for easy securing and a professional finish.
Secure the grass around the perimeter using landscape staples or nails, placing them every 6 to 12 inches. This spacing keeps the grass secure and prevents shifting.
If your putting green consists of several sections of grass, connect them using seam tape and adhesive. Adhere strictly to the manufacturer’s instructions to ensure a strong and durable connection between the pieces.
After securing the surface, inspect for any wrinkles or bumps. Smooth out these imperfections by pulling the grass taut and adjusting the staples as necessary. This step helps ensure a flat surface, crucial for great putting performance. A well-installed putting green made of fake grass for golf not only enhances aesthetics but also ensures a superior playing experience.

Apply Infill and Finalize Maintenance Steps
To ensure your golf green, which uses fake grass for golf, remains in top condition, follow these essential maintenance steps.
-
Spread Infill: Utilize a drop spreader to evenly distribute infill material, such as silica sand or rubber granules, across the grass surface. Distribute 1-2 pounds of infill per square foot to boost performance and stability.
-
Brush the Grass: After applying the infill, utilize a power broom or a stiff-bristled broom to work the infill into the grass fibers. This step is crucial as it helps the grass blades stand upright, creating a more natural appearance and improving playability.
-
Final Inspection: Conduct a thorough walk-around of the turf area to identify any uneven spots or loose edges. Make necessary adjustments to ensure that the surface is secure and level, which is vital for optimal performance.
-
Regular Maintenance: Establish a routine maintenance schedule for your putting green, including the following tasks:
- Brush the turf regularly to keep it looking fresh.
- Rinse the surface to eliminate debris and maintain cleanliness.
- Inspect for signs of wear or damage to address issues promptly.
- For cleaning spills, use gentle soap and water to avoid permanent stains.
- Apply turf-friendly pest control products to manage any insect invasions.
Many customers, including Dick Bryant and Scott Sachse, have shared their appreciation for Hall Turf’s professionalism and meticulous attention to detail, ensuring that your turf installation is not only beautiful but also functional.
-
Seasonal Maintenance: Be aware of seasonal tasks, such as removing leaves in the fall to prevent moisture trapping and rinsing the foliage in spring to eliminate dust and pollen. Creating a regular maintenance plan will guarantee that your surface, particularly if it’s made of fake grass for golf, stays pleasurable throughout the year.
-
Professional Assistance: If you encounter significant issues or need expert help, consider reaching out to Hall Turf’s professional cleaning services for turf maintenance. Their knowledgeable team can offer valuable support in maintaining your golf area pristine, just as Les Boatright experienced with Brock’s creative solutions.
-
Enjoy Your Green: With everything arranged, take a moment to appreciate your new golf green! Use it to practice your putting skills and share the enjoyment with friends and family.
Neglecting these maintenance tasks could ultimately detract from your enjoyment and investment in your golf green.

Conclusion
Transforming your yard into an artificial putting green offers both aesthetic appeal and a practical space for golf practice. By following the structured steps outlined in this guide, from selecting the optimal location to ensuring proper maintenance, homeowners can achieve a high-quality installation that enhances both aesthetics and functionality.
The article detailed essential steps, including:
- Choosing the right site
- Preparing the base
- Installing the turf
- Applying infill
Each phase is crucial for achieving a smooth, durable, and visually appealing putting green. Insights from industry professionals and testimonials from satisfied homeowners highlight the importance of meticulous preparation and installation, ensuring long-lasting enjoyment of your investment.
The process of installing a backyard putting green is about more than just construction; it’s about crafting a space for enjoyment and relaxation. Regular maintenance and attention to detail will keep your golf area in prime condition, allowing you to enjoy countless hours of practice and play. Embrace the opportunity to transform your yard into a golfer’s paradise, and watch as it becomes a cherished gathering spot for family and friends. This investment not only enhances your property but also enriches your leisure time.
Frequently Asked Questions
Why is choosing the right location important for a putting green?
Choosing the right location is crucial for the success of a putting green as it ensures ample sunlight, minimizes wear and tear from busy areas, and allows for proper drainage.
What characteristics should the chosen site for a putting green have?
The site should be flat, receive ample sunlight, be free from overhanging branches, and have adequate drainage to prevent water pooling.
How can a landscaping expert assist in the process of setting up a putting green?
A landscaping expert can provide valuable insights into soil and drainage conditions, which are vital for maintaining the quality of the putting green.
What features can enhance the playability of a putting green?
Incorporating features like slopes, undulations, or multiple holes can enhance the playability of a putting green.
What tools can be used to create a layout for the putting green?
CAD software or graph paper can be used to create a precise layout for the putting green.
What is the typical size range for a putting green?
The usual size for a putting green varies from 500 to 1,000 square feet, with a small area of about 10-15 feet in diameter being optimal, though it can be modified based on available space and design preferences.
How can design software or applications benefit the planning of a putting green?
Design software or applications can help visualize how the golf area will blend into the yard, allowing for adjustments before installation begins to ensure the final product meets expectations.
What is the overall goal of proper preparation and design for a putting green?
The goal is to create a golf area that enhances the outdoor experience, ensuring it is functional and aesthetically pleasing.
List of Sources
- Choose Location and Design for Your Putting Green
- Top Backyard Putting Green Trends for 2026 Revealed (https://artificialturfexpress.com/blog/backyard-putting-green-design-trends)
- 2026’s Biggest Artificial Turf Putting Green Design Trends – OC Turf & Putting Greens (https://octurfandputtinggreens.com/2026s-biggest-artificial-turf-putting-green-design-trends)
- Why Luxury Backyard Putting Greens Are Becoming Popular USA (https://backninegreens.com/blog/why-luxury-backyard-putting-greens-are-becoming-popular-in-the-usa)
- prnewswire.com (https://prnewswire.com/news-releases/vibrant-synthetic-turf-creates-breathtaking-home-putting-green-302495867.html)
- Prepare the Base for Installation
- Installing Artificial Turf: Step By Step – Realturf USA (https://realturf.com/us/installing-artificial-turf-step-by-step)
- homedepot.com (https://homedepot.com/services/c/cost-install-artificial-grass/b7561b9d1)
- apexturfaz.com (https://apexturfaz.com/do-weeds-grow-through-artificial-grass)
- totalturfsupply.com (https://totalturfsupply.com/artificial-grass-stop-weeds)
- lowes.com (https://lowes.com/n/how-to/install-artificial-grass)
- Install the Artificial Turf
- How Long Does Artificial Grass Actually Last? (https://bellaturf.ca/blog/how-long-does-artificial-grass-actually-last)
- Fixing 5 Challenges in Commercial Artificial Turf Installations (https://velcro.com/news-and-blog/2024/07/fixing-5-challenges-in-artificial-turf-installation)
- How To Install the Ultimate Artificial Turf Putting Green | Synthetic Grass Warehouse (https://syntheticgrasswarehouse.com/blog/how-to-install-the-ultimate-artificial-turf-putting-green)
- Ultimate Guide to Securing Artificial Turf (https://premiumgrassblades.com/the-ultimate-guide-to-securing-artificial-turf-spiral-nails-staples-and-proper-installation)
- DIY Putting Green Installation: A Step-by-Step Guide (https://artificialturfexpress.com/blog/installing-the-best-putting-greens-in-your-yard-the-ultimate-diy-guide)
- Apply Infill and Finalize Maintenance Steps
- Artificial Golf Greens Maintenance Tips (https://southwestgreens.com/blog/artificial-golf-greens-maintenance-tips)
- Artificial Putting Green Maintenance: Year-Round Care Guide (https://aglgrass.com/blogs/artificial-putting-green-maintenance)
- Backyard Putting Green Maintenance: Keep Your Roll True (https://turfresh.com/blog/helpful-artificial-grass-maintenance-tips-for-your-backyard-putting-green)
- Perfecting Putting Green Surfaces – Part 2 – Infill Placement | Ask JW | Synthetic Grass Warehouse (https://syntheticgrasswarehouse.com/company/ask-an-expert/ask-jw/perfecting-putting-green-surfaces-part-2-infill-placement)