
Introduction
Creating a backyard pitching green can transform any outdoor space into a golfer’s paradise. It offers a convenient way to practice and improve skills right at home. This guide outlines the essential steps and materials needed to build the perfect green, ensuring both functionality and aesthetic appeal. However, the challenge lies in navigating the complexities of installation and maintenance. Homeowners must consider how to ensure their DIY project stands the test of time while delivering an optimal playing experience.
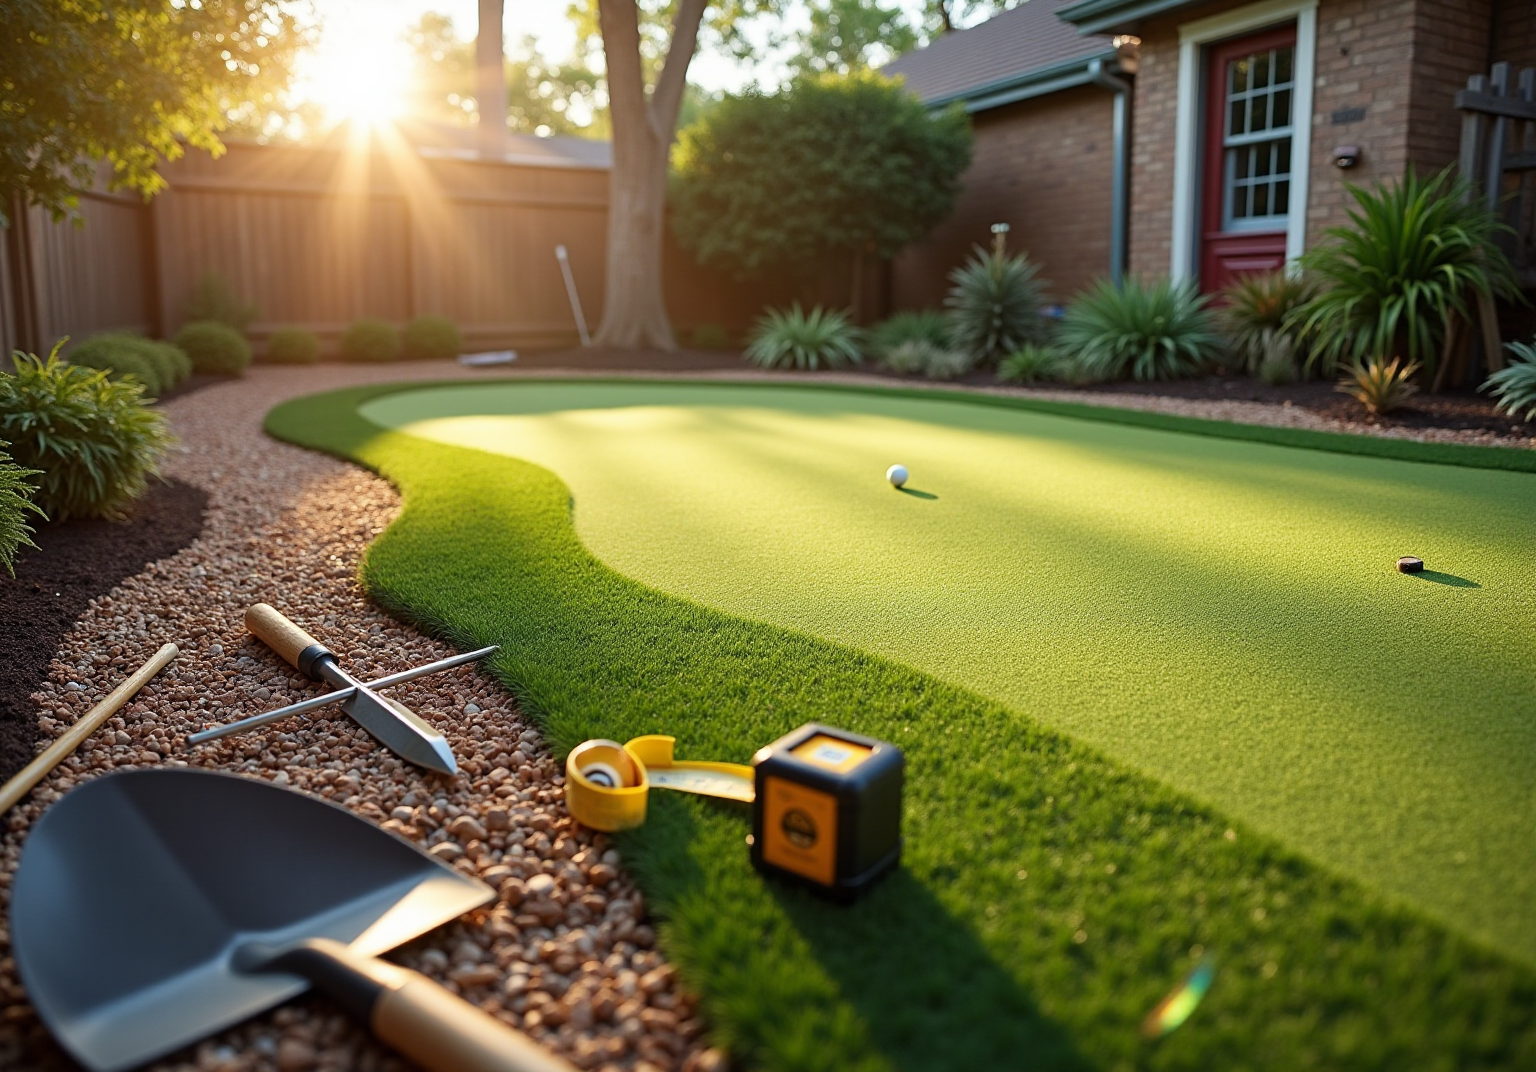
Gather Essential Materials and Tools
To create your ideal pitching green, gather the following essential materials and tools:
Materials:
- Synthetic Grass: Opt for , featuring a low pile height of approximately half an inch. This height ensures optimal ball roll and longevity. , helping you find the perfect choice for your needs.
- : Utilize crushed stone or decomposed granite to guarantee , both crucial for maintaining the integrity of the green. Experts highlight that selecting the right base material is vital for a .
- : This material prevents weed growth beneath the grass, ensuring a clean and low-maintenance surface.
- : Choose sand or rubber infill to enhance the grass’s performance, providing a smoother roll and extending its lifespan. Infill also helps prevent wrinkles, warping, and shifting in synthetic grass.
- Seaming Tape and Adhesive: These are necessary for securely connecting sections of grass, ensuring a seamless appearance.
- Landscape Nails: Use these to anchor the grass in place, preventing shifting and maintaining the green’s shape.
Tools:
- Shovel: Essential for digging and moving soil to prepare the site.
- Rake: Useful for leveling the ground and evenly distributing materials.
- Plate Compactor: This tool compresses the base material, creating a solid foundation for the grass.
- Utility Knife: Necessary for cutting the turf to the desired size and shape.
- Measuring Tape: Ensures precise dimensions for the area, which is crucial for proper installation.
- Level: A level helps confirm that the surface is flat, which is essential for a functional putting surface.
- Garden Hose: Use this to outline the layout of the area, allowing for precise design before installation.
Considering can save time and ensure a . Typically, this allows for project completion in just 1-2 days, compared to the many hours or weekends required for DIY. Clients have praised Hall Turf for their exceptional service and attention to detail, ensuring a professional-looking pitching green that enhances your backyard and provides an excellent practice area.

Prepare the Site for Installation
To prepare your site for the ideal , follow these essential steps:
- Select the Location: Choose a and has good drainage. Avoid low areas where water might collect, as is crucial for the longevity of your lawn.
- Clear the Area: Remove any existing grass, weeds, and debris. Use a shovel or sod cutter to strip away the top layer of soil, ensuring a for your .
- Excavate the Soil: Dig down approximately 4 to 6 inches to create a . This depth is vital for effective drainage and a stable foundation, preventing future settling.
- Install a Weed Barrier: Lay down a durable over the excavated area. This will help prevent weeds from growing through the grass, maintaining a clean and attractive surface.
- Add Base Material: Fill the excavated area with 2 to 4 inches of . This layer is essential for drainage and provides a strong foundation for the grass. The average cost for synthetic greens is around $25 per square foot, with premium options exceeding $30, so budgeting for quality materials is important.
- Compact the Base: Use a plate compactor to thoroughly compact the base material. This step is crucial to prevent settling and ensure a .
- Check for Level: Finally, use a level to ensure the surface is even. Make any necessary adjustments to create a flat area that will enhance the performance of your pitching surface.
By meticulously following these steps, you will establish a solid foundation that significantly enhances the performance and longevity of your pitching green. Additionally, proper site preparation can save time and costs associated with future maintenance and repairs. As noted by satisfied customers, Hall’s team, led by experts like Brock, ensures that every installation is handled with professionalism and attention to detail, contributing to the success of your project.

Install the Turf for Your Pitching Green
Once your site is prepared, it’s time to :
- Roll Out the Surface: Unroll the over the prepared base, allowing it to acclimate for a few hours to minimize wrinkles and creases.
- Cut to Size: Use a utility knife to trim the grass to fit the desired shape of your pitching area, ensuring that the edges are straight and clean.
- Join Seams: For greens requiring multiple pieces of sod, lay them side by side and apply seaming tape and adhesive to bond the edges. Press firmly to ensure a secure connection, as proper seam joining is crucial for .
- Secure the Grass: Use to fasten the grass around the perimeter and at seams, spacing them approximately 12 inches apart to maintain stability.
- Add Infill Material: Distribute infill material uniformly across the grass surface. This step not only burdens the surface but also by resembling natural grass. Consider utilizing antimicrobial infill from Hall Grass to handle and promote a cleaner environment.
- Brush the Grass: Use a broom or brush to work the infill into the grass fibers, helping to stand the fibers upright and enhance the green’s appearance.
- Final Adjustments: Inspect for any wrinkles or uneven areas and make necessary adjustments to guarantee a smooth surface ready for play. Furthermore, ensure adequate drainage to avoid water accumulation, which is crucial for preserving the lifespan of the grass.
By following these steps, you will ensure that your installation of the is done correctly, providing an excellent surface for practice. Investing in from can lead to long-term savings on maintenance and water usage, making it a worthwhile investment for homeowners. As noted by satisfied customers, Hall Turf‘s team, led by Brock, is known for their professionalism and attention to detail, ensuring that your project is completed on time and to your satisfaction.

Finalize and Maintain Your Pitching Green
To maintain your in optimal condition, consider implementing these essential :
- : Position golf cups and flags at your preferred spots on the green. This not only adds a professional touch but also enhances your practice sessions.
- : Consistently remove debris such as leaves, twigs, and dirt to keep the surface clean. Using a leaf blower or broom can make this task efficient.
- : Periodically brush the surface to ensure the fibers stand upright and the infill is evenly distributed. This practice is crucial for maintaining a smooth and playable surface.
- : Regularly check the surface for signs of wear or damage. Promptly addressing any issues can prevent further deterioration and extend the lifespan of your green.
- : Over time, infill may settle or become uneven. Replenish infill as necessary to maintain the desired level and performance of the grass.
- Watering: occasionally to keep it clean and help settle the infill. Avoid overwatering, as this can lead to drainage problems.
- : Depending on your climate, consider seasonal tasks such as deep cleaning or reapplying infill to ensure your landscape remains in optimal shape.
By adhering to these maintenance tips, you can enjoy your pitching green for years, ensuring it continues to be a valuable asset to your home.

Conclusion
Building a perfect pitching green at home is a rewarding project that not only enhances your backyard but also improves your golfing skills. By following the outlined steps, anyone can create an ideal practice area that looks great and performs well. The combination of quality materials, proper site preparation, meticulous turf installation, and ongoing maintenance ensures a long-lasting and enjoyable green.
Essential materials such as synthetic grass, base materials, and infill options play a critical role in creating a stable and functional surface. The importance of site preparation cannot be overstated; selecting the right location and ensuring proper drainage are crucial for the longevity of your green. Additionally, the detailed installation process and maintenance tips provide a comprehensive guide to achieving the best results.
Ultimately, investing time and effort into building and maintaining a pitching green can transform your backyard into a golfer’s paradise. This project not only enhances your practice sessions but also adds value to your home. Whether you choose a DIY approach or seek professional assistance, the satisfaction of having a personal pitching green is unmatched. Take the first step today and enjoy the benefits of a well-crafted practice area for years to come.
Frequently Asked Questions
What materials are essential for creating a pitching green?
The essential materials include synthetic grass, base material (crushed stone or decomposed granite), weed barrier fabric, infill material (sand or rubber), seaming tape and adhesive, and landscape nails.
Why is synthetic grass important for a pitching green?
Synthetic grass designed for putting surfaces features a low pile height of approximately half an inch, which ensures optimal ball roll and longevity.
What type of base material should be used for a pitching green?
Crushed stone or decomposed granite should be used as base material to guarantee proper drainage and stability.
What is the purpose of weed barrier fabric?
Weed barrier fabric prevents weed growth beneath the grass, ensuring a clean and low-maintenance surface.
How does infill material benefit synthetic grass?
Infill material, such as sand or rubber, enhances the grass’s performance, provides a smoother roll, extends its lifespan, and helps prevent wrinkles, warping, and shifting.
What tools are necessary for installing a pitching green?
Necessary tools include a shovel, rake, plate compactor, utility knife, measuring tape, level, and garden hose.
What is the function of a plate compactor in the installation process?
A plate compactor compresses the base material, creating a solid foundation for the grass.
Why is it recommended to consider professional installation from Hall?
Professional installation can save time and ensure a high-quality result, typically completing the project in just 1-2 days compared to the many hours or weekends required for DIY.
What feedback have clients given about Hall Turf’s service?
Clients have praised Hall Turf for their exceptional service and attention to detail, resulting in a professional-looking pitching green that enhances backyards and provides an excellent practice area.