
Introduction
While artificial grass installation is increasingly favored for its low-maintenance benefits, it involves complexities that demand careful attention. A successful artificial grass installation involves careful planning and execution beyond merely laying down turf. This article outlines four best practices for successful artificial grass installation, including:
- Thorough site assessment
- Meticulous final inspection
Overlooking these steps can lead to challenges that affect the turf’s longevity and appearance. Ignoring these essential steps can compromise the installation’s effectiveness, ultimately diminishing the investment made in artificial grass.
Conduct Site Assessment and Preparation
Proper preparation is crucial for a successful artificial grass installation available right now, as overlooking site assessment can lead to significant challenges. Before starting the setup of artificial grass, it is essential to conduct a comprehensive site assessment. This involves evaluating the area for existing vegetation, soil conditions, and drainage patterns. Here are the steps to follow:
- Evaluate the Area: Measure the dimensions of the installation site and note any slopes or uneven surfaces. This will help in planning the excavation and base preparation.
- Check for Drainage Issues: Identify any areas where water tends to pool. Proper drainage is essential to prevent water buildup beneath the grass, which can result in mold and deterioration.
- Remove Existing Vegetation: Clear the area of any grass, weeds, or debris. This can be done using a shovel or a turf cutter to ensure a clean surface for the new turf.
- Assess Soil Quality: Test the soil for compaction and drainage capabilities. If the soil is too compacted, it may need to be loosened to allow for proper drainage and base setup.
- Plan for Obstacles: Identify any underground utilities or structures that may disrupt the setup process. Mark these areas clearly to avoid damage during excavation.
Ultimately, thorough site preparation not only enhances the artificial grass installation available right now but also ensures the longevity and performance of the grass.

Prepare the Base for Installation
Preparing the foundation for synthetic turf setup is crucial for attaining a stable and durable surface. A solid foundation is essential for the success of the artificial grass installation available right now. Follow these best practices to ensure a successful installation:
- Excavate the Area: Begin by removing 3 to 4 inches of soil from the installation site. This depth supports the foundational materials and prevents the grass from rising above the surrounding terrain, avoiding drainage issues.
- Install a Weed Barrier: Lay down a durable, permeable weed barrier fabric to prevent weeds from growing through the turf. This barrier allows for proper drainage while blocking unwanted vegetation, ensuring a clean and low-maintenance lawn.
- Add Foundation Material: Choose high-quality foundation materials, such as crushed stone, gravel, or decomposed granite, to create a solid base. Distribute 2 to 3 inches of this material uniformly over the area, as the quality of the foundational material greatly affects the durability and performance of the synthetic grass.
- Compact the Foundation: Thoroughly compact the foundation material using a plate compactor. This step is vital to prevent settling and ensure a level surface. Aim for a compaction rate of at least 95%, as proper compaction is essential for the longevity and performance of synthetic grass.
- Check for Levelness: After compacting, use a long straight edge or level to check the surface for levelness. Make any necessary modifications to ensure a smooth, uniform foundation, which directly impacts the performance of the synthetic grass.
Following these steps helps you build a strong foundation that supports the synthetic grass while enhancing its durability and appearance. Rushing through preparation can lead to costly mistakes, such as uneven surfaces or drainage issues. Proper preparation is key to ensuring that the artificial grass installation available right now is successful.

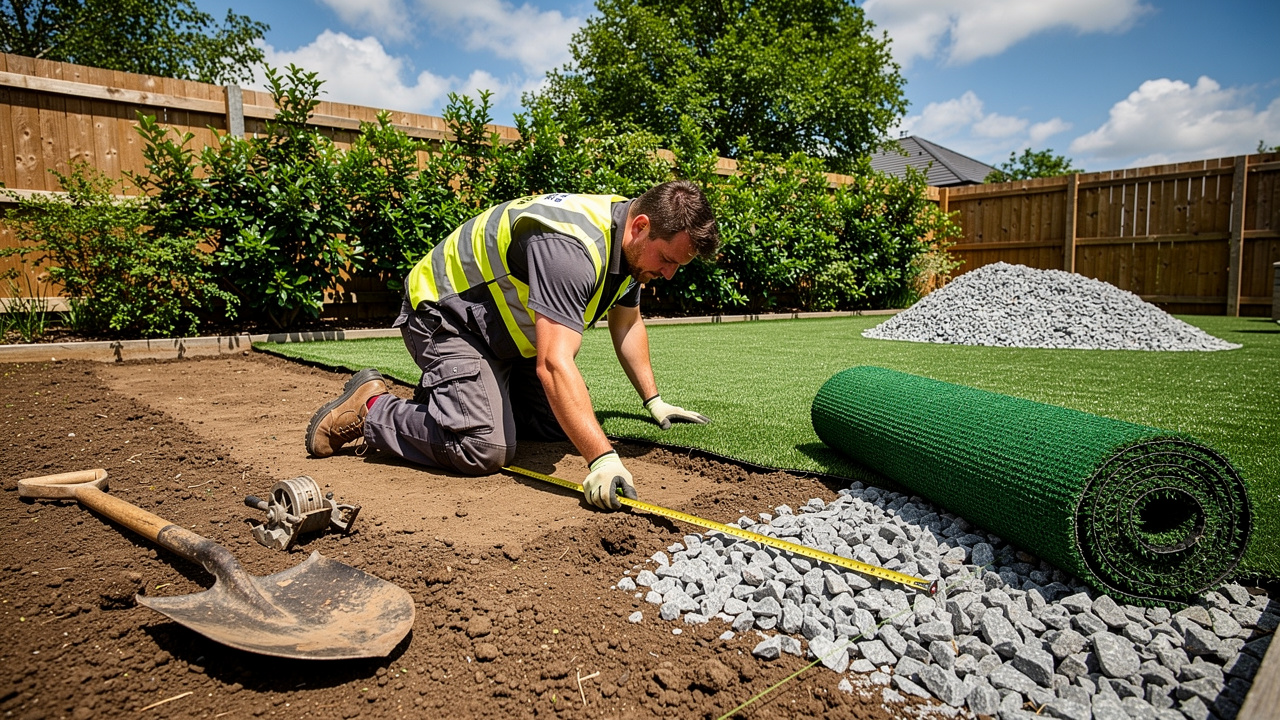
Install and Secure the Artificial Turf
To achieve a flawless and professional appearance, it is essential to utilize artificial grass installation available right now and secure the synthetic grass with precision. Hall Turf, a licensed contractor with over 15 years of experience and a client base of over 80,000 satisfied customers, follows these guidelines to ensure quality installation:
- Roll Out the Surface: Begin by rolling out the synthetic grass over the prepared base. Allow the grass to acclimate for about 30 minutes to reduce curling and ensure it lays flat.
- Cut to Fit: Trim the edges of the grass to fit the area precisely. Use a sharp utility knife for clean cuts, ensuring that the edges align with any borders or landscaping features.
- Secure the Grass: Use galvanized landscape nails or staples to fasten the grass around the perimeter. Place nails every 4 to 6 inches along the edges to prevent movement. It is essential to avoid driving the nails too deep, as this can harm the grass and result in uneven surfaces.
- Seam the Grass: If several sections of grass are used, overlap the seams by at least 4 inches and secure them with seam tape and adhesive. This method ensures a seamless appearance and prevents water from seeping through.
- Brush and Infill: After securing the grass, brush the fibers upright using a stiff broom. If applicable, add infill material to enhance stability and support the grass blades, with a recommended application of 2-3 pounds per square foot for optimal performance.
Following these steps ensures a long-lasting and visually appealing outdoor space, especially with artificial grass installation available right now. Satisfied customers, including Scott Sachse, have praised Hall Turf’s exceptional work, highlighting the company’s attention to detail and professionalism. Dick Bryant also noted how Hall Turf’s expert evaluation led to the perfect solution for his turf needs, showcasing the company’s commitment to customer satisfaction. For inquiries and quotes, please contact Hall Turf at (816) 555-7890 or email info@hallturf.com.

Conduct Final Inspection and Maintenance
A thorough final inspection is essential to ensure that the artificial grass installation available right now meets quality standards and client expectations. Here’s how to perform this step:
- Inspect the Turf: Walk around the installation area and check for any visible seams, wrinkles, or uneven spots. Ensure that the grass is securely fastened and that there are no loose edges.
- Check Drainage: Test the drainage by pouring water on the grass and observing how it flows. Ensure that water drains away from the surface and does not pool in any areas.
- Review Infill Levels: If infill was used, check that it is evenly distributed across the surface. This helps preserve the grass’s appearance and performance.
- Clean the Area: Remove any debris or excess materials from the setup site. A clean area enhances the overall look and prepares it for immediate use, with artificial grass installation available right now.
- Provide Maintenance Guidelines: Educate the client on how to care for their new synthetic grass. This includes regular brushing, rinsing, and checking for debris accumulation.
Neglecting this step could lead to complications that affect the turf’s longevity and performance. Failure to address these aspects may result in dissatisfaction and increased maintenance costs for the client. By prioritizing these checks, you not only enhance the installation’s quality but also foster client satisfaction and trust in your services.

Conclusion
Proper installation of artificial grass is essential for achieving both aesthetic appeal and long-term performance. By adhering to best practices – such as conducting thorough site assessments, preparing a solid base, securing the turf correctly, and performing a final inspection – the longevity and performance of the artificial grass can be significantly enhanced. With Hall Turf’s expertise, you can expect a high-quality installation tailored to your needs.
Key insights from the article emphasize the importance of each step in the installation process. From evaluating the site and preparing the base to securing the turf and conducting a final inspection, every detail matters. Testimonials from satisfied customers like Scott Sachse and Dick Bryant highlight Hall Turf’s commitment to professionalism and attention to detail, reinforcing the value of choosing a licensed contractor with extensive experience in the field.
Investing time and effort in proper artificial grass installation creates a beautiful outdoor space and builds lasting satisfaction. For those considering artificial turf, reaching out to Hall Turf at (816) 555-7890 or via email at info@hallturf.com can provide valuable insights and support throughout the installation process. Choosing Hall Turf for your installation ensures a commitment to quality that translates into enduring satisfaction.
Frequently Asked Questions
Why is site assessment important before installing artificial grass?
Site assessment is crucial because it helps identify existing vegetation, soil conditions, and drainage patterns, which can prevent significant challenges during installation.
What are the steps involved in conducting a site assessment for artificial grass installation?
The steps include evaluating the area dimensions and slopes, checking for drainage issues, removing existing vegetation, assessing soil quality, and planning for any obstacles like underground utilities.
How do you evaluate the area for artificial grass installation?
Measure the dimensions of the installation site and note any slopes or uneven surfaces to aid in planning excavation and base preparation.
What should be done to address drainage issues before installation?
Identify areas where water tends to pool and ensure proper drainage to prevent water buildup beneath the grass, which can lead to mold and deterioration.
How do you prepare the area by removing existing vegetation?
Clear the area of grass, weeds, or debris using a shovel or turf cutter to create a clean surface for the new turf.
Why is it important to assess soil quality before installation?
Assessing soil quality is important to test for compaction and drainage capabilities. Compacted soil may need to be loosened to ensure proper drainage and base setup.
What should be considered regarding obstacles during site preparation?
Identify and mark any underground utilities or structures that may disrupt the installation process to avoid damage during excavation.
How does thorough site preparation affect the artificial grass installation?
Thorough site preparation enhances the installation process and ensures the longevity and performance of the artificial grass.
List of Sources
- Prepare the Base for Installation
- Best Base for Artificial Turf: What Matters | US Turf (https://usturfsandiego.com/news/ideal-base-for-artificial-turf)
- What is the Best Base to Put Under Artificial Grass? (https://delaturf.com/post/what-is-the-best-base-to-put-under-artificial-grass)
- Installation – Xtreme Green Synthetic Turf (https://xgreensynthetic.com/services/installation)
- 4 Steps to Prepare the Base for Artificial Grass Installation – Hall Turf | Artificial Turf Installation Kansas City KS & MO (https://hallturf.com/4-steps-to-prepare-the-base-for-artificial-grass-installation)
- Master Artificial Turf Base Preparation in 4 Simple Steps (https://californiaturfco.com/master-artificial-turf-base-preparation-in-4-simple-steps)
- Install and Secure the Artificial Turf
- Our Step-by-Step Turf Installation Process at Ideal Turf Solutions (https://idealturfsolutions.com/2022/12/step-by-step-overview-of-our-turf-installation-process)
- How to Install Astro Turf Near You: A Step-by-Step Guide – Hall Turf | Artificial Turf Installation Kansas City KS & MO (https://hallturf.com/how-to-install-astro-turf-near-you-a-step-by-step-guide)
- How to install artificial turf grass: Comprehensive guide (https://nationalpost.com/sponsored/homes-sponsored/how-to-install-artificial-turf-grass-comprehensive-guide)
- How to Install Artificial Turf on Dirt | US Turf (https://usturfsandiego.com/news/how-to-install-artificial-turf-on-dirt)
- How to Install Artificial Turf – RCP Block & Brick (https://rcpblock.com/installation-artificial-turf.html)