
Introduction
Installing artificial grass is a complex task that can significantly enhance outdoor spaces. However, achieving a flawless finish requires more than just laying down turf. This guide delves into the essential techniques for applying artificial grass glue and tape, ensuring a strong bond that withstands the test of time.
It is essential to address common installation challenges to maintain the integrity of the project. By exploring best practices and troubleshooting tips, readers will be equipped to effectively address any issues, ensuring a successful installation.
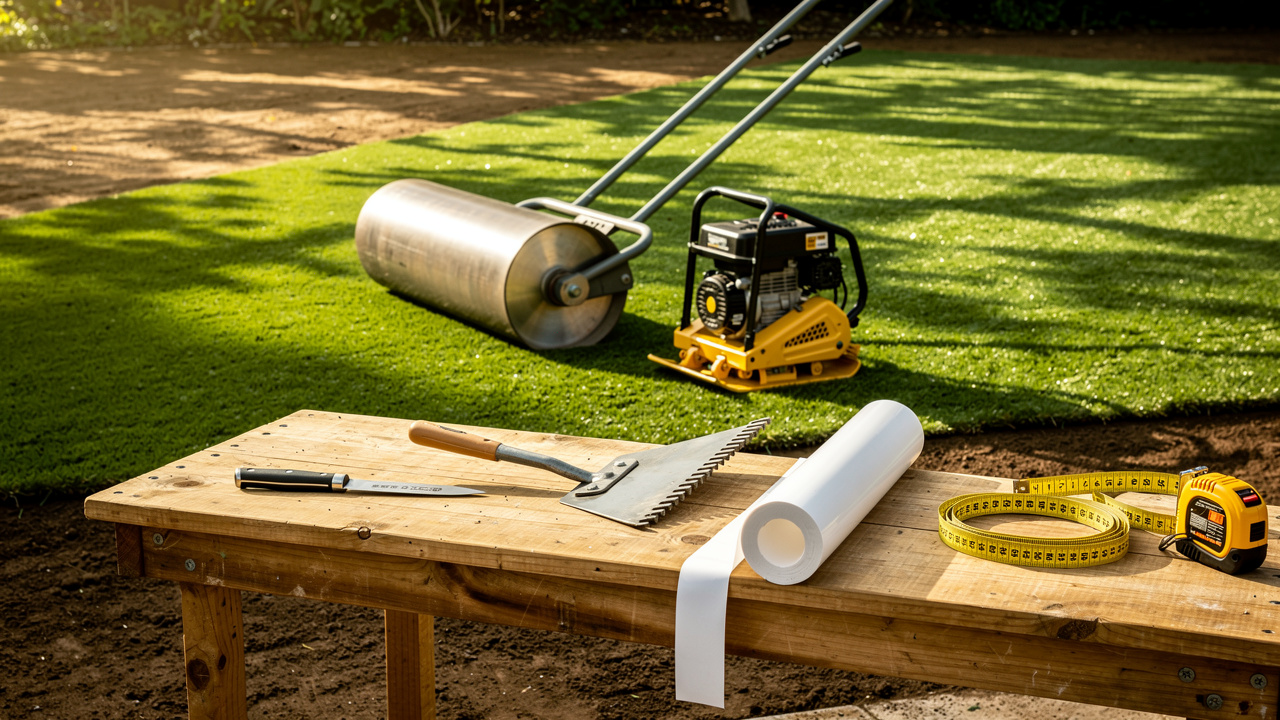
Gather Essential Tools and Materials
Selecting the right tools is crucial for a successful artificial grass installation, as the quality of the finish depends on it. Choose a high-quality adhesive, like artificial grass glue and tape, specifically made for synthetic grass, applying it thinly to prevent spilling onto the fibers for a strong bond. Using artificial grass glue and tape is essential for connecting two sections of grass together flawlessly, offering a neat finish.
You’ll need a utility knife to cut the grass and seam material to the right lengths for precision. Use a notched trowel or spreader to apply the adhesive evenly. Keep measuring tape handy for accurate measurements of the grass area, and having both short and long tape measures will help ensure precision during installation. A heavy roller is essential to press the turf into the adhesive, creating a strong bond. Additionally, a vibrating plate compactor is important for proper compaction of the sub-base. Gloves will protect your hands from adhesive and sharp tools, while cleaning supplies like rags or paper towels will help maintain a tidy workspace by cleaning up any spills or excess glue. A water hose is useful for helping infill settle after installing artificial grass.
Having these tools and materials on hand will make your installation process smoother and help you achieve a professional finish with your artificial grass project. Hall Turf, a licensed contractor with over 15 years of experience and a client base of over 80,000 satisfied customers, emphasizes the importance of using the right tools. As noted by satisfied customers like Scott Sachse, who praised the exceptional job done by Hall Turf’s team, having the right tools is just as important as working with skilled professionals. Brock, an essential member of the Hall Turf team, is acknowledged for his attention to detail and dedication to customer satisfaction, making certain that every project is completed on time and to the highest standards. Ultimately, the right tools and skilled professionals are key to achieving a flawless installation that meets your expectations.

Apply Artificial Grass Glue: Step-by-Step Instructions
Achieving a successful artificial grass installation hinges on the proper application of artificial grass glue and tape. Follow these step-by-step instructions to apply artificial grass glue effectively:
- Prepare the Surface: Make sure the area is clean, dry, and free of debris like grass, weeds, and rocks. Check drainage to avoid water pooling, maintaining a slight slope away from structures.
- Measure and Cut: Use a measuring ribbon to determine the length of the joint and cut the adhesive strip accordingly, ensuring a perfect fit.
- Place the Adhesive Strip: Position the adhesive strip side up along the joint where the two pieces of grass will meet, ensuring it is straight and secure.
- Apply the Adhesive: Grab a notched trowel and spread the glue evenly over the joining strip, aiming for a consistent layer approximately 1/8 inch thick to ensure a strong bond.
- Press the Grass Edges: Carefully align the edges of the grass over the glued seam tape and press down firmly to ensure a secure attachment.
- Roll the Seam: Use a heavy roller to press the grass into the glue, eliminating air pockets and ensuring a tight bond.
- Allow to Cure: Allow the glue to cure for about 24 hours, following the manufacturer’s instructions, but keep in mind that weather can affect this time. Avoid walking on the grass or applying any infill during this period.
For enhanced security, spike the patio edges every 4 – 6 inches using artificial grass glue and tape to secure the grass in place while the adhesive sets. Additionally, it is advisable to wear gloves and a mask to protect against adhesive fumes during the installation process.
Neglecting these steps could undermine the longevity and effectiveness of your artificial grass installation.

Utilize Seam Tape: When and How to Apply
The use of artificial grass glue and tape plays a pivotal role in ensuring a robust connection between two pieces of artificial grass. Here’s how to utilize it effectively:
- When to Use Seam Adhesive: Seam adhesive is essential when connecting two sections of grass, particularly in larger areas where one piece is insufficient.
- Dry Fit the Grass: Lay the grass pieces side by side to check for proper fit. Trim any excess to ensure a snug connection.
- Position the Joining Strip: Place the joining strip beneath the joint, ensuring it is centered and flat for optimal adhesion.
- Apply Adhesive: Use a notched trowel to spread glue evenly over the joint material, ensuring full coverage without excess that might seep through the grass.
- Press the Turf Together: Align the edges of the turf and press them firmly onto the glued tape, ensuring a tight fit.
- Secure the Joint: Use a heavy roller to press down on the joint, which helps create a strong bond and eliminates air pockets that could weaken the joint. Additionally, secure the joint with bags of infill for 45-60 minutes to enhance the bond.
- Cure Time: Allow the joint to cure according to the adhesive instructions before using the area. The longevity of the installation is compromised without proper curing with artificial grass glue and tape.
Important Considerations: Leave a 3/8″ inch space for the joint to prevent a ‘mohawk’ or ‘valley’ effect. Neglecting routine maintenance can lead to joint failure, often caused by improper adhesive use or environmental factors. The average lifespan of tape is usually 6-8 years in typical residential lawns, giving homeowners a clearer understanding of durability expectations.
Following these steps will help you achieve a seamless connection between grass pieces, improving both the look and durability of your artificial grass installation.

Troubleshoot Common Installation Issues
Despite meticulous planning, various challenges may arise during the installation of artificial grass. Here are some common problems and how to troubleshoot them:
- Joints Lifting: Approximately 24% of artificial grass installations encounter joint lifting. To address this, ensure that enough glue was applied and that the grass was pressed down firmly. If seams are still lifting, reapply glue and use a roller to secure the seam effectively. Incorrect installation is the most frequent reason for holes and tears in synthetic grass, so attention to detail during this step is essential.
- Bubbles or Air Pockets: Bubbles or air pockets can compromise the integrity of the installation. Should bubbles appear, puncture them with a utility knife and expel the air. Reapply glue if necessary to maintain a seamless finish.
- Uneven Turf: An uneven appearance often indicates issues with base preparation. Verify that the ground is level and compacted before laying the grass to prevent future problems. Using a vibrating plate compactor can help achieve the necessary density for the sub-base, ensuring a stable foundation. Failure to prepare the base properly can result in costly repairs and dissatisfaction with the installation.
- Apparent Joints: To reduce apparent joints, make sure that the turf edges are cut neatly and that the tape is applied properly. Using infill can help blend the seams and enhance the overall appearance. Additionally, consider installing a weed membrane to prevent weed growth, which is a common concern for homeowners.
- Adhesive Not Curing: If the adhesive is not curing properly, check the temperature and humidity levels. Ensure that the adhesive is suitable for the current weather conditions, as improper environmental factors can hinder curing.
By being aware of these common issues and their solutions, addressing these common issues proactively can significantly enhance the longevity and appearance of your artificial grass installation.

Conclusion
Successful artificial grass installation hinges on meticulous attention to detail, particularly in the application of glue and tape. This guide has outlined the essential tools and materials needed, along with step-by-step instructions for effectively applying artificial grass glue and seam tape. Following these best practices helps homeowners and professionals achieve a durable finish that improves the look of any outdoor space.
Key insights discussed include:
- The importance of properly preparing the surface
- Using the right amount of adhesive
- Troubleshooting common installation issues
Customer testimonials, including one from Scott Sachse, underscore Hall Turf’s professionalism and expertise in artificial grass installation. With a client base of over 80,000 satisfied customers, Hall Turf emphasizes the significance of using high-quality materials and skilled professionals to achieve the best results.
In conclusion, investing time and effort into the installation process will pay off in the long run, ensuring that your artificial grass remains beautiful and functional for years to come. If you’re starting your artificial grass project, Hall Turf is here to provide expert guidance and support throughout the process. For inquiries or quotes, reach out to Hall Turf at (816) 555-7890 or via email at info@hallturf.com. Choosing Hall Turf for your artificial grass project ensures a professional finish that enhances your outdoor space for years to come!
Frequently Asked Questions
Why is selecting the right tools important for artificial grass installation?
Selecting the right tools is crucial for a successful artificial grass installation because the quality of the finish depends on it. Using appropriate tools ensures a professional and neat result.
What specific tools are needed for installing artificial grass?
Essential tools for installing artificial grass include high-quality adhesive (artificial grass glue and tape), a utility knife, a notched trowel or spreader, measuring tape, a heavy roller, a vibrating plate compactor, gloves, cleaning supplies (like rags or paper towels), and a water hose.
How does adhesive play a role in the installation process?
Adhesive, specifically artificial grass glue and tape, is essential for connecting two sections of grass together flawlessly, ensuring a strong bond and a neat finish.
What is the purpose of a heavy roller in the installation?
A heavy roller is used to press the turf into the adhesive, creating a strong bond between the grass and the surface beneath it.
Why is a vibrating plate compactor important?
A vibrating plate compactor is important for ensuring proper compaction of the sub-base, which is crucial for a stable and durable installation.
How can gloves and cleaning supplies assist during installation?
Gloves protect your hands from adhesive and sharp tools, while cleaning supplies like rags or paper towels help maintain a tidy workspace by cleaning up any spills or excess glue.
What benefits does Hall Turf provide in terms of installation?
Hall Turf, a licensed contractor with over 15 years of experience and a client base of over 80,000 satisfied customers, emphasizes the importance of using the right tools and skilled professionals for a flawless installation.
Can customer testimonials provide insight into Hall Turf’s service quality?
Yes, testimonials from satisfied customers, such as Scott Sachse, highlight the exceptional job done by Hall Turf’s team, showcasing their attention to detail and dedication to customer satisfaction.
List of Sources
- Gather Essential Tools and Materials
- Essential Tools for DIY Artificial Grass Installation (https://artificialturfexpress.com/blog/15-important-tools-youll-need-for-diy-artificial-grass-installation-in-san-jose)
- Artificial Grass Install Accessories | Synthetic Grass Warehouse (https://syntheticgrasswarehouse.com/products/install-accessories)
- DIY Guide: Essential Tools for Installing (https://blog.artificialgrassrecyclers.com/diy-guide-tools-you-need-to-install-your-own-artificial-turf)
- Artificial Turf Material Supply List For Any Installation (https://turfkingz.com/resources/artificial-turf-material-supply-list)
- Apply Artificial Grass Glue: Step-by-Step Instructions
- Master Artificial Turf Glue: Best Practices for Homeowners (https://californiaturfco.com/master-artificial-turf-glue-best-practices-for-homeowners)
- The Complete Guide To Artificial Turf Glue | Chemique US (https://chemiqueadhesives.com/us/the-complete-guide-to-turf-glue)
- Master Artificial Grass Glue: 4 Steps for a Flawless Installation – Hall Turf | Artificial Turf Installation Kansas City KS & MO (https://hallturf.com/master-artificial-grass-glue-4-steps-for-a-flawless-installation)
- Artificial Grass Installation Video Guide (2024) (https://bellaturf.ca/blog/artificial-grass-installation-video-guide-2024)
- Synthetic Turf Installation: 10 Essential Adhesive Tips (https://artificialturfexpress.com/blog/sticking-it-10-adhesive-tips-for-synthetic-turf-installation)
- Utilize Seam Tape: When and How to Apply
- Artificial Turf Seam Tape vs. Glue: Preventing Seam Failures | Polysols (https://polysols.com/turf-seam-tape-vs-glue-down?srsltid=AfmBOopRO3qdE3h1c5LaiLqmYOl9ANN3hbGzQXmxPhbndlLTDLIFczff)
- Artificial Turf Seam Tape vs. Glue: Preventing Seam Failures | Polysols (https://polysols.com/turf-seam-tape-vs-glue-down?srsltid=AfmBOooSe5iN1OoSlVe1017Fch7UVMty5-OivozjFdNDmdwf05DRl9KN)
- Seaming Artificial Grass: Everything You Need To Know (2024) (https://bellaturf.ca/blog/seaming-artificial-grass-everything-you-need-to-know)
- How to Seam Artificial Grass | NexGen Lawns (https://nexgenlawns.com/how-to-seam-artificial-grass?srsltid=AfmBOoo4wQAz6ubQeRN7Vp5XI9KDvyZBD_uv2Ise9pOSoIle6ffyquMC)
- Nails, glue, or tape: seaming artificial grass | Purchase Green Artificial Grass (https://purchasegreen.com/blog/seaming-artificial-grass)
- How to use artificial grass seam tape: When to Use Tape vs Adhesive (https://litagrass.com/blogs/lita-artificial-grass-blog/how-to-use-artificial-grass-seam-tape-when-to-use-tape-vs-adhesive?srsltid=AfmBOooGZiOC0W34ZZ6Cmtg8Csra01me4FU1s0xBD6G_ch1bf7bOffnk)
- How to Seam Artificial Grass | NexGen Lawns (https://nexgenlawns.com/how-to-seam-artificial-grass?srsltid=AfmBOopeWVL_ifzucvy8NqgSx1RdwNLdCagAv_66LGqxrDXDWi8DHET3)
- Troubleshoot Common Installation Issues
- Artificial Grass, Market Trends, Business Insights, and Analysis (https://installartificial.com/how/artificial-grass-business-insights-market-trends)
- Problems With Artificial Grass (and Fixes) | US Turf (https://usturfsandiego.com/news/problems-with-artificial-grass)
- 7 Common Artificial Grass Problems and How to Fix Them (https://ccgrass.com/problems-with-artificial-grass)
- Overcoming Common Artificial Grass Installation Issues | Smart Turf® Artificial Grass (https://smartturf.com/overcoming-common-artificial-grass-installation-issues)