
Introduction
Transforming an ordinary outdoor space into a golfer’s paradise is possible with the creation of a small backyard putting green. This addition offers a unique blend of relaxation and recreation right at home. This guide provides a comprehensive, step-by-step approach to designing and installing a putting green that enhances playability while elevating the aesthetic appeal of any yard. However, various factors must be considered – from space evaluation to material selection. What are the key elements that can make or break this DIY project?
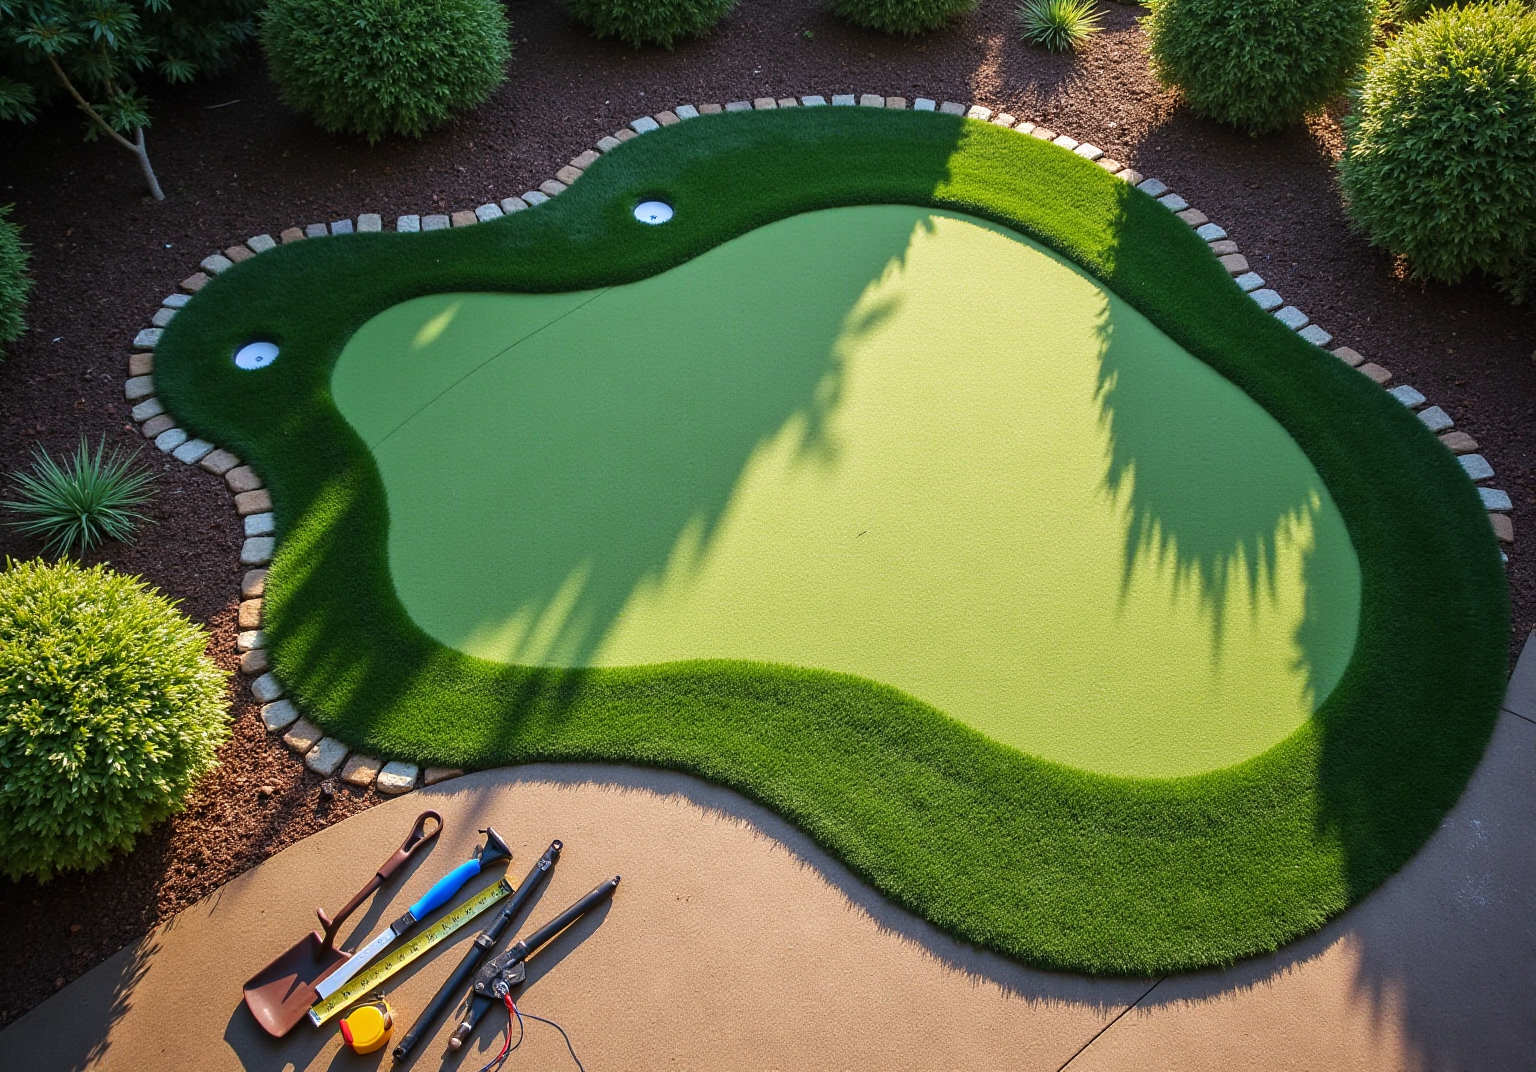
Evaluate Your Available Space for the Putting Green
- Measure Your Yard: Begin by using a tape measure to determine the dimensions of the area designated for your putting green. Consider the overall shape of the space and any existing landscaping features that may affect the design.
- Assess Sunlight Exposure: Ensure the chosen area receives adequate sunlight, ideally between 6 to 8 hours daily. This exposure is crucial for maintaining healthy grass. Avoid areas shaded by trees or nearby structures, as these can impede growth and performance.
- Check for Drainage: Observe how water drains in your yard. A well-drained area is vital to prevent water accumulation on the surface, which can damage the turf. If necessary, consider leveling the space to enhance drainage and ensure optimal conditions for your golf surface.
- Consider Accessibility: Select a location that is easily accessible for both maintenance and play. Avoid areas that are hard to reach or require significant landscaping changes, as this can complicate both maintenance and enjoyment of the space.
- Identify Obstacles: Note any barriers such as trees, fences, or slopes that may impact the design and installation of your golf area. Planning around these features is essential for creating a functional and visually appealing space.
In Kansas City, the average size of residential golf areas typically ranges from 400 to 1,000 square feet, allowing for various layouts and features. Successful backyard golf projects often incorporate custom contours and multi-hole designs, enhancing both playability and visual appeal. By carefully assessing your available area, you can design a practice space that meets your leisure needs while also enhancing your outdoor environment. With Hall’s , as highlighted by satisfied clients like Dick Bryant and Scott Sachse, you can trust that your project will be managed with professionalism and attention to detail, ensuring a beautiful and functional addition to your backyard.

Design Your Backyard Putting Green Layout
- Choose the Shape: Begin by selecting the shape of your golf green. Common options include circular, kidney, or rectangular shapes. It is essential to consider how the chosen shape integrates with your yard’s overall design. As noted by Dick Bryant, Brock’s guidance on the optimal shape was particularly beneficial for his area, showcasing Hall’s expertise in evaluating design requirements.
- Plan for Contours: Incorporate gentle slopes and undulations to replicate the experience of a real golf course. This approach not only adds challenge but also enhances the interest of your golfing experience. Aim for a slope of no more than 2%. Brock from Hall Turf emphasizes that these features significantly improve playability, a sentiment echoed by many satisfied customers.
- Determine Size: Assess your available space to decide on the dimensions of your putting area. A smaller area, such as a small backyard putting green that ranges from 150 to 300 square feet, is ideal for compact yards, while larger spaces can accommodate more expansive areas. Hall Lawn can provide expert advice on sizing to maximize your enjoyment, ensuring that your area integrates seamlessly into your landscape.
- Include Features: Consider incorporating additional features such as multiple holes, chipping areas, or fringe grass surrounding the putting surface. These elements not only enhance playability but also contribute to a more authentic golfing experience. Clients have praised Hall Grass for their innovative solutions, with Scott Sachse highlighting the exceptional work completed on his new lawn.
- Sketch Your Design: Create a rough sketch of your layout, clearly marking the dimensions, shape, and any additional features. This sketch will serve as a . With Hall’s expertise, you can refine your design to ensure it meets your needs and expectations, much like Les Boatright experienced with his project.

Gather Materials and Tools for Installation
Collecting the appropriate materials and tools is essential for a successful installation of a small backyard putting green. Here’s what you’ll need:
-
Materials Needed:
- Artificial Turf: Choose high-quality turf specifically designed for putting greens. This ensures durability and a true roll. Hall Turf offers a variety of options with unique features tailored to enhance your putting experience on a small backyard putting green.
- Base Material: Use crushed stone or decomposed granite to promote drainage and provide a stable foundation. Compact it to 90%-95% for longevity.
- Weed Barrier Fabric: Install a weed barrier using special fabric to prevent unwanted growth beneath the grass, ensuring a clean and low-maintenance surface.
- Putting Green Cups: Include cups for the holes where you will putt, strategically placed for optimal gameplay.
- Infill Material: Select infill like sand or rubber granules to support the fibers and create a realistic feel, typically needing 0.5 to 1.5 pounds per square foot.
- Artificial Grass Adhesives and Tape: Utilize adhesives and tape for connecting grass pieces, ensuring a secure and seamless installation.
-
Tools Required:
- Shovel: Essential for digging and leveling the ground, ensuring a proper base.
- Rake: Used to spread and level the base material evenly across the installation area.
- Plate Compactor: A crucial tool for compacting the base material, providing stability and preventing future settling.
- Utility Knife: Necessary for cutting the grass to the desired size and shape.
- Tape Measure: Important for accurate measurements during the installation of a small backyard putting green, ensuring it fits perfectly in your yard.
- Landscape Pins: Use these to secure the turf in place, preventing movement and maintaining a smooth surface.
-
Safety Gear: Always wear gloves, safety glasses, and a dust mask when handling materials to protect yourself during the installation process. With Hall Turf’s , you can trust that your project will be handled with expertise, just like the many satisfied customers who have praised Brock’s professionalism and attention to detail.

Follow the Step-by-Step Installation Process
- Prepare the Site: Begin by selecting a flat location with adequate drainage to ensure optimal performance of the golf surface. Clear the area of any existing grass, debris, or obstacles. Excavate the ground to a depth of 10-12 inches to create a level base, which is essential for the performance of the putting green.
- Install the Base: Add a layer of crushed stone or decomposed granite, approximately 4 inches deep. Use a rake to evenly distribute the material, then compact it thoroughly with a plate compactor to establish a solid foundation. As marketing specialist Brad Timsit emphasizes, “Proper base preparation is critical because it prevents uneven settling, water pooling, and surface rippling.”
- Lay the Weed Barrier: Position a weed barrier fabric over the compacted base to inhibit weed growth through the grass, ensuring a clean and low-maintenance surface.
- Cut and Lay the Grass: Roll out the synthetic grass over the prepared area. Use a utility knife to cut the grass to fit, ensuring that seams are tight and edges are securely tucked to prevent lifting. Customers have commended Hall for their attention to detail and the quality of their installations, resulting in a seamless appearance.
- Install the Putting Green Cups: Cut holes for the putting green cups according to the manufacturer’s specifications, ensuring they are level with the grass surface for a cohesive look.
- Fasten the Grass: Use landscape pins or staples to secure the edges of the grass to the ground, placing them approximately 6 inches apart to keep the grass firmly in place. Brock, a representative from Hall Turf, is recognized for his professionalism and dedication to ensuring that every installation is executed correctly.
- Add Infill Material: Evenly distribute infill material over the surface, brushing it in to support the fibers and create a realistic putting area that mimics natural grass.
- Final Touches: Conduct a thorough inspection of the surface for any uneven areas or loose edges. Make necessary adjustments to ensure a smooth, playable surface that enhances your backyard experience. Common mistakes to avoid include improper compaction of the base and failing to secure the turf, which can lead to issues later on. With Hall’s , you can sidestep these pitfalls and enjoy a beautifully installed lawn area for golf.

Maintain Your Backyard Putting Green for Longevity
- Regular Cleaning: To maintain a pristine putting green, it is essential to regularly remove debris such as leaves and dirt. Using a stiff-bristled broom or a ensures efficient cleaning and prevents the buildup that can affect playability.
- Brushing the Grass: Regular brushing of the grass fibers is crucial for keeping them upright and maintaining a natural appearance. This practice also aids in evenly distributing the infill material, which is essential for optimal performance.
- Occasionally rinsing the grass with water helps eliminate dust and any pet waste, ensuring a clean and hygienic surface. A light spray every few weeks can wash away environmental debris without displacing the infill. During warm months, a gentle water spray can enhance the comfort of the grass for use.
- Weed Control: Regular inspections of the edges of the putting green for any weeds are necessary. Swift removal is essential to prevent them from establishing themselves and disturbing the integrity of the grass.
- Infill Maintenance: Periodically checking the infill material and replenishing it as necessary is important. Maintaining the right level of infill is critical for the grass’s performance and feel, ensuring a consistent playing surface. Consistent upkeep can prolong the lifespan of synthetic grass by as much as 25%, translating to an additional 3-5 years of use.
- Seasonal Maintenance: In winter, using a plastic shovel to remove snow prevents harm to the grass fibers. During hot months, ensuring the turf is adequately rinsed helps prevent overheating and maintains comfort during use. Additionally, considering hiring professionals for occasional inspections and maintenance can ensure the longevity of your putting green.

Conclusion
Creating a small backyard putting green is a rewarding project that enhances outdoor leisure and improves golfing skills at home. By evaluating your available space, designing a thoughtful layout, gathering the right materials, and following a structured installation process, anyone can achieve a functional and aesthetically pleasing putting green.
Key steps include:
- Measuring the yard to determine the ideal location
- Considering factors such as sunlight and drainage
- Selecting the appropriate shape and size for the green
The installation process demands attention to detail, from preparing the site and laying the base to securing the turf and adding infill for optimal performance. Regular maintenance – such as cleaning, brushing, and checking for weeds – ensures the longevity and enjoyment of your putting green.
Ultimately, investing time and effort into building a backyard putting green can transform your outdoor space into a personal golfing oasis. Embrace the opportunity to enjoy the game of golf in your own backyard, and consider consulting with professionals to elevate your project. With the right approach, your small putting green can become a cherished feature that enhances both your home and your golfing experience.
Frequently Asked Questions
How should I evaluate the available space for my putting green?
Start by measuring the dimensions of the area designated for the putting green, assess sunlight exposure to ensure it receives 6 to 8 hours of sunlight daily, check for proper drainage to prevent water accumulation, consider accessibility for maintenance and play, and identify any obstacles like trees or fences that may impact the design.
What is the ideal size for a residential putting green in Kansas City?
The average size of residential golf areas in Kansas City typically ranges from 400 to 1,000 square feet, allowing for various layouts and features.
What shapes can I choose for my backyard putting green?
Common shape options for a backyard putting green include circular, kidney, or rectangular shapes. It’s important to consider how the chosen shape integrates with your yard’s overall design.
How can I enhance the playability of my putting green?
Incorporate gentle slopes and undulations into your design to replicate a real golf course experience. Aim for a slope of no more than 2% to improve playability.
What additional features can I include in my putting green design?
Consider adding features such as multiple holes, chipping areas, or fringe grass surrounding the putting surface to enhance playability and create a more authentic golfing experience.
How can I plan the dimensions of my putting green?
Assess your available space to determine the size of your putting area. Smaller greens can range from 150 to 300 square feet, while larger spaces can accommodate more expansive areas.
Should I create a sketch of my putting green layout?
Yes, creating a rough sketch of your layout, clearly marking dimensions, shape, and additional features, will serve as a valuable reference during installation.
List of Sources
- Evaluate Your Available Space for the Putting Green
- Why Luxury Backyard Putting Greens Are Becoming Popular USA (https://backninegreens.com/blog/why-luxury-backyard-putting-greens-are-becoming-popular-in-the-usa)
- 2026’s Biggest Artificial Turf Putting Green Design Trends – OC Turf & Putting Greens (https://octurfandputtinggreens.com/2026s-biggest-artificial-turf-putting-green-design-trends)
- Backyard Putting Green Installation | US Turf San Diego (https://usturfsandiego.com/residential-turf/putting-greens)
- Boost Home Value with a Backyard Putting Green! #HomeValue (https://heavenlygreens.com/blog/backyard-putting-green-boost-home-value)
- Top Backyard Putting Green Trends for 2026 Revealed (https://artificialturfexpress.com/blog/backyard-putting-green-design-trends)
- Design Your Backyard Putting Green Layout
- TurfMutt Foundation release 2026 backyard trends (https://gardencentermag.com/news/turfmutt-foundation-2026-backyarding-trends)
- Luxury Putting Green Trends in 2026 (https://bestputtinggreensandturfpalmdesert.com/blog/luxury-putting-green-trends-in-2026)
- 🌱 Artificial Turf Trends for 2026: Style, Comfort, and Sustainability – InspireScapes (https://inspirescapes.com/artificial-turf-trends-for-2026-style-comfort-and-sustainability)
- Five Landscape Design Trends for 2026 – The Edge from the National Association of Landscape Professionals (https://blog.landscapeprofessionals.org/five-landscape-design-trends-for-2026)
- Top Backyard Putting Green Trends for 2026 Revealed (https://artificialturfexpress.com/blog/backyard-putting-green-design-trends)
- Gather Materials and Tools for Installation
- DIY Backyard Putting Green vs Pro Install: Which is Best? (https://aglgrass.com/blogs/diy-backyard-putting-green)
- Creating a Backyard Putting Green? Here’s what you’ll need. (https://purchasegreen.com/blog/creating-a-backyard-putting-green)
- Ensure a Perfect Turf Putting Green Installation With These 4 Steps – SGW Sacramento (https://sgwsacramento.com/blog/ensure-a-perfect-turf-putting-green-installation-with-these-4-steps)
- DIY Putting Green Installation: A Step-by-Step Guide (https://artificialturfexpress.com/blog/installing-the-best-putting-greens-in-your-yard-the-ultimate-diy-guide)
- How to Install a Putting Green in Your Backyard: A Step-by-Step Guide (https://turffactorydirect.com/blog/how-to-install-a-putting-green-in-your-backyard?srsltid=AfmBOoqWnGMlln7xZW_PoJS2jwHkOaaku_f6EqmSqD4vD79PS0orQKT8)
- Follow the Step-by-Step Installation Process
- Guide to a Perfect Putting Green in Your Yard – Nature’s Seed (https://naturesseed.com/resources/lawn-turf/how-to-make-a-putting-green-in-your-yard?srsltid=AfmBOoopHuyVp08CDq06JXNxno4XiyJ2lImHO_OQawPGBz3QHYVIz78S)
- DIY Artificial Grass Putting Green Installation: Step-by-Step Guide – SGW Phoenix (https://sgwarizona.com/phoenix/blog/diy-artificial-grass-putting-green-installation-step-by-step-guide)
- How To Build a Backyard Putting Green (https://xgrass.com/how-to-build-putting-green.html)
- Backyard Putting Green Guide: Cost, Materials & DIY Installation (https://fieldturflandscape.com/turf-tips/how-do-i-make-my-grass-a-putting-green-a-step-by-step-guide)
- How To Make Your Backyard Putting Green Dream a Reality (https://usga.org/content/usga/home-page/course-care/green-section-record/62/issue-17/how-to-make-your-backyard-putting-green-dream-a-reality.html)
- Maintain Your Backyard Putting Green for Longevity
- How to Clean and Maintain Putting Green Turf: A Seasonal Guide (https://backninegreens.com/blog/how-to-clean-and-maintain-putting-green-turf-seasonal-checklist)
- Artificial Golf Greens Maintenance Tips (https://southwestgreens.com/blog/artificial-golf-greens-maintenance-tips)
- Turf Putting Green Care: Maintain Your Golf Surface (https://europeanco.com/blog/how-to-maintain-your-turf-putting-green)
- 10 Tips for Maintaining an Artificial Grass Putting Green (https://wintergreengrass.com/10-tips-for-maintaining-an-artificial-grass-putting-green)
- Backyard Putting Green Upkeep: Maintenance Homeowners Expect (https://artificialturfexpress.com/blog/backyard-putting-green-maintenance-guide)