
Introduction
Transforming any backyard into a golfer’s paradise is possible with the creation of an outdoor putting green. However, achieving that ideal surface involves more than simply laying down grass. This article explores the essential practices for installing putting green turf, including guidance on:
- Selecting appropriate materials
- Maintaining your green for durability
- Tailoring care strategies to suit local climates
With numerous options and potential challenges, how can one ensure a successful installation that satisfies both aesthetic appeal and performance standards?
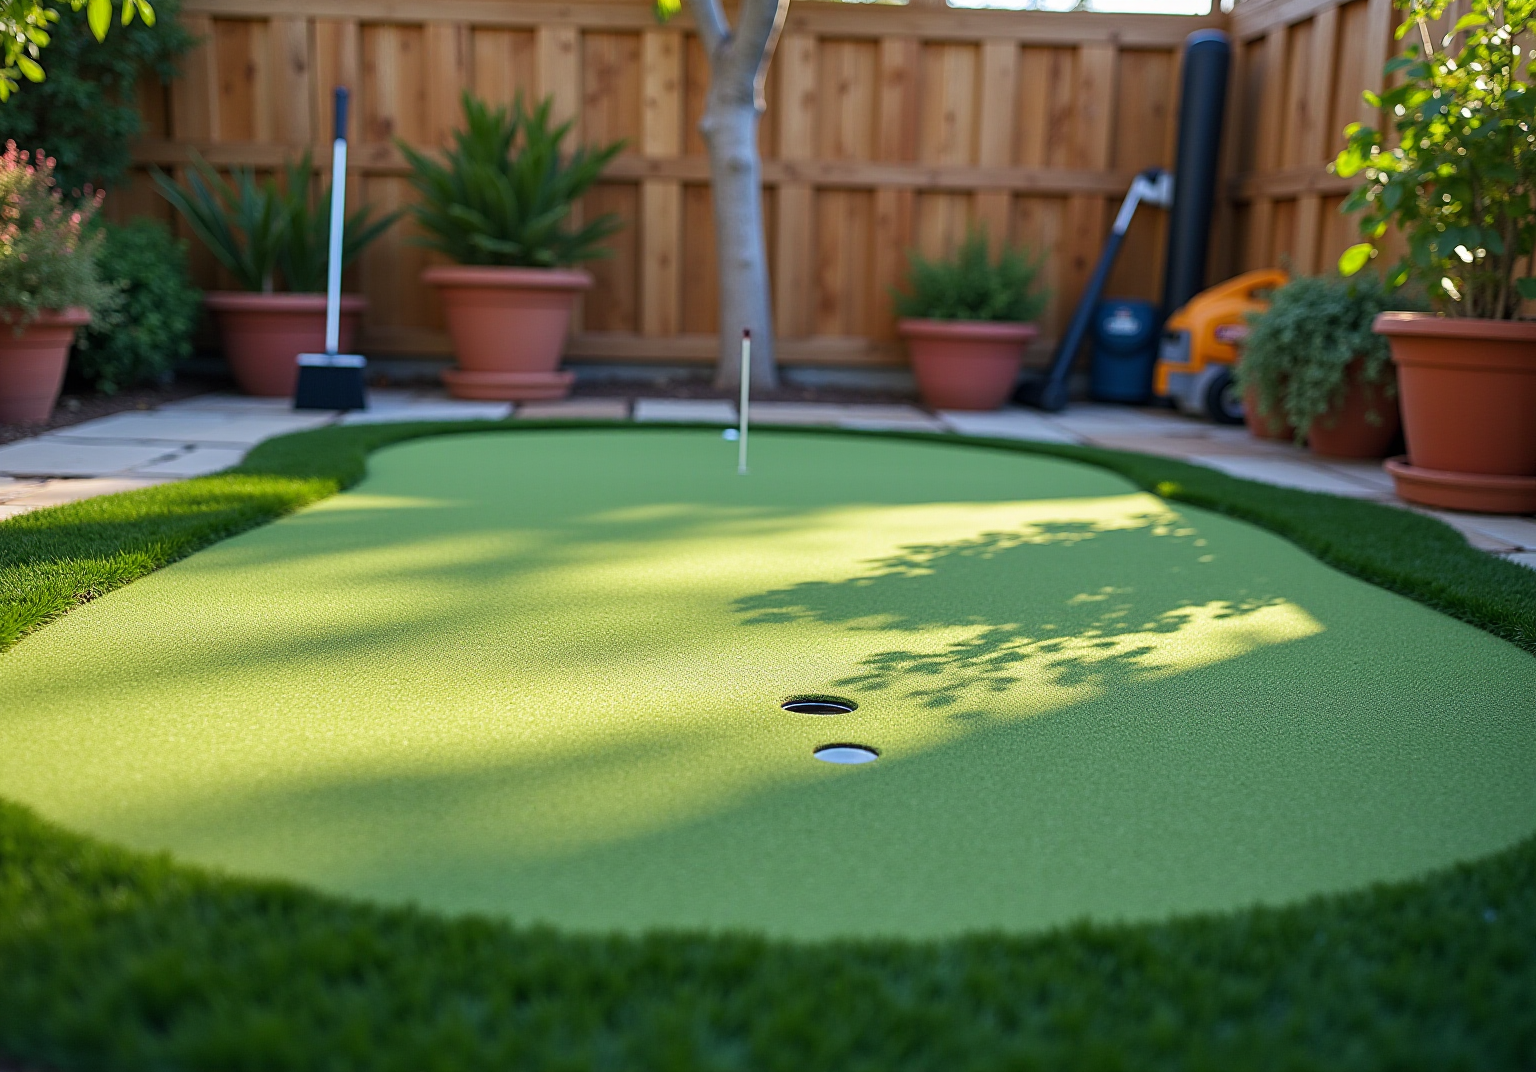
Choose the Right Turf Material for Optimal Performance
Selecting the right surface material is crucial for a successful installation of your . Here are the key factors to consider:
- Material Type: Opt for , such as nylon or polyethylene. Nylon is well-known for its durability and resilience, making it ideal for serious golfers. On the other hand, polyethylene offers a softer feel, making it a popular choice for residential applications. tailored to meet diverse needs, ensuring you find the perfect fit for your project.
- Face Weight: Look for grass with a . This range guarantees a capable of withstanding heavy foot traffic and varying weather conditions, thereby enhancing the longevity of your putting green. Hall Turf’s products are designed to meet these specifications, ensuring optimal performance.
- Drainage Properties: It is essential to choose grass with to prevent water pooling, which can compromise playability. A well-draining grass maintains its integrity and performance over time, allowing for consistent use regardless of weather conditions. in their installations.
- Color and Texture: Select a surface that closely resembles the . This choice not only enhances the aesthetic appeal of your backyard but also contributes to a more enjoyable playing experience. Hall Turf’s high-quality grass options are designed to provide a realistic appearance and texture, ensuring satisfaction.
By carefully selecting the appropriate grass material, you can create a putting green outdoor that is not only visually appealing but also delivers outstanding performance, ensuring a reliable surface for practice and play. Additionally, be mindful of or choosing grass that does not suit your intended purpose, as these can lead to disappointment with your setup. At Hall Turf, our team, led by experts like Brock, is committed to helping you find the perfect solution tailored to your needs, ensuring a .

Implement Regular Maintenance Routines for Longevity
To maintain your in optimal condition, it’s essential to establish a regular maintenance routine that includes several key practices:
- : Regularly clear leaves, twigs, and other debris from the surface. This not only prevents damage but also maintains a clean appearance. Effective enhances aesthetic appeal and prevents moisture buildup, which can lead to mold and drainage issues. Lawn care professionals recommend using a leaf blower or rake for efficient .
- Brushing: Utilize a stiff-bristled brush or power broom to brush the grass fibers against their natural direction. This practice keeps the fibers upright, ensuring a and preventing matting that can affect ball roll. is vital for maintaining the grass’s performance.
- : Periodically check and replenish , such as silica sand or rubber granules. Proper weight and stability of the surface are crucial for maintaining the grass’s performance and appearance, as even distribution of infill directly influences ball roll and speed.
- Cleaning: Schedule every few months using a mild soap solution to remove stains and odors, particularly if pets use the area. Rinse thoroughly to avoid residue buildup, which can detract from the grass’s longevity and overall performance. Lightly misting the surface with water and using a lawn roller can also help smooth out any wrinkles or bumps.
By adhering to these , you can prolong the lifespan of your turf outdoor, ensuring it remains a functional and appealing aspect of your outdoor area. Regular maintenance can extend the lifespan of by up to 25%, providing an additional 3-5 years of effective use.

Follow Best Installation Practices for Lasting Results
To ensure a successful installation of your , follow these essential practices:
- : Begin by clearing the area of existing grass, weeds, and debris. Excavate to a depth of 4-6 inches, which is crucial for establishing a solid foundation for the turf. This depth facilitates and prevents future settling issues. As Josh Lewis, a partner at Gradoville and Hertzing Management Group, states, “You’re either going to spend it proactively on really solid infrastructure and proper construction methods, or you’re going to spend it reactively on the back end making up for cutting corners on the construction side.”
- : Install a of , approximately 4 inches deep. This layer is vital for ensuring stability and effective drainage. Compact the base thoroughly to avoid settling; a well-constructed base enhances the longevity of the turf. A properly built green can last over 10 years with correct maintenance, underscoring the importance of investing in . Satisfied customers have noted that working with professionals like Brock from Hall Turf ensures these foundational aspects are managed with expertise, leading to exceptional results.
- Grass Layout: Roll out the grass and allow it to acclimate to the temperature. Ensure that the grain of the surface is consistent and aligned in the same direction to achieve a natural appearance. Proper alignment is essential for maintaining a uniform look and feel. Customers have commended Brock’s , which contributes to a seamless and professional finish.
- Seaming: When joining multiple pieces of turf, use and ensure that . This prevents visible gaps, enhancing both the aesthetic and performance of the green. Misaligned seams can detract from the overall quality of the setup, a point emphasized by clients who appreciated Brock’s meticulous approach.
- : Install golf cups at the desired locations, ensuring they are flush with the turf surface. This creates a seamless playing experience, allowing for realistic practice conditions.
By adhering to these installation methods, you can create a turf outdoor area that not only looks professional but also functions effectively for years to come. Adequate and are essential for creating a lasting and enjoyable surface for golf, and collaborating with specialists like those at Hall Turf can significantly impact the outcome.

Adapt Maintenance Strategies to Local Climate Conditions
To effectively maintain your , it is essential to implement that ensure optimal health and appearance throughout the year.
Watering Practices: Adjust your watering schedule according to local rainfall and temperature. In hot, dry climates, increase the to keep the grass adequately hydrated. Conversely, in cooler, wetter areas, reduce watering to prevent oversaturation, which can harm the turf.
Seasonal Adjustments: Modify your maintenance routines in response to . For instance, during the summer months, increase brushing and infill checks to mitigate heat stress on the grass. In winter, prioritize debris removal and minimize foot traffic to protect the turf from damage.
Fertilization: Select fertilizers that are appropriate for your local climate and grass type. In warmer regions, consider using slow-release fertilizers to provide a steady supply of nutrients without encouraging excessive growth, which can lead to maintenance challenges.
Pest Management: Stay vigilant regarding local pests that may threaten your turf. Implement preventive measures and treatments that are tailored to address the common pest issues in your region.
By adapting your maintenance strategies to align with local climate conditions, you can ensure that your remains healthy, functional, and visually appealing throughout the year.

Conclusion
In conclusion, selecting and installing outdoor putting green turf requires a careful balance of quality materials, proper installation techniques, and ongoing maintenance strategies. By prioritizing these elements, one can create a durable and visually appealing putting green that enhances both the functionality and enjoyment of outdoor spaces.
Choosing the right turf material, such as nylon or polyethylene, is crucial as it significantly impacts performance and longevity. Key installation practices, including thorough site preparation and effective drainage, are essential for establishing a solid foundation. Additionally, regular maintenance routines tailored to local climate conditions further extend the lifespan and performance of the turf, ensuring it remains in optimal condition for years.
Ultimately, investing in high-quality materials and adhering to best practices for installation and maintenance will result in a putting green that not only looks impressive but also performs exceptionally well. For anyone considering an outdoor putting green, understanding these best practices is vital for achieving a rewarding and enjoyable golfing experience at home.
Frequently Asked Questions
What types of turf materials are recommended for putting greens?
It is recommended to use synthetic grass specifically designed for golf holes, such as nylon or polyethylene. Nylon is known for its durability and resilience, making it ideal for serious golfers, while polyethylene offers a softer feel, making it popular for residential applications.
What is the ideal face weight for putting green turf?
The ideal face weight for putting green turf is between 40 and 60 ounces per square yard. This range ensures a dense and durable surface that can withstand heavy foot traffic and varying weather conditions.
Why are drainage properties important in turf selection?
Drainage properties are important because they prevent water pooling, which can compromise playability. Well-draining grass maintains its integrity and performance over time, allowing for consistent use regardless of weather conditions.
How should the color and texture of the turf be chosen?
The turf should closely resemble the color and texture of natural grass to enhance the aesthetic appeal of your backyard and contribute to a more enjoyable playing experience.
What common mistakes should be avoided when selecting turf for a putting green?
Common mistakes include neglecting drainage requirements and choosing grass that does not suit your intended purpose, as these can lead to disappointment with your setup.
How can Hall Turf assist in selecting the right turf material?
Hall Turf provides a variety of options tailored to meet diverse needs and has a team of experts committed to helping you find the perfect solution for your putting green installation.