
Introduction
Transforming your outdoor space with DIY artificial grass installation can be rewarding, yet it comes with its own set of challenges. This comprehensive guide outlines eight straightforward steps that not only simplify the installation process but also enhance the longevity and appearance of the turf. Many homeowners struggle with common mistakes during installation. What are the key pitfalls to avoid, and how can you ensure a professional finish? This guide will provide you with expert tips and tricks for a successful installation and a vibrant lawn that lasts.
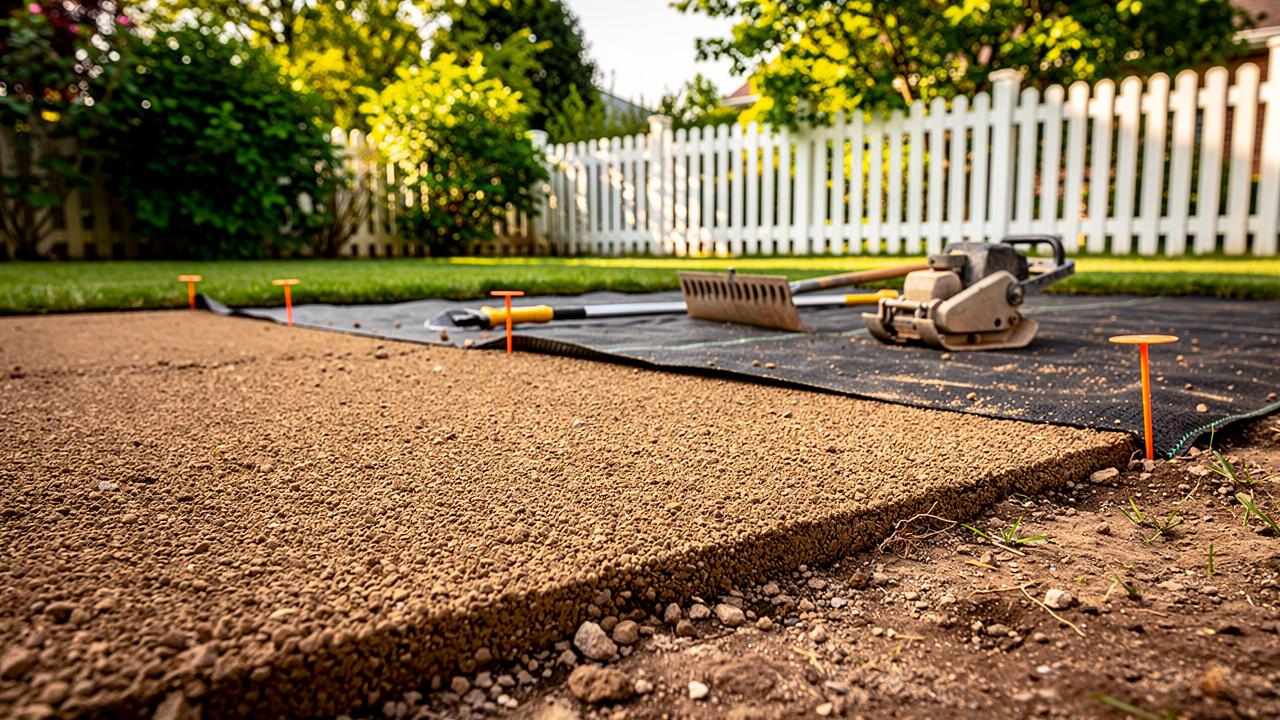
Prepare the Installation Area
Proper site preparation is crucial for the successful DIY artificial grass installation, as it directly impacts the longevity and performance of the grass.
- Clear the Area: Start by digging up the top layer of soil, about 2 to 4 inches deep, depending on your grass type. Remove any existing grass, weeds, and debris from the installation site.
- Level the Ground: Once cleared, ensure the ground is level; this promotes efficient drainage and supports healthy grass growth. Use a rake to smooth out any bumps or depressions.
- Check for Drainage: Evaluate the area for potential drainage issues. If water tends to pool in certain spots, consider creating a slight slope away from structures to facilitate proper water runoff. Without proper drainage, water pooling can damage the grass and lead to costly repairs.
- Compact the Soil: Using a plate compactor will help create a firm base for your grass installation. This step is crucial to avoid settling after the DIY artificial grass installation.
- Mark the Area: Use stakes and string to outline the area designated for the grass. This will assist in visualizing the layout and ensuring precise measurements for the grass rolls.
In Kansas and Missouri, you can expect to pay between $14 and $23 per square foot for synthetic grass installation, depending on local market conditions. Landscaping professionals emphasize that thorough site preparation significantly enhances the longevity and performance of DIY artificial grass installation. Investing time in thorough preparation can prevent future complications and ensure a lush, healthy lawn.

Install a Weed Barrier
Selecting the right material is essential for the success of your artificial turf installation. Choose a high-quality, permeable barrier fabric that allows water and nutrients to pass through while effectively blocking sunlight to inhibit plant growth. Kiran Pulidindi notes that nonwoven plant control fabric is increasingly popular as an alternative to traditional mulching products and chemical herbicides, highlighting the importance of choosing the right material.
Measure the installation area precisely and trim the barrier fabric to fit, ensuring an overlap of at least 6 inches along the edges. This overlap is crucial to prevent any gaps that could enable unwanted plants to infiltrate.
Position the barrier over the prepared soil, ensuring it lies flat without any wrinkles. Secure the fabric in place using landscape staples or nails, placing them every 2-3 feet along the edges and seams to maintain stability.
When using multiple pieces of fabric, verify that the seams overlap by at least 6 inches. This precaution helps to create a continuous barrier against plant invasion.
Conduct a thorough inspection of the entire area for any gaps or unsecured sections of fabric. Addressing these issues before proceeding is vital to ensure the effectiveness of the barrier and the longevity of your artificial turf. Plant barriers can reduce unwanted plant growth by about 70-80%, making them a valuable addition to your landscaping. Furthermore, remember to take away old mulch prior to applying new mulch to preserve the efficiency of your barrier against unwanted plants.

Add Aggregate for Stability
Selecting the right aggregate is crucial for a successful DIY artificial grass installation project. Choose high-quality aggregate materials like crushed stone or decomposed granite, which provide excellent drainage and stability. These materials prevent settling and create a durable base for DIY artificial grass installation. As Kathy Leavell emphasizes, “Choose high-quality base materials that provide strong support and allow water to drain.”
Next, evenly pour the aggregate over the weed barrier, aiming for a depth of 3 to 5 inches. Use a rake to spread it uniformly across the area, ensuring a consistent layer that effectively supports the grass.
After spreading, thoroughly compact the aggregate using a plate compactor. This step is essential for establishing a stable foundation that will support the grass and prevent future settling, which can lead to uneven surfaces. Leavell emphasizes that “proper compaction is key to a stable lawn.”
Once compacted, use a level to verify that the surface is even. Make any necessary adjustments by adding or removing aggregate to achieve a smooth, flat base. Proper grading is crucial in DIY artificial grass installation to ensure that water will not accumulate on your grass, as Leavell points out.
Finally, if applicable, ensure the aggregate is slightly sloped away from any structures. A slope of 1-2% is advised to promote adequate drainage and avoid water accumulation, which can harm the grass. Neglecting these steps can compromise the longevity and health of your lawn.

Lay Out the Artificial Grass
To achieve a flawless finish, careful attention to detail is essential during DIY artificial grass installation. Start by unrolling the artificial grass in the designated area. Allow it to acclimate for at least two hours to eliminate any creases or wrinkles, ensuring a smooth DIY artificial grass installation process.
Next, lay the grass in the desired direction, making sure the blades are all facing the same way for a uniform appearance. When using multiple rolls, stagger the seams to avoid a straight line, enhancing the natural look.
Utilize a utility knife to trim any extra grass along the edges, ensuring a snug fit against borders and obstacles. Taking the time to trim the edges properly will give your installation a polished look.
Step back and assess the layout from various angles to ensure it appears even and natural. Make any necessary adjustments before securing the surface to achieve the best aesthetic outcome.
Finally, during the DIY artificial grass installation, use landscape staples or nails to temporarily fasten the grass in place while you work on the edges. Place these fasteners every 6 to 8 inches along the perimeter to prevent shifting during installation. Proper installation not only enhances the aesthetic appeal but also extends the lifespan of your artificial grass.

Secure the Turf Edges
Securing sod properly is crucial for a healthy lawn and an appealing landscape.
- Use Landscape Staples: Begin securing the edges of the sod using U-shaped landscape staples or galvanized nails. Position them every 6-8 inches along the perimeter and seams to keep the grass in place securely.
- Tuck the Edges: For a clean finish, tuck the edges of the grass under any adjacent surfaces, such as patios or walkways. A putty knife can help tuck the grass neatly.
- Check for Gaps: Check the edges for gaps or unsecured areas. Address these issues by adding more staples or adjusting the grass as needed. Gaps in the grass can lead to uneven growth and an unkempt appearance. Neglecting these gaps may result in the grass lifting or dying off in those areas.
- Cut Extra Edges: If needed, cut any surplus grass along the borders to achieve a tidy look. Avoid cutting too much to prevent exposing the base material.
- Final Inspection: Once all edges are secured, conduct a final inspection to ensure everything is in place, looks uniform, and allows for proper drainage. Ensuring every detail is attended to will contribute to the longevity and beauty of your lawn.

Apply Infill for Enhanced Performance
Selecting the right filling material is crucial for achieving optimal grass performance and appearance. Choose a suitable filling material based on the intended purpose of the grass. Common options include:
- Silica sand for budget-friendly lawns
- Crumb rubber for high-traffic areas
- Organic infills like cork or coconut fiber, which are recommended for environmentally conscious projects
Next, use a drop spreader to evenly distribute the material across the surface of the grass. Aim for a depth of about 1-2 inches, adjusting based on the specific grass type and filling material used. Typically, lawns require approximately 2 to 3 pounds of infill material per square foot for optimal performance.
After applying the material, use a power broom or stiff-bristle broom to brush the grass fibers upright. This helps the material settle evenly and enhances the natural appearance of the grass.
Inspect the grass to ensure that the material is evenly distributed and that the fibers are standing upright. According to LITA Grass, suitable material is essential for preserving the vertical orientation of grass fibers. Add more material as necessary to achieve the desired look and feel.
Finally, conduct a final grooming of the surface to ensure all fibers are standing tall and the material is well-distributed, providing a natural appearance. Installing material in wet weather can lead to clumping and uneven distribution, which compromises the installation quality. Proper infill application is essential for maximizing both the aesthetic appeal and durability of your grass installation.

Troubleshoot Common Installation Issues
Addressing common installation issues is crucial for maintaining the integrity and appearance of your synthetic lawn.
- Wrinkles and Creases: If you notice wrinkles or creases in the surface, gently stretch the material while securing it in place. CCGrass emphasizes that stretching the grass during installation is key to preventing future issues. If the problem persists, using a heat gun can warm the surface, making it easier to handle. Additionally, unrolling the grass and allowing it to acclimate in sunlight for several hours can help reduce wrinkles.
- Uneven Surfaces: If the ground appears uneven, inspect the base for settling or low spots. You may need to raise the grass, add more aggregate, and recompact the area before re-laying the grass to achieve a smooth surface. Proper sub-base preparation is essential to avoid bumps and drainage problems.
- Drainage Problems: If water pools on the surface, check that the base is properly sloped and that the aggregate is compacted. Most turf has one drainage hole per square foot, so adjusting the slope or incorporating additional drainage solutions may be necessary to facilitate proper water runoff. Ideally, the installation should occur when temperatures are between 50-85°F to guarantee optimal conditions for drainage. Failure to ensure proper drainage can result in water pooling, which may damage the grass over time.
- Plant Growth: Should unwanted plants appear, check the integrity of the barrier to ensure it is intact and correctly installed. While plant growth is uncommon in properly installed artificial grass, it can still happen under certain conditions, such as along edges or in seams. Applying a weed killer to any visible weeds can help manage this issue effectively.
- Infill Concerns: If the material is uneven or lacking, add more as necessary and brush the surface to spread it uniformly. Routine upkeep will assist in keeping the material in position, ensuring optimal performance and appearance. As landscaping experts note, maintaining proper infill levels is essential for the longevity and functionality of your synthetic lawn. Neglecting these aspects can lead to costly repairs and diminished lawn quality in the long run.

Maintain Your Artificial Grass
Maintaining your Hall Turf grass requires consistent care to preserve its quality and appearance.
- Regular Cleaning: Rinse the surface with a hose at least once a week to eliminate dust, debris, and pet waste. Regular cleaning keeps your turf looking fresh and prevents odors and allergens from building up, protecting your investment in Hall Turf’s solutions.
- Brush the Grass: Utilize a stiff-bristle broom or a power broom to regularly groom the grass fibers. This practice keeps the blades upright and prevents matting, ensuring the grass remains vibrant and visually appealing, as recommended by the Hall Turf team during installation.
- Inspect for Damage: Conduct regular inspections for signs of damage, such as tears or loose seams. Neglecting to inspect for damage can lead to costly repairs and a decline in the grass’s quality. By addressing these issues promptly, you can maintain the longevity and aesthetic appeal of your grass surface.
- Top Up Material: Over time, the fill may settle or wash away, affecting the grass’s performance. Regularly check the infill levels and replenish as necessary to maintain optimal cushioning and stability, ensuring your grass remains as functional and beautiful as when it was first installed by Hall Turf.
- Deep Cleaning: Schedule a deep clean at least once a year using a mild soap solution to tackle stubborn stains or odors. Ensure thorough rinsing afterward to remove any soap residue, preserving the turf’s appearance and hygiene, similar to the exceptional care Hall Turf provides to its clients.
By following these maintenance steps, you can ensure your investment continues to enhance your outdoor space for years to come.

Conclusion
Many homeowners find themselves overwhelmed by the complexities of DIY artificial grass installation, yet mastering this skill can transform their outdoor spaces. Mastering the art of DIY artificial grass installation not only enhances the aesthetic appeal of outdoor areas but also provides a low-maintenance solution for homeowners. By following the outlined steps – from proper site preparation to meticulous installation and maintenance – achieving a lush, green lawn becomes an attainable goal. Each phase of the process plays a vital role in ensuring that the artificial grass remains durable and visually appealing for years to come.
Key insights include:
- The importance of thorough ground preparation
- The selection of appropriate materials such as weed barriers and aggregates
- The meticulous laying and securing of the grass itself
Additionally, understanding the role of infill and maintaining the installation are crucial for preventing common issues that could compromise the lawn’s integrity. Addressing these details not only enhances the overall outcome but also safeguards your investment in a beautiful landscape.
By committing to these steps, homeowners can avoid costly mistakes and enjoy a lawn that remains vibrant and inviting for years to come. Whether for aesthetic purposes or practical benefits, the commitment to a well-installed artificial grass surface will undoubtedly yield lasting satisfaction and enjoyment.
Frequently Asked Questions
Why is site preparation important for DIY artificial grass installation?
Proper site preparation is crucial as it directly impacts the longevity and performance of the artificial grass.
What steps should I take to prepare the installation area?
Start by digging up the top layer of soil (2 to 4 inches deep), clearing any existing grass, weeds, and debris. Then, level the ground, check for drainage issues, compact the soil, and mark the area with stakes and string.
How can I ensure proper drainage for my artificial grass installation?
Evaluate the area for drainage issues, and if water tends to pool, create a slight slope away from structures to facilitate proper water runoff.
What is the purpose of compacting the soil before installation?
Compacting the soil creates a firm base for the grass installation, which helps avoid settling after the installation.
How much does synthetic grass installation cost in Kansas and Missouri?
In Kansas and Missouri, the cost for synthetic grass installation ranges from $14 to $23 per square foot, depending on local market conditions.
What is a weed barrier and why is it important?
A weed barrier is a high-quality, permeable fabric that blocks sunlight to inhibit plant growth while allowing water and nutrients to pass through. It is essential for preventing unwanted plants from infiltrating the artificial turf.
How should I install the weed barrier?
Measure the installation area and trim the barrier fabric to fit with at least 6 inches of overlap along the edges. Position the fabric flat, secure it with landscape staples or nails every 2-3 feet, and ensure seams overlap by at least 6 inches.
What should I do before applying a new mulch?
Remove old mulch prior to applying new mulch to maintain the efficiency of your barrier against unwanted plants.
How effective are plant barriers in reducing unwanted plant growth?
Plant barriers can reduce unwanted plant growth by about 70-80%, making them a valuable addition to landscaping.
List of Sources
- Prepare the Installation Area
- One moment, please… (https://usturfsandiego.com/news/artificial-turf-installation)
- Artificial Turf Market Size, Share 2031 Industry Report (https://mordorintelligence.com/industry-reports/artificial-turf-market)
- californiaturfco.com (https://californiaturfco.com/4-best-practices-for-installing-artificial-turf-synthetic-grass)
- How Much Does Artificial Grass Cost in 2026? (https://lawnstarter.com/blog/cost/artificial-grass-price)
- Install a Weed Barrier
- barkerbrotherslandscape.com (https://barkerbrotherslandscape.com/weed-barriers-in-landscape-beds)
- Artificial Grass News | American Syn-Turf Industry Updates (https://americansynturf.com/news)
- gminsights.com (https://gminsights.com/industry-analysis/nonwoven-weed-control-fabric-market)
- linkedin.com (https://linkedin.com/pulse/weed-control-membrane-landscape-fabric-market-analysis-forecast-tmq6e)
- Master the Base for Artificial Turf: A Step-by-Step Guide (https://californiaturfco.com/master-the-base-for-artificial-turf-a-step-by-step-guide)
- Add Aggregate for Stability
- Best Base for Artificial Turf: What Matters | US Turf (https://usturfsandiego.com/news/ideal-base-for-artificial-turf)
- What Is the Best Base for Under Artificial Grass? (https://syntheticturftc.com/what-is-the-best-base-for-under-artificial-grass)
- 10 Essential Turf Base Materials for Your Artificial Grass Project (https://californiaturfco.com/10-essential-turf-base-materials-for-your-artificial-grass-project)
- Essential Gravel for Turf: Best Practices for Homeowners – Hall Turf | Artificial Turf Installation Kansas City KS & MO (https://hallturf.com/essential-gravel-for-turf-best-practices-for-homeowners)
- find.fusionturf.com (https://find.fusionturf.com/answers/how-much-base-rock-for-artificial-turf)
- Lay Out the Artificial Grass
- artificialturfexpress.com (https://artificialturfexpress.com/blog/fake-grass-gaining-popularity)
- Ultimate Guide to Securing Artificial Turf (https://premiumgrassblades.com/the-ultimate-guide-to-securing-artificial-turf-spiral-nails-staples-and-proper-installation)
- Expert Tips to Prevent Common Synthetic Grass Putting Green Installation Mistakes | Synthetic Grass Warehouse (https://syntheticgrasswarehouse.com/blog/expert-tips-to-prevent-common-synthetic-grass-putting-green-installation-mistakes)
- Artificial Grass Installation: 6-Step DIY Guide (https://progreen.com/blog/how-to-install-artificial-grass)
- sgwnevada.com (https://sgwnevada.com/blog/5-expert-tips-to-prevent-creases-while-installing-artificial-grass)
- Secure the Turf Edges
- hallturf.com (https://hallturf.com/4-steps-to-perfect-your-artificial-turf-edge-installation)
- How to Secure Artificial Grass: Glue vs Nails vs Tape (https://ccgrass.com/how-to-secure-artificial-grass-properly)
- Ultimate Guide to Securing Artificial Turf (https://premiumgrassblades.com/the-ultimate-guide-to-securing-artificial-turf-spiral-nails-staples-and-proper-installation)
- How to Secure Artificial Turf Perimeter Edges: Galvanized Nails or Sod Staples (https://artificialturfsupply.com/how-to/how-to-secure-artificial-turf-perimeter-edges-galvanized-nails-or-sod-staples)
- Apply Infill for Enhanced Performance
- mightygrass.com (https://mightygrass.com/types-of-infill-for-artificial-grass)
- Artificial Turf Infill Market: Trends & Growth Analysis 2035 (https://wiseguyreports.com/reports/artificial-turf-infill-market)
- litagrass.com (https://litagrass.com/blogs/lita-artificial-grass-blog/best-infill-for-artificial-grass-types-amounts-when-to-use?srsltid=AfmBOop1UBSZc33Ep6RLsKmtD-ObAzZ_uwq0QtS9Bh3kByEgpEVCAtkZ)
- Artificial Turf Infill Options (Pros, Cons & Best Uses) | US Turf (https://usturfsandiego.com/news/artificial-turf-infill-options)
- Which Artificial Turf Infill Is Best for Your Yard? (2026 Guide for Texas and Florida) (https://magnoliaturf.com/what-is-turf-infill-and-what-kind-should-you-use)
- Troubleshoot Common Installation Issues
- Top 5 Turf Installation Quote Mistakes Contractors Keep Making (https://aglgrass.com/blogs/turf-installation-quote-mistakes)
- xihyturf.com (https://xihyturf.com/artificial-turf-grass-installation-mistakes.html)
- 7 Common Artificial Grass Problems and How to Fix Them (https://ccgrass.com/problems-with-artificial-grass)
- syntheticgrasswarehouse.com (https://syntheticgrasswarehouse.com/blog/ask-jw-stop-wrinkles-before-they-start)
- sgwnevada.com (https://sgwnevada.com/blog/5-expert-tips-to-prevent-creases-while-installing-artificial-grass)
- Maintain Your Artificial Grass
- Best Synthetic Grass Maintenance Tips for Homeowners in 2026 (https://californiaturfco.com/best-synthetic-grass-maintenance-tips-for-homeowners-in-2026)
- Artificial Turf Maintenance Guide | Cleaning & Care Tips (https://fieldturflandscape.com/maintenance/artificial-turf-maintenance-guide)
- Complete Artificial Turf Cleaning & Maintenance Guide 2026 • Turf Monsters AZ (https://turfmonstersaz.com/complete-artificial-turf-cleaning-maintenance-guide-2026)
- Artificial Grass Maintenance Costs (2025) – What To Expect (https://dfwturf.com/artificial-grass-maintenance-costs)