
Introduction
Transforming an outdoor space with artificial grass involves more than simply laying down turf; it starts with careful preparation and a thorough understanding of the installation process. This guide presents four essential steps designed to enhance both the durability and aesthetic appeal of artificial grass in your home, resulting in a beautiful lawn that requires minimal maintenance. However, what critical pitfalls could derail this seemingly straightforward project? Understanding these challenges can help homeowners avoid them, ensuring a flawless finish.
Prepare Your Site for Installation
- Clear the Area: Begin by removing any existing grass, weeds, rocks, or debris from the installation site. A shovel or a sod cutter can be utilized for larger areas, ensuring a clean slate for your grass.
- Level the Ground: After clearing, use a rake to create a level surface. This step is crucial to prevent bumps or dips in the ground, which can affect both aesthetics and functionality.
- Check for Drainage: Proper drainage is essential for the longevity of your grass. If the ground appears too flat, consider creating a slight slope of about 2% to facilitate effective water runoff, preventing pooling and potential damage.
- Install a Weed Barrier: To maintain the quality of your setup, lay down a weed barrier. This will prevent future weed growth beneath the grass, ensuring a clean and healthy surface over time.
Thorough preparation is vital for the installation to be successful. A well-prepared site can significantly reduce maintenance needs and enhance the turf’s lifespan. Industry insights from Mordor Intelligence indicate that the installation of artificial grass greatly benefits from proper preparation, as it lays the foundation for a durable and visually appealing setup. Furthermore, case studies reveal that installations with proper preparation have reported up to a 50% reduction in maintenance costs over time, highlighting the importance of investing effort in this initial phase.

Build a Solid Base Layer
- Excavate the Area: Start by digging down about 3-4 inches to create enough space for the base layer. This depth is essential for drainage, which helps prevent future issues with the grass’s performance. This material can allow up to 30 gallons of water to drain through its perforated backing per square meter per minute.
- Add Foundation Substance: Fill the excavated area with an appropriate foundation material, such as crushed stone or decomposed granite. It is recommended to maintain a depth for the foundation to ensure stability. Spread the material evenly to achieve a depth of 2-3 inches, creating a solid base.
- Compact the Foundation: Compact the material using a plate compactor. This step is crucial, as it stabilizes the base and provides a solid base, which is essential for the installation. As landscape expert Ramsey John notes, ‘A well-prepared foundation is not merely a support for artificial grass; it’s the distinction between a short-term fix and a durable solution.’
- Check for Levelness: After compacting, use a level to ensure the surface is even. Make any necessary adjustments to create a flat surface before proceeding to the next steps. Skipping this step can result in uneven surfaces and pooling water, which compromises the overall quality of the turf. Keeping a record of materials used will also assist in future maintenance or repairs, ensuring the installation remains in optimal condition.

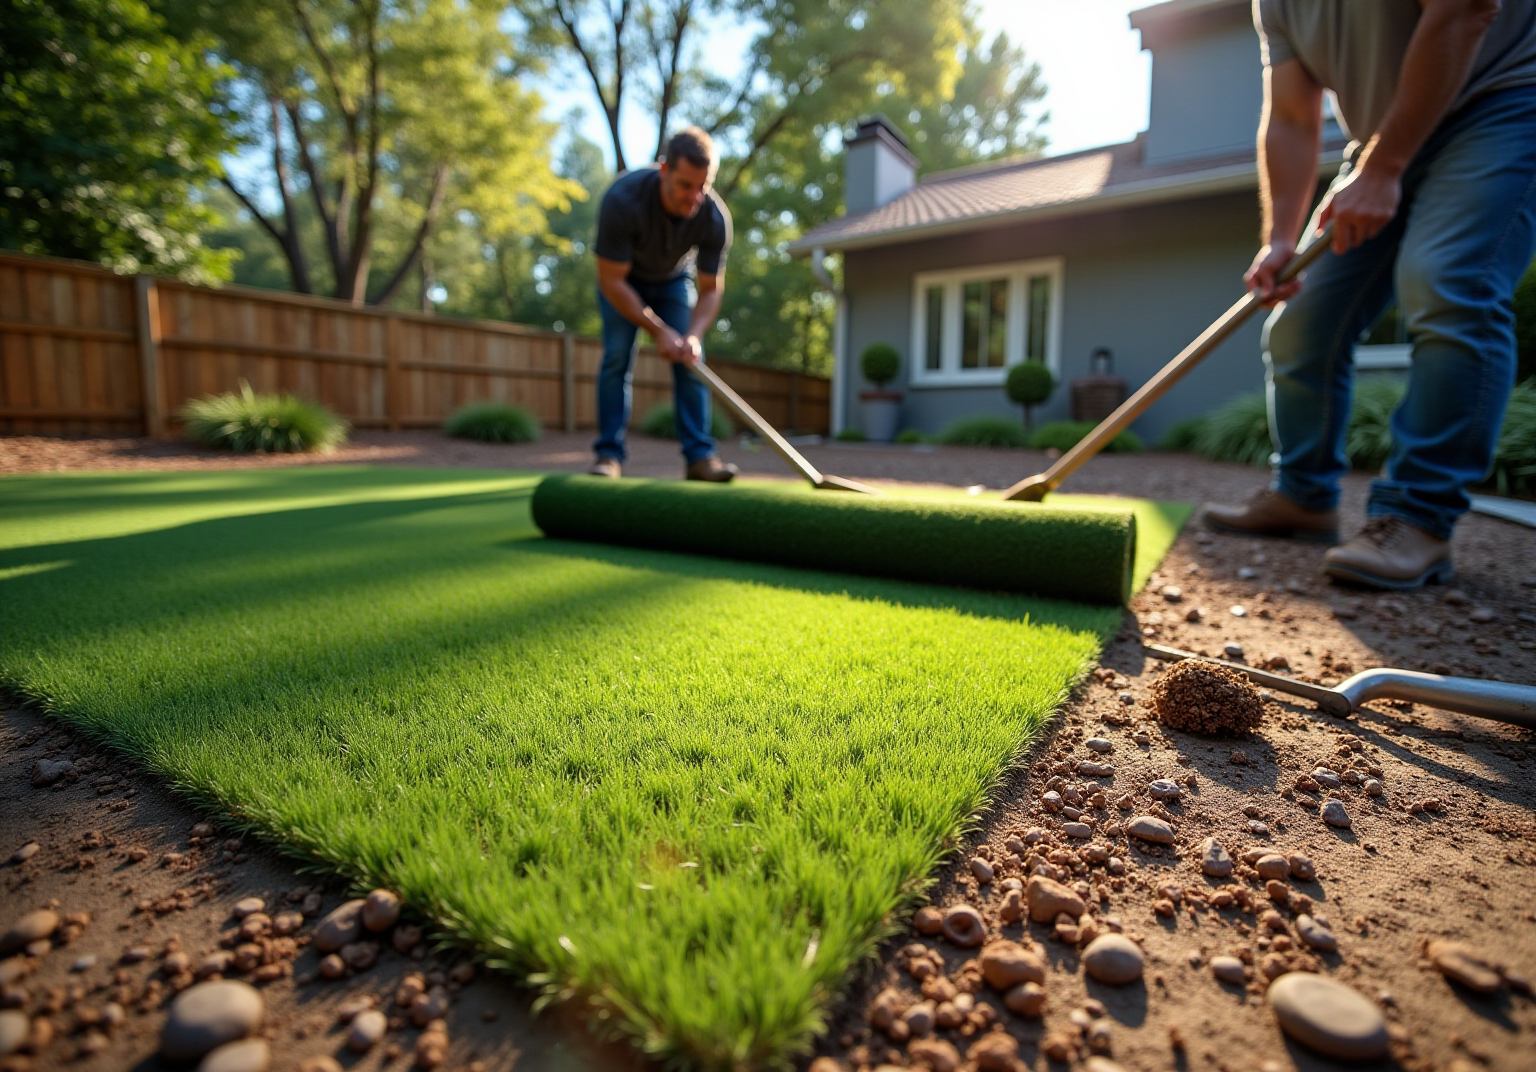
Lay the Artificial Grass
Begin by carefully unrolling the grass over the prepared base. Allow the grass to adjust to the surrounding temperature for about 30 to 60 minutes, especially if the temperature exceeds 60 degrees. This step is crucial as it helps prevent potential shrinking during the setup. Homeowners can rely on professional services; many have reported exceptional experiences with their team, particularly with Brock, who assesses needs and provides tailored solutions.
Utilize a utility knife to trim the edges, ensuring it fits the designated area perfectly. Always cut from the back of the grass to avoid fraying the fibers, which can compromise the appearance and durability of the turf. Clients like Les Boatright have noted Brock’s attention to detail, ensuring a perfect fit and finish.
When using multiple pieces of turf, it is essential to align the seams correctly. Ensure that all grass blades face the same direction to achieve a seamless look, enhancing the overall aesthetic of your setup. Scott Sachse’s experience underscores the professionalism of the crew, who are dedicated to delivering a high-quality installation.
Temporarily secure the ground cover in place using landscape pins or stakes. This will prevent any shifting while you work on permanently securing it, ensuring a smooth and even surface. With Hall Turf’s expertise and support, you can be confident in achieving a successful installation.

Secure the Turf and Add Infill
- Secure the Edges: Start by using galvanized nails or landscape staples to secure the edges of the grass every 4-6 inches. It is essential that the nails penetrate the underlying material rather than the grass itself to maintain its integrity. This step is crucial for achieving a professional finish, as evidenced by satisfied customers like Scott Sachse, who commended the work performed by the installation crew.
- Add Infill Substance: Distribute infill materials, such as silica sand or rubber granules, evenly across the grass surface. This important step not only weighs down the grass but also helps keep the blades upright, enhancing the lawn’s overall appearance and functionality. Homeowners should consider eco-friendly infill options, reflecting the current trend towards sustainable materials that promote a healthier environment.
- Brush the Grass: Employ a power broom or a stiff-bristled broom to work the infill into the grass fibers. This process ensures an even distribution of the infill, contributing to a more natural look and feel while also enhancing durability. Brock’s meticulous attention to detail during installations has been recognized by clients such as Les Boatright, who appreciated his commitment to quality.
- Final Inspection: After infilling, conduct a comprehensive inspection of the surface for any areas needing additional infill or adjustments. Ensure that everything is secure and visually uniform, resulting in a polished final appearance. As noted by Dick Bryant, partnering with a professional installer guarantees that each project is executed with professionalism and expertise, leading to successful installations.
Infill is crucial for the performance of artificial grass, providing stability and enhancing aesthetic appeal. However, it is vital to consider the environmental impact of infill, including its role in urban heat and microplastic pollution. This is particularly important, as demonstrated in various residential and commercial projects where attention to detail has led to long-lasting, visually appealing turf solutions. Furthermore, homeowners should be aware of potential issues to make informed decisions.

Conclusion
Successfully installing artificial grass at home begins with meticulous preparation and culminates in a polished finish. By following the outlined steps, homeowners can ensure that their artificial turf not only looks great but also stands the test of time, providing a low-maintenance, beautiful outdoor space.
Key steps include:
- Thoroughly preparing the site by clearing debris
- Leveling the ground
- Ensuring proper drainage
These elements are crucial for a successful installation. Building a solid base layer enhances durability and stability, while carefully laying the turf and securing it with infill contribute to a professional appearance and functionality. Each stage plays a vital role in the overall success of the project, as emphasized by industry insights and customer experiences.
Investing time and effort into these steps enhances the aesthetic appeal of your lawn and significantly reduces future maintenance costs. By adhering to best practices for artificial grass installation, homeowners can enjoy a vibrant, green space that remains hassle-free for years to come. Embrace these guidelines to transform your outdoor area into a stunning retreat that reflects both quality and care.
Frequently Asked Questions
What is the first step in preparing a site for installation?
The first step is to clear the area by removing any existing grass, weeds, rocks, or debris from the installation site.
How can I clear a larger area effectively?
For larger areas, you can use a shovel or a sod cutter to ensure a clean slate for your grass.
Why is it important to level the ground?
Leveling the ground is crucial to prevent bumps or dips, which can affect both the aesthetics and functionality of the grass installation.
What should I check for regarding drainage before installation?
You should check for proper drainage; if the ground appears too flat, consider creating a slight slope of about 2% to facilitate effective water runoff and prevent pooling.
What is the purpose of installing a weed barrier?
Installing a weed barrier fabric helps maintain the quality of the setup by preventing future weed growth beneath the grass, ensuring a clean and low-maintenance surface over time.
Why is thorough site preparation important for artificial grass installation?
Thorough site preparation is vital as it significantly reduces maintenance needs and enhances the turf’s lifespan.
What benefits does proper site preparation provide according to industry insights?
Proper site preparation can lead to a 30% reduction in maintenance costs over time, making it a worthwhile investment for a durable and visually appealing setup.
List of Sources
- Prepare Your Site for Installation
- Plastic Turf Fields Are Taking Over America (https://nytimes.com/2025/07/26/business/artificial-turf-grass-sports.html)
- Artificial Turf Market Size, Share 2031 Industry Report (https://mordorintelligence.com/industry-reports/artificial-turf-market)
- Artificial Turf Market Size And Share | Industry Report, 2033 (https://grandviewresearch.com/industry-analysis/artificial-turf-market)
- laist.com (https://laist.com/brief/news/climate-environment/once-hailed-as-a-drought-fix-california-moves-to-restrict-synthetic-turf-over-health-concerns)
- Build a Solid Base Layer
- Best Base for Artificial Turf: What Matters | US Turf (https://usturfsandiego.com/news/ideal-base-for-artificial-turf)
- How to Prepare the Base for Artificial Grass | Professional Installation Guide (https://globalsynturf.com/site-base-preparation)
- How to Install Artificial Turf on Dirt | US Turf (https://usturfsandiego.com/news/how-to-install-artificial-turf-on-dirt)
- sgwsacramento.com (https://sgwsacramento.com/blog/important-facts-about-compaction-to-ensure-a-perfect-artificial-turf-installation-every-time)
- portotheme.com (https://portotheme.com/the-overlooked-importance-of-base-preparation-in-artificial-turf-installation)
- Lay the Artificial Grass
- beaconturf.com (https://beaconturf.com/the-full-artificial-turf-installation-process)
- openpr.com (https://openpr.com/news/4319628/5-important-artificial-grass-installation-tips)
- globalsynturf.com (https://globalsynturf.com/how-long-does-it-take-for-artificial-grass-to-settle)
- lawnpop.com (https://lawnpop.com/installation-times-what-to-expect-from-artificial-turf)
- shopping.yahoo.com (https://shopping.yahoo.com/home-garden/outdoor/articles/cities-banning-artificial-turf-heres-155000203.html)
- Secure the Turf and Add Infill
- Once it was hailed as a drought fix — but now California’s moving to restrict synthetic turf over health concerns (https://calmatters.org/environment/2023/10/california-synthetic-turf-pfas)
- thecooldown.com (https://thecooldown.com/green-home/fake-grass-los-angeles-ban)
- Plastic Turf Fields Are Taking Over America (https://nytimes.com/2025/07/26/business/artificial-turf-grass-sports.html)
- As California installs more artificial turf, health and environmental concerns multiply (https://latimes.com/science/story/2025-09-17/californias-love-hate-relationship-with-artificial-turf)
- abc7.com (https://abc7.com/post/la-council-committee-approves-motion-study-feasibility-banning/15011627)