
Introduction
Transforming a yard into a lush, green oasis is now more achievable than ever, thanks to advancements in artificial grass technology. This guide provides a clear overview of the installation process, detailing the essential tools and materials required for a flawless synthetic lawn. Yet, what occurs when the excitement of a new lawn encounters the reality of installation challenges? This article outlines step-by-step strategies to ensure a successful transformation while also offering insights on maintaining that pristine appearance for years to come.
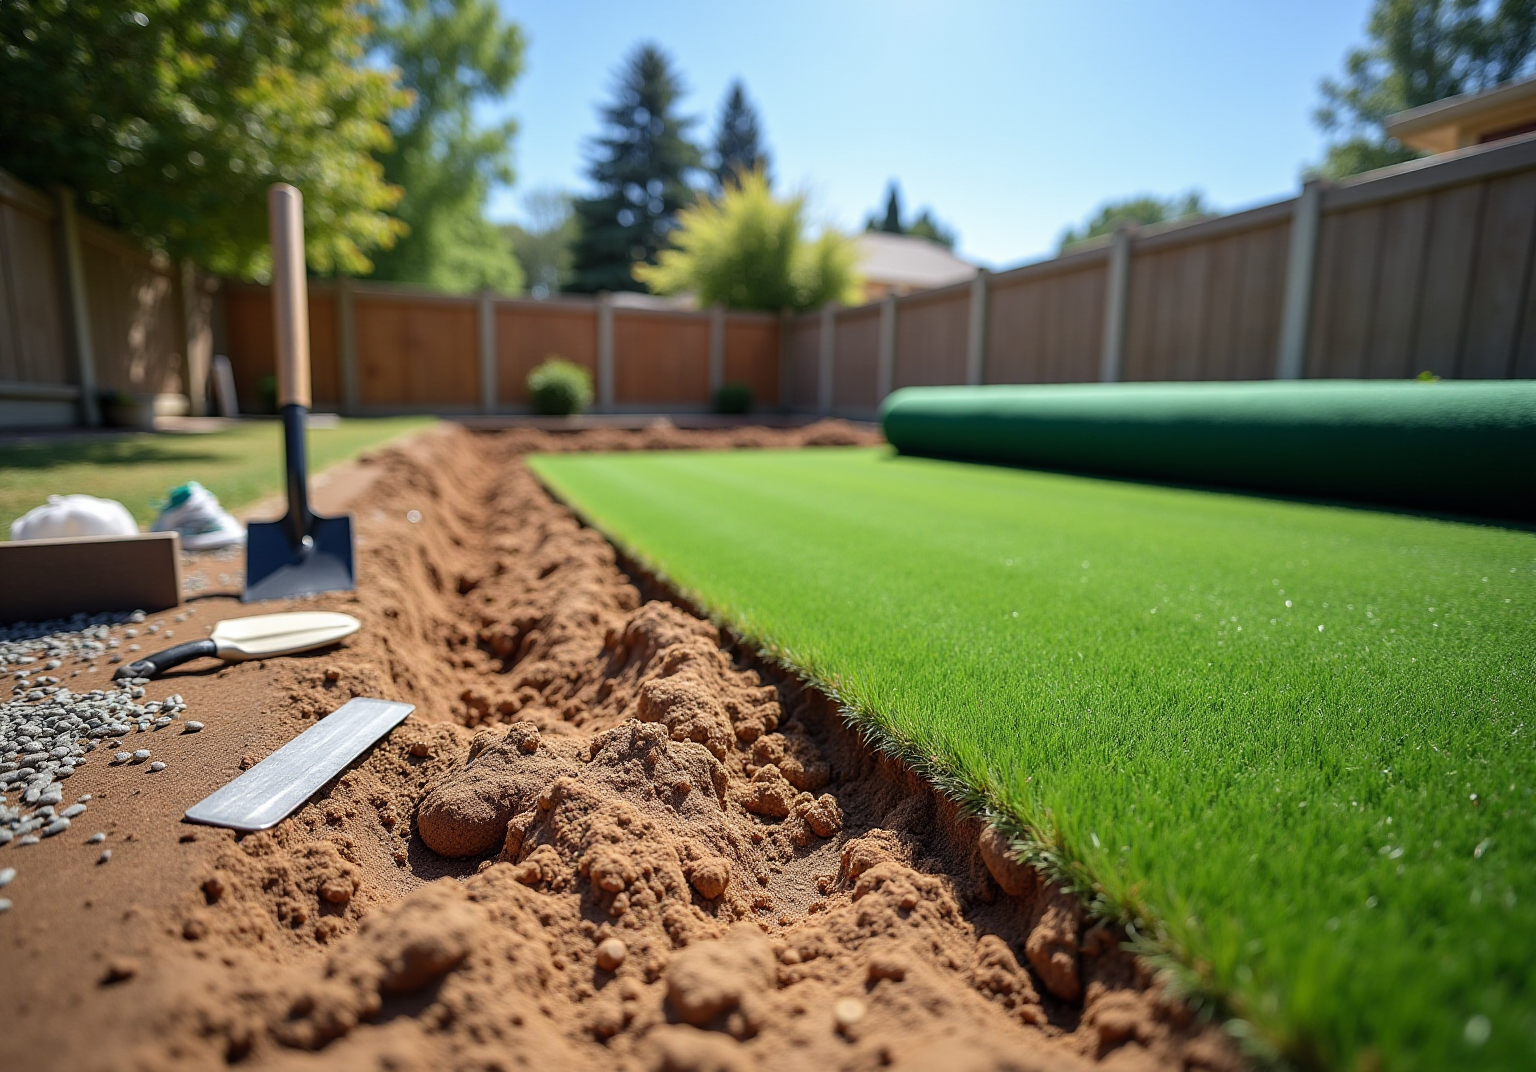
Prepare the Installation Area for Artificial Grass
- Clear the Area: Start by removing any existing grass, weeds, and debris from the setup site. Use a shovel or sod cutter to ensure a clean area, which is essential for a successful installation.
- Excavate the Soil: Dig down approximately 2-4 inches to create a base. This depth is crucial for drainage, helping to prevent water accumulation and promoting the longevity of your artificial grass.
- Level the Ground: Utilize a rake to smooth out the soil, achieving an even surface. Be attentive to any low spots that may require additional soil to ensure a flat surface.
- Compact the Soil: Use a plate compactor or hand tamper to compact the soil thoroughly. A solid base is vital to prevent settling after the turf is installed, providing a stable foundation. Aim for a compaction of 90% for optimal results.
- Install a weed barrier by laying down a fabric across the entire area to prevent weeds from growing through the soil. This step not only maintains aesthetic appeal but also enhances durability. The cost of weed barrier fabric typically ranges from $0.05 to $0.85 per square foot.
- Check the drainage by ensuring the ground slopes away from any structures. A slight gradient of about 1 inch for every 8-10 feet is necessary to facilitate proper water runoff and avoid accumulation, which can compromise the integrity of the grass.

Gather Necessary Tools and Materials for Installation
Gather Necessary Tools and Materials for Installation
-
Tools Needed:
- Shovel: This tool is essential for digging and leveling the ground, creating a stable base for the turf.
- Rake: A rake is used to smooth out the soil, ensuring an even surface for installation.
- Plate Compactor or Hand Tamper: These tools are important for compacting the soil, which helps prevent settling and preserves the quality of the grass over time.
- Utility Knife: A utility knife is necessary for slicing the grass to fit the specified space precisely.
- Hammer or Mallet: This tool is utilized to fasten the grass with stakes, keeping it in position during and after installation.
- Tape Measure: Accurate measurements of the area are important to avoid miscalculations.
- Grass Staples: These are necessary to secure the edges of the grass, preventing shifting and ensuring a neat finish.
- Dropspreader: Recommended for even distribution of infill, enhancing the quality of the installation.
-
Materials Needed:
- Turf: Choose the appropriate type based on your specific needs, such as color or texture.
- Landscape Fabric: This material is essential for preventing weed growth beneath the grass, which can compromise its appearance and longevity.
- Drainage Material: Crushed stone or decomposed granite is suggested for effective drainage, ensuring the grass remains dry and functional.
- Infill Material: Sand or rubber granules are essential to weigh down the surface and provide cushioning, mimicking the feel of natural grass.
- Seaming Tape and Adhesive: These are necessary for connecting pieces of grass together seamlessly, ensuring a professional appearance.
-
Average Cost of Materials in 2026:
The average cost of materials for artificial grass installation in 2026 varies based on quality and type, typically ranging from $2 to $5 per square foot for the turf itself. Additional costs for infill and accessories should also be considered, with homeowners budgeting approximately $1 to $2 per square foot for these materials, depending on the chosen products. -
Safety Gear:
Prioritize safety by wearing gloves and safety glasses during the installation process to protect yourself from potential injuries. -
Maintenance Note:
Regular maintenance is essential for extending the lifespan of artificial turf. This includes cleaning and inspecting the surface.

Install the Artificial Grass: Step-by-Step Instructions
- Lay the Base Material: Start by spreading a layer of gravel, about 2-3 inches thick, over the prepared area. Rake it evenly and compact it thoroughly with a plate compactor to establish a solid foundation.
- Position the Turf: Roll out the turf over the compacted base, allowing it to acclimate for a few hours. This step minimizes curling and facilitates a smoother installation.
- Cut the Grass: Carefully trim the edges of the sod using a utility knife, cutting from the back to avoid damaging the grass fibers. This ensures a precise fit for your specific area.
- Secure the Turf: Attach the turf to the ground with grass staples or nails, placing them every 6-12 inches around the perimeter. This secures the grass and prevents shifting.
- Join Seams: For installations involving multiple sections of grass, use seam tape to connect them. Ensure that the seams are aligned to maintain a seamless appearance.
- Add Infill: Evenly distribute infill material. This step is essential as it helps weigh down the grass and keeps the blades upright. Use a broom to brush the infill into the grass fibers for optimal results.
- Final Touches: Brush the grass fibers and achieve an even appearance. Inspect the installation for any areas that may require additional infill or adjustments to ensure a polished finish.

Maintain Your Artificial Grass for Long-Lasting Beauty
- Rinse the surface with a garden hose every few weeks to eliminate dust, debris, and pollen. This routine preserves its appearance and helps prevent unpleasant odors, ensuring a fresh environment for play.
- Use a stiff broom or specialized grass brush to fluff the blades, particularly in high-traffic spots. This practice maintains a natural look and feel, enhancing the overall aesthetic of your lawn.
- Promptly address spills or pet waste by cleaning the affected area with a mild soap and water solution. Thorough rinsing is essential to avoid any residue that could attract dirt or odors.
- Regularly evaluate the infill material and replenish it as necessary to ensure sufficient cushioning and support for the grass. Maintaining proper infill levels is crucial for the longevity and performance of your lawn.
- Inspect for Damage: Conduct routine examinations of the surface for signs of wear or damage. Timely intervention can prevent minor issues from escalating, preserving the quality of your lawn.
- For larger installations or persistent issues, consider enlisting professional services for deep cleaning or repairs. Expert maintenance can significantly enhance the lifespan and appearance of your lawn. As noted by satisfied customers like Scott Sachse, who praised the exceptional job done by the team, professional care is invaluable.
- To keep your synthetic turf smelling fresh, especially in areas frequented by pets, consider using a turf deodorizer. This will help neutralize odors from organic residues.

Conclusion
In conclusion, installing an artificial grass synthetic lawn can significantly enhance outdoor spaces, transforming them into lush, green areas that require minimal upkeep. This guide has outlined a comprehensive, step-by-step approach to ensure a successful installation, covering everything from area preparation to long-term maintenance for enduring beauty.
Thorough preparation is crucial; this includes:
- Clearing the area
- Leveling the ground
- Ensuring proper drainage
Gathering the right tools and materials is essential for a smooth installation process, as is following precise steps to lay the grass correctly. Regular maintenance practices, such as cleaning and inspecting for damage, are vital for preserving both the appearance and functionality of the synthetic lawn.
Ultimately, investing time and effort into the installation and maintenance of artificial grass not only enhances the aesthetic appeal of outdoor spaces but also contributes to a sustainable and enjoyable environment. By adhering to this guide, homeowners can confidently create a beautiful, low-maintenance lawn that stands the test of time.
Frequently Asked Questions
What is the first step in preparing the installation area for artificial grass?
The first step is to clear the area by removing any existing grass, weeds, and debris using a shovel or sod cutter to ensure a clean site for installation.
How deep should I excavate the soil for artificial grass installation?
You should excavate the soil approximately 2-4 inches deep to create a level base that allows for proper drainage and prevents water accumulation.
How can I level the ground before installing artificial grass?
You can level the ground by using a rake to smooth out the soil and addressing any low spots that may require additional soil to achieve a uniform surface.
Why is it important to compact the soil before installing artificial grass?
Compacting the soil is vital to prevent settling after the turf is installed, providing a stable foundation. Aim for a compaction density of 90% for optimal results.
What is the purpose of installing a weed barrier when preparing for artificial grass?
A weed barrier fabric is installed to prevent weeds from growing through the artificial grass, maintaining aesthetic appeal and reducing future maintenance efforts.
How much does weed barrier fabric typically cost?
The cost of weed barrier fabric typically ranges from $0.05 to $0.85 per square foot.
What should I check regarding drainage before installing artificial grass?
You should check that the ground slopes away from any structures, ensuring a slight gradient of about 1 inch for every 8-10 feet to facilitate proper water runoff and avoid accumulation.
List of Sources
- Prepare the Installation Area for Artificial Grass
- lawnpop.com (https://lawnpop.com/how-to-prepare-the-ground-before-laying-artificial-grass)
- How to Install Artificial Grass – Master Guide (https://artificialturfsupply.com/how-to/how-to-install-artificial-grass-master-guide)
- How Much Does Artificial Grass Cost in 2026? (https://lawnlove.com/blog/artificial-grass-cost)
- How to Install Artificial Turf: Step-by-Step Guide | US Turf (https://usturfsandiego.com/news/how-to-install-artificial-turf)
- shawgrass.com (https://shawgrass.com/about/news-blog/how-to-prep-for-artificial-grass-installation)
- Gather Necessary Tools and Materials for Installation
- syntheticturfnorthwest.com (https://syntheticturfnorthwest.com/a-helpful-guide-to-installing-synthetic-turf-diy)
- neograss.co.uk (https://neograss.co.uk/22-essential-tools-installing-artificial-grass)
- sgwtexas.com (https://sgwtexas.com/dallas/blog/2023/02/28/5-key-supplies-you-need-for-your-next-artificial-turf-installation)
- 5 Tools That Contractors Installing Artificial Grass Should Use | Purchase Green Artificial Grass (https://purchasegreen.com/blog/crucial-tools-contractors-installing-artificial-grass-should-use)
- Top Artificial Lawn Tools for Turf Care | US Turf (https://usturfsandiego.com/news/top-artificial-lawn-tools)
- Install the Artificial Grass: Step-by-Step Instructions
- Step-by-Step Guide to Installing Artificial Grass in California’s Diverse Climate (https://agsturf.com/artificial-turf-news/Step-by-Step-Guide-to-Installing-Artificial-Grass-in-California-s-Diverse-Climate-0108.html)
- maslandscaping.com (https://maslandscaping.com/artificial-turf-installation-estimate)
- How to Install Artificial Grass on Soil | US Turf (https://usturfsandiego.com/news/how-to-install-artificial-grass-on-soil)
- Artificial Turf Installation a DIY Guide (https://synlawn.com/articles/artificial-turf-installation-a-diy-guide)
- Artificial Turf Market, Industry Size Forecast [Latest] (https://marketsandmarkets.com/Market-Reports/artificial-turf-market-121486580.html)
- Maintain Your Artificial Grass for Long-Lasting Beauty
- progreen.com (https://progreen.com/how-long-does-artificial-grass-last)
- How Long Does Synthetic Lawn Last? A Complete Lifespan Guide (https://socalgreens.com/how-long-does-synthetic-lawn-last-a-complete-lifespan-guide)
- How to Clean Artificial Turf | A Complete Homeowner Guide (https://usturfsandiego.com/news/how-to-clean-artificial-turf)
- Artificial Turf Maintenance Guide | Cleaning & Care Tips (https://fieldturflandscape.com/maintenance/artificial-turf-maintenance-guide)
- Maintenance and Cleaning Tips for Your Synthetic Turf | GrassTex Blog (https://grass-tex.com/maintenance-and-cleaning-tips-for-your-synthetic-turf)