
Introduction
Installing artificial sod can transform any Kansas home into a lush, green oasis. However, this process requires careful planning and execution. This guide outlines five essential steps that ensure a smooth installation while enhancing the longevity and visual appeal of the turf. Additionally, it is crucial to consider what happens when unexpected challenges arise during the installation. Understanding best practices and potential pitfalls can significantly impact the achievement of a flawless outcome.
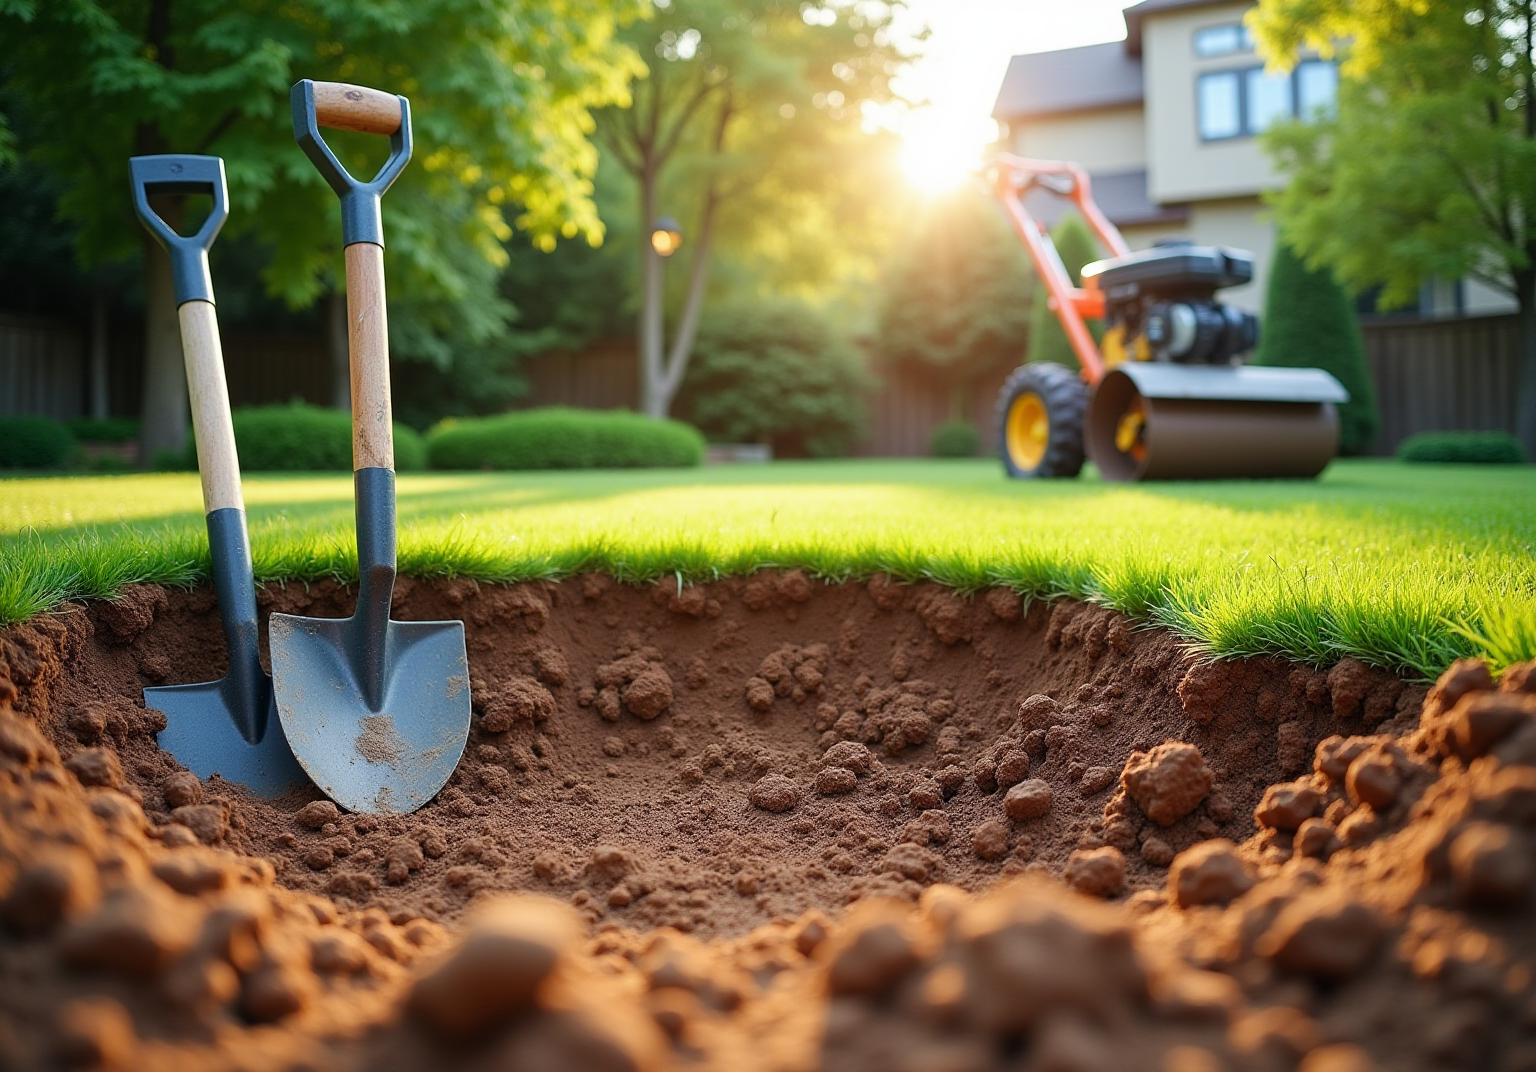
Prepare the Installation Area
-
Clear the Area: Start by removing any existing grass, weeds, and debris from the setup site. Utilize a shovel or sod cutter to eliminate the top layer of soil, ensuring a clean area for the grass installation.
-
Excavate the Soil: Dig down approximately 3-4 inches to create sufficient space for the base material. This depth is crucial for proper drainage and prevents the grass from sitting too high, which can lead to water pooling. Brock’s expertise ensures this step is executed with precision, minimizing future maintenance issues.
-
Level the Ground: Use a rake to level the excavated area, ensuring it is smooth and even. Regularly check for low spots that may collect water and fill them in with soil to maintain a uniform surface. Brock’s attention to detail during this phase contributes to a flawless finish.
-
Install a Weed Barrier: Lay down a weed barrier fabric to prevent weeds from growing through the grass. This step is vital for preserving the integrity of your setup over time, as it reduces maintenance needs and enhances durability. Customers have noted how Brock emphasizes this crucial step to ensure long-lasting results.
-
Compact the Soil: Employ a plate compactor to compact the soil, creating a solid foundation for the grass. Adequate compaction is essential for avoiding settling and ensuring a stable surface, which enhances the durability and functionality of the artificial sod setup. Brock’s thorough approach guarantees that this foundation is robust and reliable.
Adhering to these best practices not only enhances the visual appeal of your outdoor area but also ensures that your artificial sod installation will endure over time, providing a beautiful and practical space for many years. With the synthetic grass market projected to reach USD 13.67 billion by 2033, investing in quality setup is more important than ever. Experts like Brock at Hall Turf oversee the setup process with precision and care, ensuring optimal results. Clients have praised Brock for his professionalism and meticulousness, making him a trusted choice for your landscaping needs.

Lay the Artificial Turf
-
Unroll the artificial sod: Begin by unrolling the artificial sod across the prepared area. Allow it to relax for 2-4 hours to eliminate any creases or folds, ensuring a smooth installation surface.
-
Cut to fit: Utilize a sharp utility knife to trim the edges of the grass for a precise fit. Always cut from the back to protect the blades and maintain their integrity.
-
Align seams: When using multiple sections of grass, ensure that the seams are aligned correctly. The grass blades should all face the same direction to achieve a natural appearance, enhancing the overall aesthetic of your lawn.
-
Secure the grass: Anchor the grass using landscape staples or U-shaped nails, placing them every 6-12 inches along the edges and seams. This prevents movement and ensures the surface remains securely in place.
-
Check for wrinkles: Smooth out any wrinkles or bubbles by gently pulling the surface and re-securing it. This step is vital for achieving a flat and uniform surface, which not only improves appearance but also increases the longevity of the installation.

Secure and Finish the Turf Installation
-
Trim Excess Grass: After securing the grass, carefully trim any excess material along the edges with a sharp utility knife. This step ensures a clean and professional finish, preventing fraying and maintaining the aesthetic appeal of your installation.
-
Apply Infill Material: Infill material, such as silica sand or rubber granules, is crucial for enhancing the performance of synthetic grass. It helps the grass blades stand upright, provides cushioning, and contributes to the overall durability of the surface. Distribute the infill uniformly over the surface to achieve optimal results.
-
Brush the Grass: Use a stiff-bristle broom to brush the grass against the grain. This technique not only distributes the infill evenly but also lifts the grass blades, creating a more natural and vibrant appearance. Regular brushing is recommended to preserve the surface’s appearance and texture.
-
Secure Edges: Ensure that all edges of the grass are firmly fastened with additional nails or staples, placed every 6-8 inches. This step is essential to prevent the surface from lifting or shifting over time, ensuring longevity and stability in your setup.
-
Final Inspection: Conduct a thorough examination of the setup, checking for any loose areas or imperfections. Address any issues promptly to guarantee a flawless finish. A well-executed installation of artificial sod can extend its lifespan, which typically lasts 15-20 years with proper care and maintenance.

Gather Essential Tools and Materials
To successfully install artificial sod, it is essential to gather the right tools and materials. Here’s a comprehensive list to get you started:
Tools Needed:
- Utility knife
- Shovel
- Rake
- Plate compactor
- Landscape staples or turf nails
- Hammer
- Measuring tape
- Stiff-bristle broom
- Turf cutter (recommended for efficiently removing existing grass)
Materials Required:
- Artificial turf (entry-level: $1.50-$4.00 per sq. ft.; mid-tier artificial sod pricing is $4.00-$7.00 per sq. ft.; high-quality artificial sod is priced at $7.00-$10.00+ per sq. ft.)
- Weed barrier fabric
- Infill material (sand or rubber)
- Seam tape (if using multiple pieces)
- Adhesive (for seams)
Preparation:
Before beginning the installation, ensure all tools are in good working condition and that you have sufficient materials to complete the project. This preparation is crucial, as labor expenses for grass setup can vary from $5 to $10+ per square foot, with base preparation contributing an additional $1.50-$3.00 per sq. ft. Being well-equipped can help avoid costly interruptions. For instance, using a plate compactor is vital for creating a strong base, while a utility knife is essential for precise cuts. Additionally, having a stiff-bristle broom on hand will help maintain a tidy workspace post-installation. As AGL states, “Catching grass laying quote mistakes early helps you prevent callbacks, protect your margin, and keep install days on track.” Adequate preparation not only simplifies the process but also enhances the overall quality of the setup.

Troubleshoot Common Installation Issues
-
Wrinkles in the Grass: Should wrinkles appear, gently pull the grass to stretch it out and re-secure it. If necessary, use a heat gun on low to help relax the fibers. Additionally, ensure that the weed membrane is laid flat during installation to prevent visible folds and creases in the grass.
-
Uneven Surface: If the ground feels uneven, inspect the base for low spots. Add more base material and compact it to create a level surface before re-laying the grass. It is also important to add the recommended amount of infill to weigh down the grass and prevent creasing over time.
-
Seams Coming Apart: If seams are separating, apply seam tape and adhesive to rejoin them. Ensure that the grass is properly aligned before securing it.
-
Drainage Problems: If water collects on the surface, check the grading of the base. Modify the slope to ensure adequate drainage away from buildings, as insufficient drainage can lead to excessive water accumulation and further deterioration of the grass.
-
Infill Distribution: If the infill is uneven, use a broom to redistribute it evenly across the grass surface. Regular maintenance tasks, such as cleaning, brushing, and replacing infill, are essential for maintaining the turf’s condition and ensuring optimal performance.

Conclusion
Successfully installing artificial sod requires a meticulous approach that guarantees a beautiful and durable lawn for any Kansas home. By adhering to the outlined steps-from preparing the installation area to securing the turf and troubleshooting common issues-homeowners can achieve a professional finish that significantly enhances their outdoor space.
Thorough preparation is crucial, encompassing tasks such as:
- Clearing the area
- Leveling the ground
- Installing a weed barrier
Each of these steps is vital for the longevity and functionality of the artificial grass. Furthermore, laying the turf correctly and applying infill material are essential for maintaining a natural appearance and ensuring the grass withstands wear and tear. With expert guidance and careful attention to detail, the installation process can be both seamless and rewarding.
The importance of investing time and resources into proper installation cannot be overstated. As the synthetic grass market continues to expand, executing the setup with precision will yield long-term benefits. By taking these steps seriously and proactively addressing potential issues, homeowners can enjoy a vibrant and low-maintenance lawn that enhances their property for years to come. Embracing these best practices will elevate the aesthetics of outdoor spaces while contributing to a sustainable and enjoyable environment.
Frequently Asked Questions
What is the first step in preparing the installation area for artificial grass?
The first step is to clear the area by removing any existing grass, weeds, and debris from the setup site using a shovel or sod cutter.
How deep should the soil be excavated for proper drainage?
The soil should be excavated approximately 3-4 inches to create sufficient space for the base material, which is crucial for proper drainage.
Why is leveling the ground important during installation?
Leveling the ground is important to ensure a smooth and even surface, preventing low spots that may collect water and maintaining a uniform surface.
What is the purpose of installing a weed barrier?
A weed barrier fabric is installed to prevent weeds from growing through the grass, reducing maintenance needs and enhancing the durability of the setup.
How is the soil compacted, and why is it necessary?
The soil is compacted using a plate compactor to create a solid foundation for the grass. Adequate compaction is essential to avoid settling and ensure a stable surface.
What should be done after preparing the area before laying the artificial turf?
After preparing the area, the artificial sod should be unrolled across the prepared site and allowed to relax for 2-4 hours to eliminate any creases or folds.
How should the edges of the artificial grass be cut?
The edges of the grass should be trimmed with a sharp utility knife, cutting from the back to protect the blades and maintain their integrity.
How should seams be aligned when using multiple sections of grass?
Seams should be aligned correctly, ensuring that the grass blades all face the same direction to achieve a natural appearance.
What is the recommended method to secure the artificial grass in place?
The grass should be anchored using landscape staples or U-shaped nails, placed every 6-12 inches along the edges and seams to prevent movement.
What should be checked after laying the artificial turf?
After laying the turf, it is important to check for wrinkles or bubbles, smoothing them out by gently pulling the surface and re-securing it for a flat and uniform appearance.