
Introduction
Transforming a lawn with artificial grass is a rewarding DIY project that many homeowners may find daunting. This guide outlines the essential steps for a flawless installation, covering everything from ground preparation to the final touches. Key elements can significantly impact the success of this process, and understanding how to avoid common pitfalls is crucial to prevent costly repairs. This comprehensive overview reveals the secrets to a successful artificial grass installation, enabling you to achieve a beautiful, low-maintenance lawn.
Prepare the Installation Area
To ensure a successful artificial grass installation DIY, it is crucial to prepare the installation area properly. Here are the essential steps:
-
Clear the Area: Start by removing any existing grass, weeds, rocks, and debris from the site. A clean surface is vital for proper grass installation, as it prevents future complications.
-
Excavate the Soil: Dig down approximately 3-4 inches to create a level base. This depth is important for proper drainage and helps prevent the grass from shifting over time.
-
Check for Drainage: Ensure the area slopes slightly away from any structures to facilitate water runoff. Proper drainage is essential to prevent water accumulation beneath the grass, which can lead to damage and deterioration.
-
Compact the Soil: Use a hand tamper or plate compactor to compress the soil, establishing a stable base for the grass. This step is crucial to avoid settling after setup, ensuring the longevity of your artificial grass.
In Kansas City, the average cost for synthetic grass installation ranges from $9 to $12 per square foot, depending on the quality of the grass and the complexity of the setup. Proper site preparation can significantly influence both the overall cost and efficiency of the artificial grass installation DIY process.
Landscaping professionals emphasize the importance of thorough clearing and excavation. As one expert noted, ‘A well-prepared site is the foundation of a successful turf setup.’ Homeowners like Dick Bryant and Scott Sachse have praised the expertise of Hall Turf, highlighting the exceptional service and professionalism provided by Brock and his team. By adhering to these best practices, homeowners can achieve a durable and visually appealing artificial grass landscape.

Gather Required Tools and Materials
-
Tools Needed:
- Shovel: This tool is essential for digging up and removing existing grass, ensuring a clean slate for installation.
- Rake: A rake is utilized to even the base material, forming a smooth surface for the grass.
- Plate Compactor: Important for compacting the soil, this tool helps prevent settling and ensures a stable foundation.
- Utility Knife: Essential for cutting the grass to the desired size, it allows for precise fitting around edges and obstacles.
- Grass Staples: These secure the grass in place, preventing movement and ensuring a seamless appearance.
- Measuring Tape: This tool is crucial for precisely measuring the area, ensuring that you purchase the correct amount of grass and materials.
-
Materials Needed:
- Artificial Grass Rolls: Select the appropriate type based on your specific project needs, whether for pets, play areas, or landscaping.
- Base Material: Crushed stone or gravel is recommended for the sub-base, providing drainage and stability.
- Weed Barrier Fabric: This fabric prevents weed growth underneath the grass, maintaining a clean and low-maintenance surface.
- Infill Material: Options such as sand or rubber granules support the grass blades, enhancing durability and appearance while providing cushioning.
- Foam Padding: Consider adding foam padding under the surface in children’s play areas for added safety during falls.
As Eric Fullerton states, “No, you do not need any special skills or tools to undertake artificial grass installation DIY yourself.” With proper planning, the setup can usually be completed in just a few days, depending on the size and complexity of your lawn.

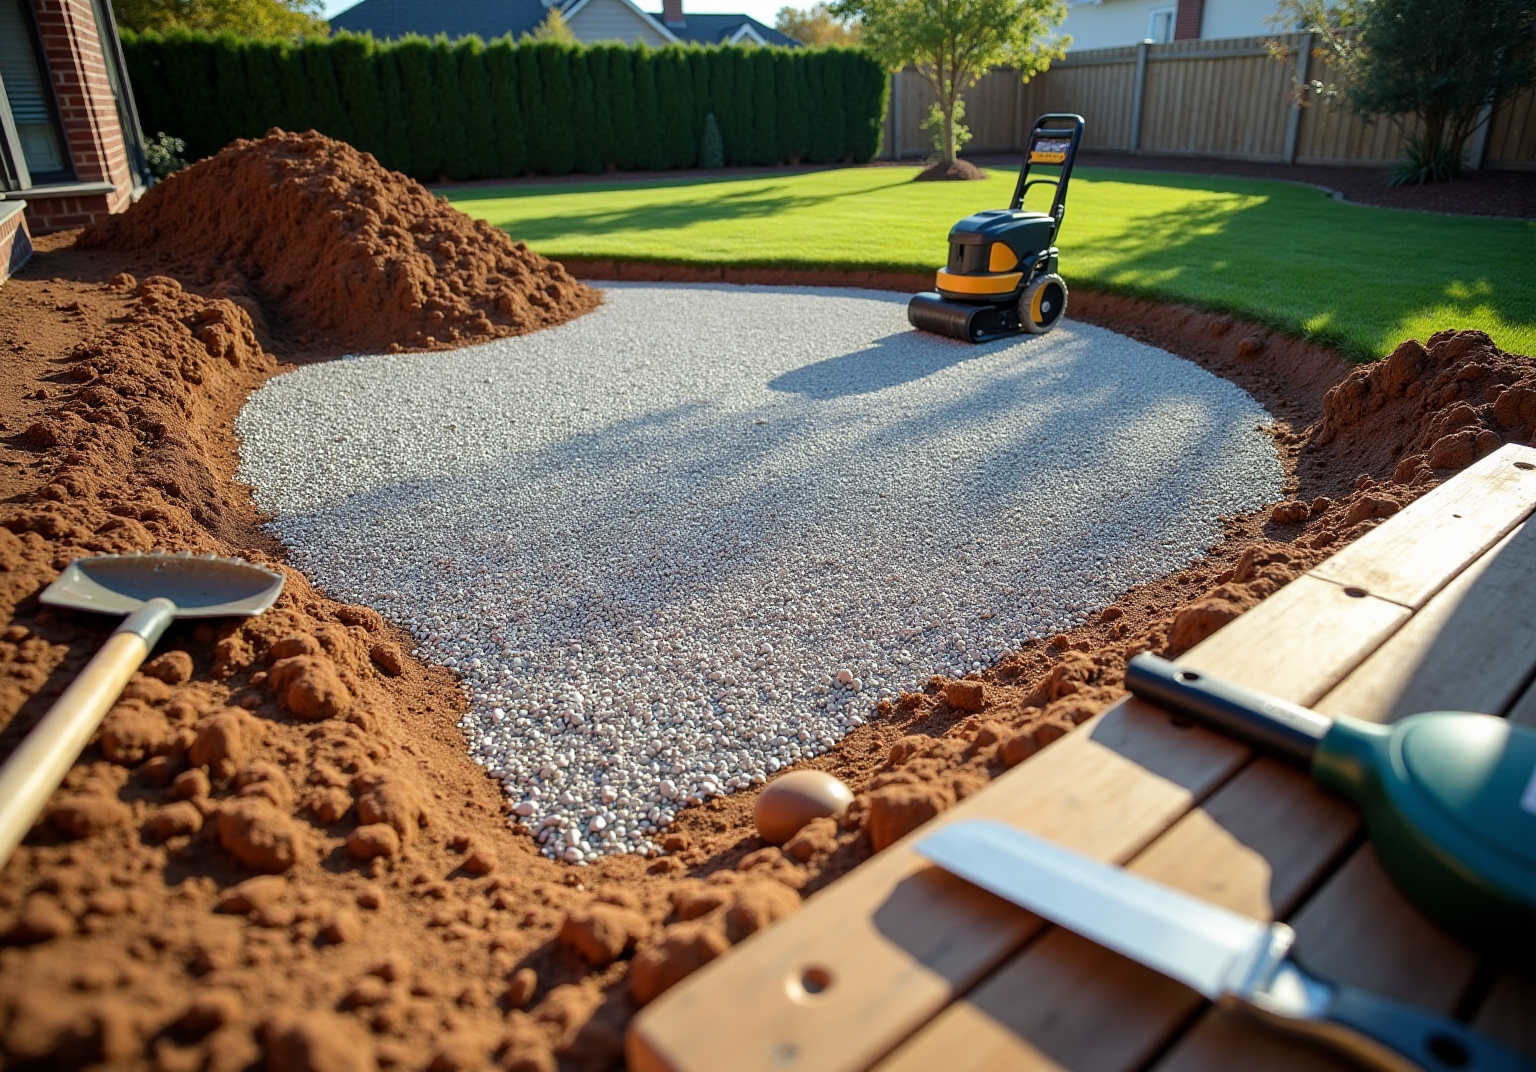
Build a Solid Base for Turf
-
Lay the Base Material: Start by spreading a layer of crushed stone or gravel about 3 to 4 inches deep across the excavated area. This foundational layer is crucial for effective drainage and stability, helping to prevent issues like uneven surfaces and premature wear. Experts agree that a well-prepared foundation ensures proper drainage, which is vital to avoid pooling water beneath the turf that can lead to odors and mold. Clients have noted that Hall Turf’s crew, led by Brock, emphasizes the importance of a solid foundation for a successful installation.
-
Level the Foundation: Use a rake to evenly distribute the foundation material, ensuring there are no high or low spots. This step is essential, as any irregularities can impact the surface’s appearance and functionality. Grass installation experts assert, “A well-planned foundation is the cornerstone of any excellent synthetic grass system,” a principle that Hall Turf adheres to in their projects.
-
Compact the Foundation: Employ a plate compactor to thoroughly compress the foundational material. Proper compaction is necessary to prevent settling over time, ensuring a robust foundation that can withstand foot traffic and weather conditions. Experts highlight that inadequate compaction can lead to costly repairs later, a concern echoed by clients who value Hall Turf’s meticulous attention to detail in this process.
-
Install Weed Barrier: After compacting, lay down a weed barrier fabric over the base. This optional layer helps prevent weeds from emerging through the grass while allowing for adequate drainage. Secure the fabric with landscape staples to maintain stability during installation.
-
Consider Drainage: Statistics show that improper drainage can result in pooling water beneath artificial turf, leading to odors and mold. Therefore, ensuring a well-constructed foundation that promotes drainage is critical for the longevity of your setup. Remember that investing in professional installation, such as that offered by Hall Turf, can safeguard you from future issues related to repairs or replacements.

Cut and Secure the Artificial Grass
-
Roll Out the Grass: Start by unrolling the artificial lawn over the prepared base, allowing it to acclimate to the ambient temperature for at least 30 minutes. This acclimation is essential as it minimizes wrinkles and facilitates easier cutting. Experts recommend this period to ensure the grass adapts to the environment, significantly enhancing the installation process. Collaborating with professionals like Brock from Hall Grass can provide valuable insights during this phase.
-
Cut the Grass: Use a utility knife to trim the grass to fit your designated area. For a clean edge, make cuts from the back of the grass along the stitch lines, ensuring precision in your measurements. This technique not only improves the appearance but also ensures a better fit. Customers have praised Brock’s attention to detail, which is beneficial when making these cuts.
-
Secure the Grass: Begin securing the grass by positioning staples around the boundary at intervals of 6 to 8 inches. As you secure the grass, ensure it remains taut and free of wrinkles to maintain a smooth appearance. Properly securing the edges with nails or staples enhances durability and prevents shifting over time. Many homeowners have found that following professional advice, such as that from Hall Grass, leads to a more effective setup.
-
Seam the Grass: When working with multiple pieces of grass, use seam tape and adhesive to join them effectively. Following the manufacturer’s guidelines will yield the best results, ensuring a seamless finish. Lawn laying specialists emphasize that careful attention to seaming techniques is crucial for achieving a professional appearance. Clients have highlighted Brock’s expertise in this area, appreciating the seamless results in their projects.
-
Best Practices for Installation: Experts recommend rolling out the turf in sections to manage weight and prevent damage. Additionally, evaluating water behavior prior to surface setup is crucial, as most backyard failures stem from neglecting this factor. Ensuring proper drainage and grading significantly impacts the longevity and performance of your artificial grass. Homeowners who have worked with Hall Landscaping have noted the importance of these practices, contributing to a successful installation.

Apply Finishing Touches and Maintenance Tips
-
Add Infill Material: If necessary, distribute infill material uniformly over the grass to support the blades and enhance stability. A drop spreader is recommended for even distribution.
-
Sweep the Grass: Utilize a stiff-bristle broom to sweep the grass fibers upright. This practice helps maintain the natural appearance of the grass while ensuring even distribution of the infill material.
-
Regular Maintenance: Schedule consistent upkeep, which includes rinsing the surface to remove debris, brushing to keep the fibers upright, and inspecting for any damage or wear. As noted by satisfied clients, Hall Grass emphasizes the importance of ongoing maintenance to ensure your lawn remains in excellent condition.
-
Seasonal Care: During colder months, gently remove snow and ice to prevent damage. In warmer months, ensure proper drainage and promptly clean any spills to maintain the turf’s appearance. Homeowners have commended Hall Turf for their expert guidance on seasonal maintenance, ensuring your installation looks appealing throughout the year.

Conclusion
In conclusion, successfully installing artificial grass is a rewarding endeavor that requires careful planning and execution. By following the outlined steps, homeowners can achieve a functional and visually appealing lawn that enhances their outdoor space while eliminating the hassle of traditional grass maintenance.
Thorough site preparation is paramount. This includes:
- Clearing the area
- Excavating the soil
- Ensuring proper drainage
Utilizing the right tools and materials – such as crushed stone for the base and infill for stability – is crucial for a long-lasting installation. Furthermore, mastering techniques for cutting and securing the grass, along with adhering to regular maintenance tips, significantly contributes to the project’s overall success.
Ultimately, the journey to a successful artificial grass installation rewards diligence and attention to detail. By embracing these best practices and considering professional insights, homeowners can enjoy a stunning lawn while saving time and money in the long run. Taking the first step towards this transformation can lead to a vibrant outdoor space that stands the test of time.
Frequently Asked Questions
What are the essential steps for preparing the installation area for artificial grass?
The essential steps include clearing the area of existing grass, weeds, rocks, and debris; excavating the soil to a depth of 3-4 inches; checking for proper drainage by ensuring the area slopes away from structures; compacting the soil to establish a stable base; and ensuring the site is clean for installation.
Why is proper drainage important in artificial grass installation?
Proper drainage is essential to prevent water accumulation beneath the grass, which can lead to damage and deterioration. The area should slope slightly away from structures to facilitate water runoff.
What tools are needed for installing artificial grass?
The tools needed include a shovel, rake, plate compactor, utility knife, grass staples, and measuring tape.
What materials are required for artificial grass installation?
The required materials include artificial grass rolls, base material (such as crushed stone or gravel), weed barrier fabric, infill material (like sand or rubber granules), and optional foam padding for children’s play areas.
What is the average cost of synthetic grass installation in Kansas City?
The average cost for synthetic grass installation in Kansas City ranges from $9 to $12 per square foot, depending on the quality of the grass and the complexity of the setup.
Do I need special skills or tools to install artificial grass myself?
No, you do not need any special skills or tools to undertake artificial grass installation DIY. With proper planning, the setup can usually be completed in just a few days, depending on the size and complexity of your lawn.
Why is thorough site preparation important for artificial grass installation?
Thorough site preparation is crucial as it serves as the foundation for a successful turf setup, influencing both the overall cost and efficiency of the installation process.