
Introduction
Transforming a yard with artificial turf enhances both its aesthetic appeal and functionality. However, the installation process can be challenging without proper guidance. This article outlines a step-by-step approach to installing astroturf like a professional, helping homeowners achieve a flawless finish.
What are the key techniques and common pitfalls that can determine the success of an astroturf installation?
Prepare the Ground for Artificial Turf
-
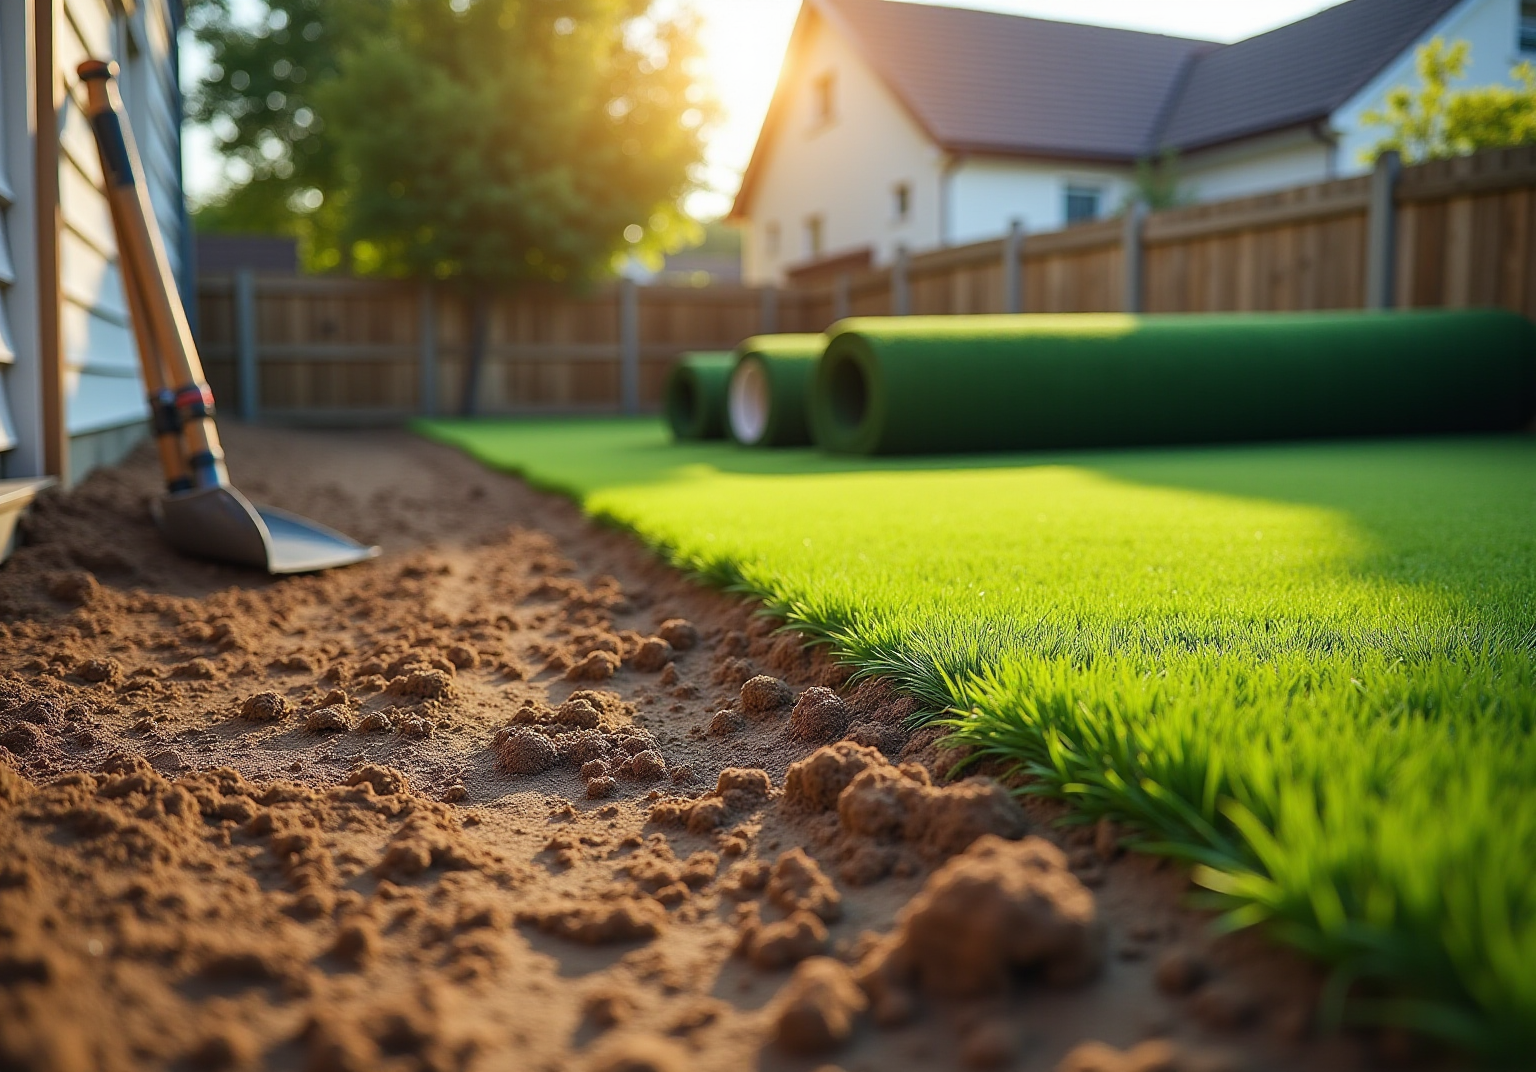
Clear the Area: Begin by removing any existing grass, weeds, and debris from the installation site. Utilize a shovel or turf cutter to dig approximately 3-4 inches deep, ensuring the removal of organic material that could compromise the lawn’s integrity. As Dick Bryant noted, having a professional assess your needs can lead to the most effective solutions for your grass issues.
-
Level the Ground: After clearing the area, use a rake to level the soil. Achieving a smooth and even surface is essential, as any irregularities can impact the final appearance and performance of the grass. Scott Sachse praised the exceptional work done by Hall Turf, highlighting the expertise and attention to detail that ensures a flawless setup.
-
Install a Weed Barrier: To inhibit future weed growth, lay down a weed barrier fabric. This step is crucial for preserving the grass’s integrity and aesthetic appeal over time. Les Boatright emphasized the importance of detail-oriented work, which is vital for a successful installation.
-
Add Base Material: Distribute a layer of crushed stone or gravel, about 2-4 inches thick, across the area. This base material is essential for providing drainage and stability. Compact it thoroughly with a plate compactor to establish a solid foundation.
-
Check for Drainage: Ensure the ground slopes slightly away from any structures to facilitate proper water drainage. This slope is critical to prevent pooling and enhance the durability of the artificial turf installation.

Lay the Artificial Grass
-
Roll Out the Grass: Start by rolling out the synthetic lawn over the prepared area. Allow it to acclimate for a few hours to minimize curling and ensure it lies flat, which is crucial for a smooth installation. Homeowners can trust Hall Turf’s expertise in providing astroturf for yard installations, as evidenced by satisfied clients who have praised the team’s professionalism and attention to detail.
-
Cut to Fit: Utilize a sharp utility knife to trim the edges of the grass for an accurate fit. Leave an extra inch around the perimeter for adjustments during installation. Consulting with sod installation experts, such as those at Hall Turf, can provide valuable insights for cutting and fitting the lawn correctly.
-
Align Seams: When working with multiple pieces of turf, carefully align the seams. Ensure that the grass blades are all oriented in the same direction to achieve a natural look, which is a significant consideration for many homeowners. Brock, a representative from Hall Turf, is recognized for his innovative solutions and thorough approach, facilitating a smoother alignment process.
-
Secure the Grass: Employ landscape staples or galvanized nails to secure the grass around the perimeter and along the seams. Space these fasteners approximately 6-8 inches apart to maintain stability and prevent shifting. Additionally, verify the presence of underground utilities before commencing installation to ensure safety during excavation. Clients have expressed satisfaction with Hall Turf’s commitment to safety and quality in their astroturf for yard, as highlighted in various testimonials.
-
Seam the Edges: To create a strong bond at the seams, apply seam tape and adhesive to connect the pieces. Press down firmly to ensure a secure connection, which is vital for preventing separation over time. Consider installing a weed barrier beneath the grass to inhibit weed growth, which is essential for maintaining the longevity and functionality of your installation. Homeowners can rely on Hall Turf’s expertise to guide them through the process of selecting astroturf for yard, ensuring a durable and visually appealing result.

Secure and Finish the Turf Installation
-
Tuck the Edges: Begin by using a putty knife to tuck the edges of the grass beneath any borders or hardscapes. This technique creates a clean transition between the grass and the surrounding areas.
-
Add Infill Material: Depending on the type of surface, it may be necessary to incorporate infill material, such as sand or rubber granules. This addition helps the blades of vegetation stand upright and provides cushioning. Ensure the infill is spread evenly across the surface.
-
Brush the Turf: Utilize a stiff broom to brush the turf fibers upright. This action aids in distributing the infill and enhances the natural appearance of the grass.
-
Final Inspection: Conduct a thorough walk-around of the setup to identify any loose areas or visible seams. Make any necessary adjustments to ensure that everything is secure and presents a uniform look.
-
Clean Up: Finally, remove any debris or excess materials from the installation site to maintain a tidy area.

Maintain Your Artificial Turf for Longevity
-
Regular Cleaning: Periodically rinse the surface with a garden hose to remove dust, debris, and pet waste. This routine is essential for maintaining cleanliness and preventing unpleasant odors, thereby ensuring a fresh environment for your outdoor space. As Dick Bryant noted, “the recommendation was perfect!” This underscores the significance of regular maintenance.
-
Brush the Surface: Use a stiff broom or power broom to fluff the grass fibers regularly, especially in high-traffic areas. This practice not only preserves the grass’s appearance but also prevents matting, which can diminish its visual appeal and effectiveness. Scott Sachse praised the team’s professionalism, stating they performed an outstanding job, which reflects the level of attention necessary for landscape upkeep.
-
Inspect for Damage: Regularly inspect for signs of wear or damage, such as loose seams or tears. Promptly addressing any issues is crucial to prevent further deterioration and maintain the integrity of your grass. Brock’s attention to detail, as noted by Les Boatright, ensures that any potential problems are managed efficiently.
-
Weed Control: Monitor for weeds that may appear around the edges of your grass. Utilize a grass-safe weed killer or manually remove them to maintain a tidy appearance and prevent any potential harm to the lawn.
-
Seasonal Maintenance: Adapt your maintenance tasks to the changing seasons. In the fall, remove leaves to prevent moisture buildup, and in winter, rinse off snow to avoid accumulation that could damage the turf. Regular seasonal care is vital for preserving the longevity and appearance of your astroturf for yard, ensuring you enjoy the beautiful and functional outdoor space that Hall Turf can create for you.

Conclusion
In conclusion, successfully installing astroturf in your yard not only enhances your home’s aesthetics but also provides a beautiful lawn that requires minimal upkeep. By meticulously following the outlined procedures-from preparing the ground to securing and maintaining the turf-you can achieve a professional finish and long-lasting durability.
The essential phases of installation include:
- Clearing the area
- Leveling the ground
- Laying the grass with precision
Key insights, such as the necessity of a weed barrier and proper drainage, underscore the meticulous planning required for a successful outcome. Furthermore, regular maintenance practices, including cleaning and inspecting for damage, are crucial for prolonging the life of your artificial turf.
Ultimately, investing time and effort into each step of the astroturf installation process will yield an attractive and functional outdoor space. Embrace the opportunity to transform your yard into a vibrant, green oasis that you can enjoy year-round, while benefiting from the professional tips and techniques shared throughout this guide.
Frequently Asked Questions
What is the first step in preparing the ground for artificial turf?
The first step is to clear the area by removing any existing grass, weeds, and debris. This involves digging approximately 3-4 inches deep to eliminate organic material that could affect the lawn’s integrity.
How should the ground be leveled after clearing?
After clearing the area, use a rake to level the soil. It is important to achieve a smooth and even surface, as any irregularities can impact the final appearance and performance of the artificial grass.
Why is it important to install a weed barrier?
Installing a weed barrier is crucial for inhibiting future weed growth, which helps preserve the grass’s integrity and aesthetic appeal over time.
What type of base material should be added, and how thick should it be?
A layer of crushed stone or gravel, about 2-4 inches thick, should be distributed across the area. This base material is essential for providing drainage and stability.
How should the base material be compacted?
The base material should be compacted thoroughly using a plate compactor to establish a solid foundation for the artificial turf.
What drainage considerations should be taken into account?
Ensure that the ground slopes slightly away from any structures to facilitate proper water drainage. This slope is critical to prevent pooling and enhance the durability of the artificial turf installation.